Campaigns Overview
Campaigns are the fundamental element to your Advanced Marketing tool. You will need to set up a Campaign to send emails and newsletters and run reports on your marketing activity.
A Campaign will have one or more Campaign Stages. Campaign Stages let you group multiple emails or contact segmentations in one Campaign.
When using the Advanced Marketing tool, you can also opt to create a Simple Campaign, where you simply create an email, select a mailing list and send.
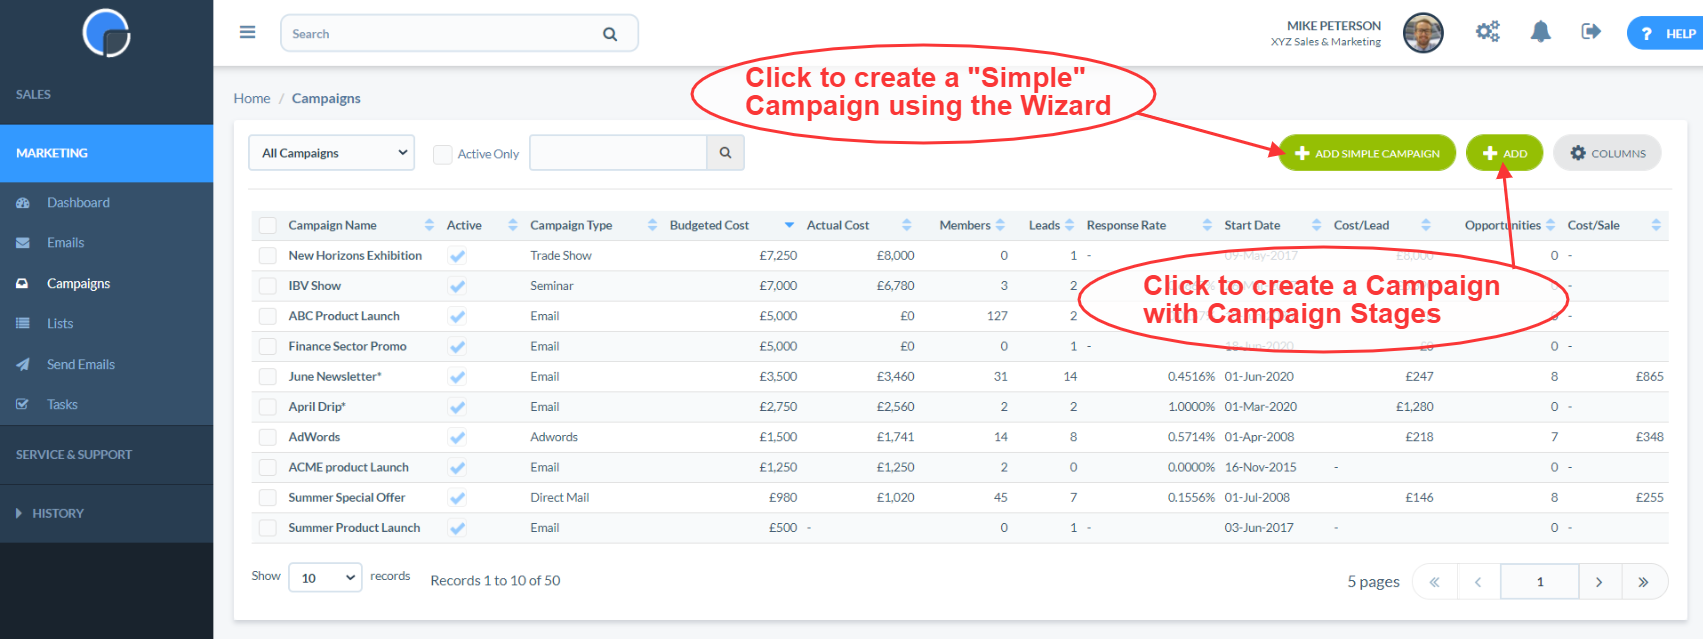
From the Marketing menu, click Campaigns to display the summary grid of your past Campaigns. If you have not yet created any campaigns the table will be blank.
Campaigns Summary Grid
As with all your CRM data tables you can click on any of the column headers to sort the data by that column. Depending upon your security settings, you can choose to see My Campaigns, My Group’s Campaigns or All Campaigns from the dropdown menu above the column headings. The Active Only checkbox will limit the list to just your active campaigns (i.e. the campaigns currently running).
The Search bar above the table allows you to search all the displayed fields: entering ‘Adwords’ will search for all Campaigns containing the letters ‘Adwords’.
To view or edit a Campaign simply click on the Campaign name to open it. Click the checkbox to select one or more Campaign and new editing icons will appear at the top of your page, e.g. to copy.
Customise Your Campaigns Grid
You can change the view of your Campaigns grid to fit your requirements. To change the columns displayed on the table click ‘Columns’ and select/deselect the columns you wish to show. You can change the order of the columns by “dragging and dropping” from the title bar. If all the columns available don’t fit your screen size a “+” box will appear on the right of the table – click this to open and view all the data.
Creating a Campaign
You can create a new Campaign by clicking the “+ Add” button.
Advanced Marketing users may also chose to create a Simple Campaign by selecting the “Add Simple Campaign” option.
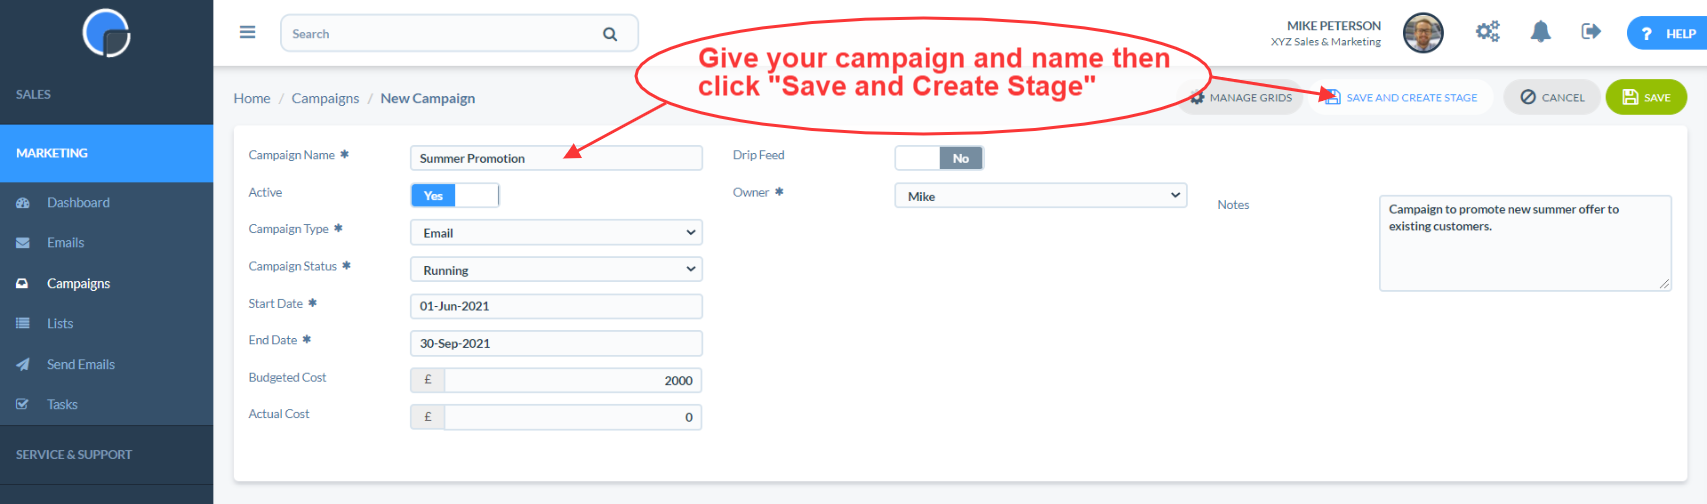
Complete the Campaign details using the date pickers and dropdown fields, and assign an Owner to the Campaign – the asterisks denotes a mandatory field. If you are running an email campaign or a campaign where you will be following up with a call or email you will need to set up one or more Campaign Stage, so click “Save and Create Stage”. If you are creating a campaign where no follow up communication is required, click Save.
To complete your Campaign see the tab above for Campaign Stages and Segmentations & Mailing Lists.
Editing a Campaign
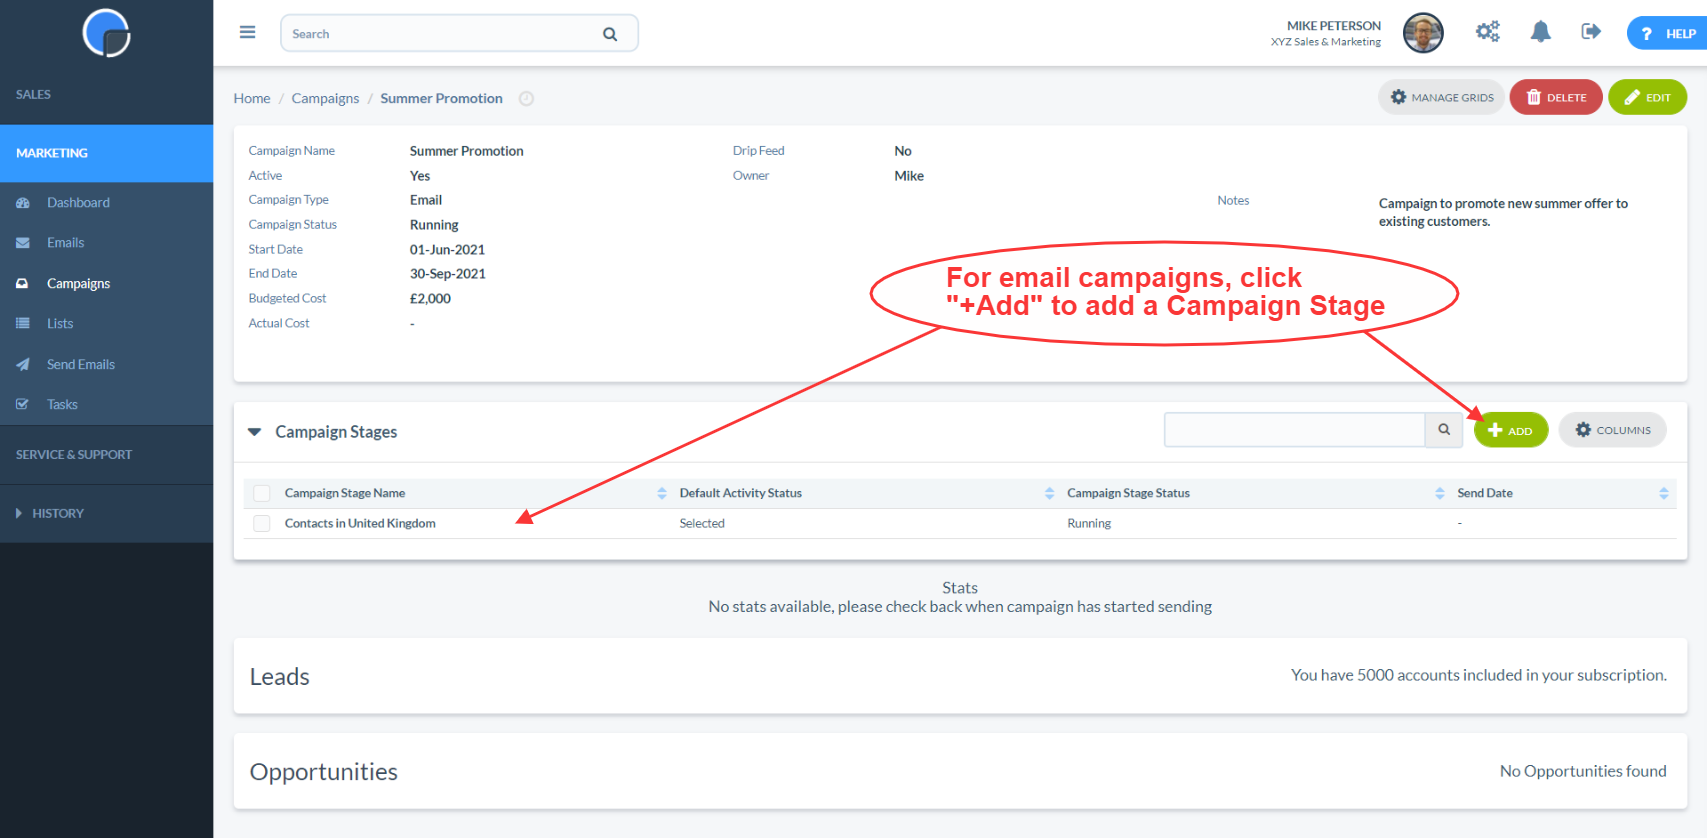
You can open an existing Campaign by clicking on the Campaign Name.
On the Campaign page, the details of that Campaign are shown plus a table showing that Campaign’s “Campaign Stages”, the Leads from that Campaign, and the Opportunities from that Campaign.
Click Edit to change any of the details of the campaign, update the stages and change the associated emails as required. Click Save.

Deleting a Campaign
Deleting a marketing Campaign will delete all it’s Campaign Stages and the Activity Status of it’s Members.
Campaign Terminology
Let’s take a look at each of the fields on the Campaign form:
Campaign Name
The name that you want to call the Campaign, such as “September Finance Campaign” or “Adwords 2020-01”.
Active Checkbox
You’ll need to set the Active checkbox to ‘Yes’ to be able to add or delete contacts to the campaign or schedule it for mailing. Even if you are just sending a test email to yourself you should set the campaign to Active.
N.B. If a Campaign is Active no emails will be sent until you schedule your email. This means that you can safely send a test email to yourself. However, if the Campaign it is not Active you will not be able to send the email.
Campaign Type
Use this box to describe what kind of Campaign it is, such as Advertising, Event, Newsletter. You can define what Campaign Types are available using the Dropdown List ‘CampaignType’. This can be accessed in Setting / System Settings, then Custom Dropdown Lists.
Campaign Status
Use this box to describe if the Campaign is Running, Planned or Completed. You can define what Campaign Status are available using the Dropdown List ‘CampaignStatus’. This can be accessed in Setting / System Settings, then Custom Dropdown Lists.
Start Date and End Date
The start and end dates of the Campaign. These are just for information, they don’t affect any processes in the CRM system.
Budgeted and Actual Cost
Enter your original Budgeted cost for the Campaign and the final Actual cost. The actual cost will be used to calculate cost per lead and cost per opportunity. These are just for reporting purposes.
Drip Feed
Tick this checkbox if you want this Campaign to be a Drip Feed campaign, where your Contacts are sent a series of automatic emails at predefined intervals.
Notes
Use the Notes box to describe the Campaign for future reference. Text entered in the Notes field will be shown when you hover your cursor over the Campaign Name on data tables.
Owner
The member of staff who “owns” the Campaign, selected from the User list.
Campaign Stages Table
This shows the summary details of each Campaign Stage for that Campaign.
Leads
The Leads grid will show you all the Leads that have been attributed to this campaign (by choosing this campaign from the campaign field on the Account).
Opportunities
The Opportunities grid will show you all the Opportunities that belong to Accounts that have been attributed to this campaign.

Campaign Stages Overview
The purpose of Campaign Stages is to divide a larger Campaign into individually manageable segments, letting you group related emails and contact segments.
For example, you could email all your prospects in a first stage campaign, and then send another email as a second stage to just those who clicked through on the first stage.
Or, you could email all or some of your customers with an invite to a golf day, and then send further details to those that accepted, and finally a reminder the week before as a third stage.
You could also segment your database into customers, prospects and suspects, create a stage for each segment, send them slightly different newsletters and then see both the individual segments’ response rate as well as the consolidated numbers.
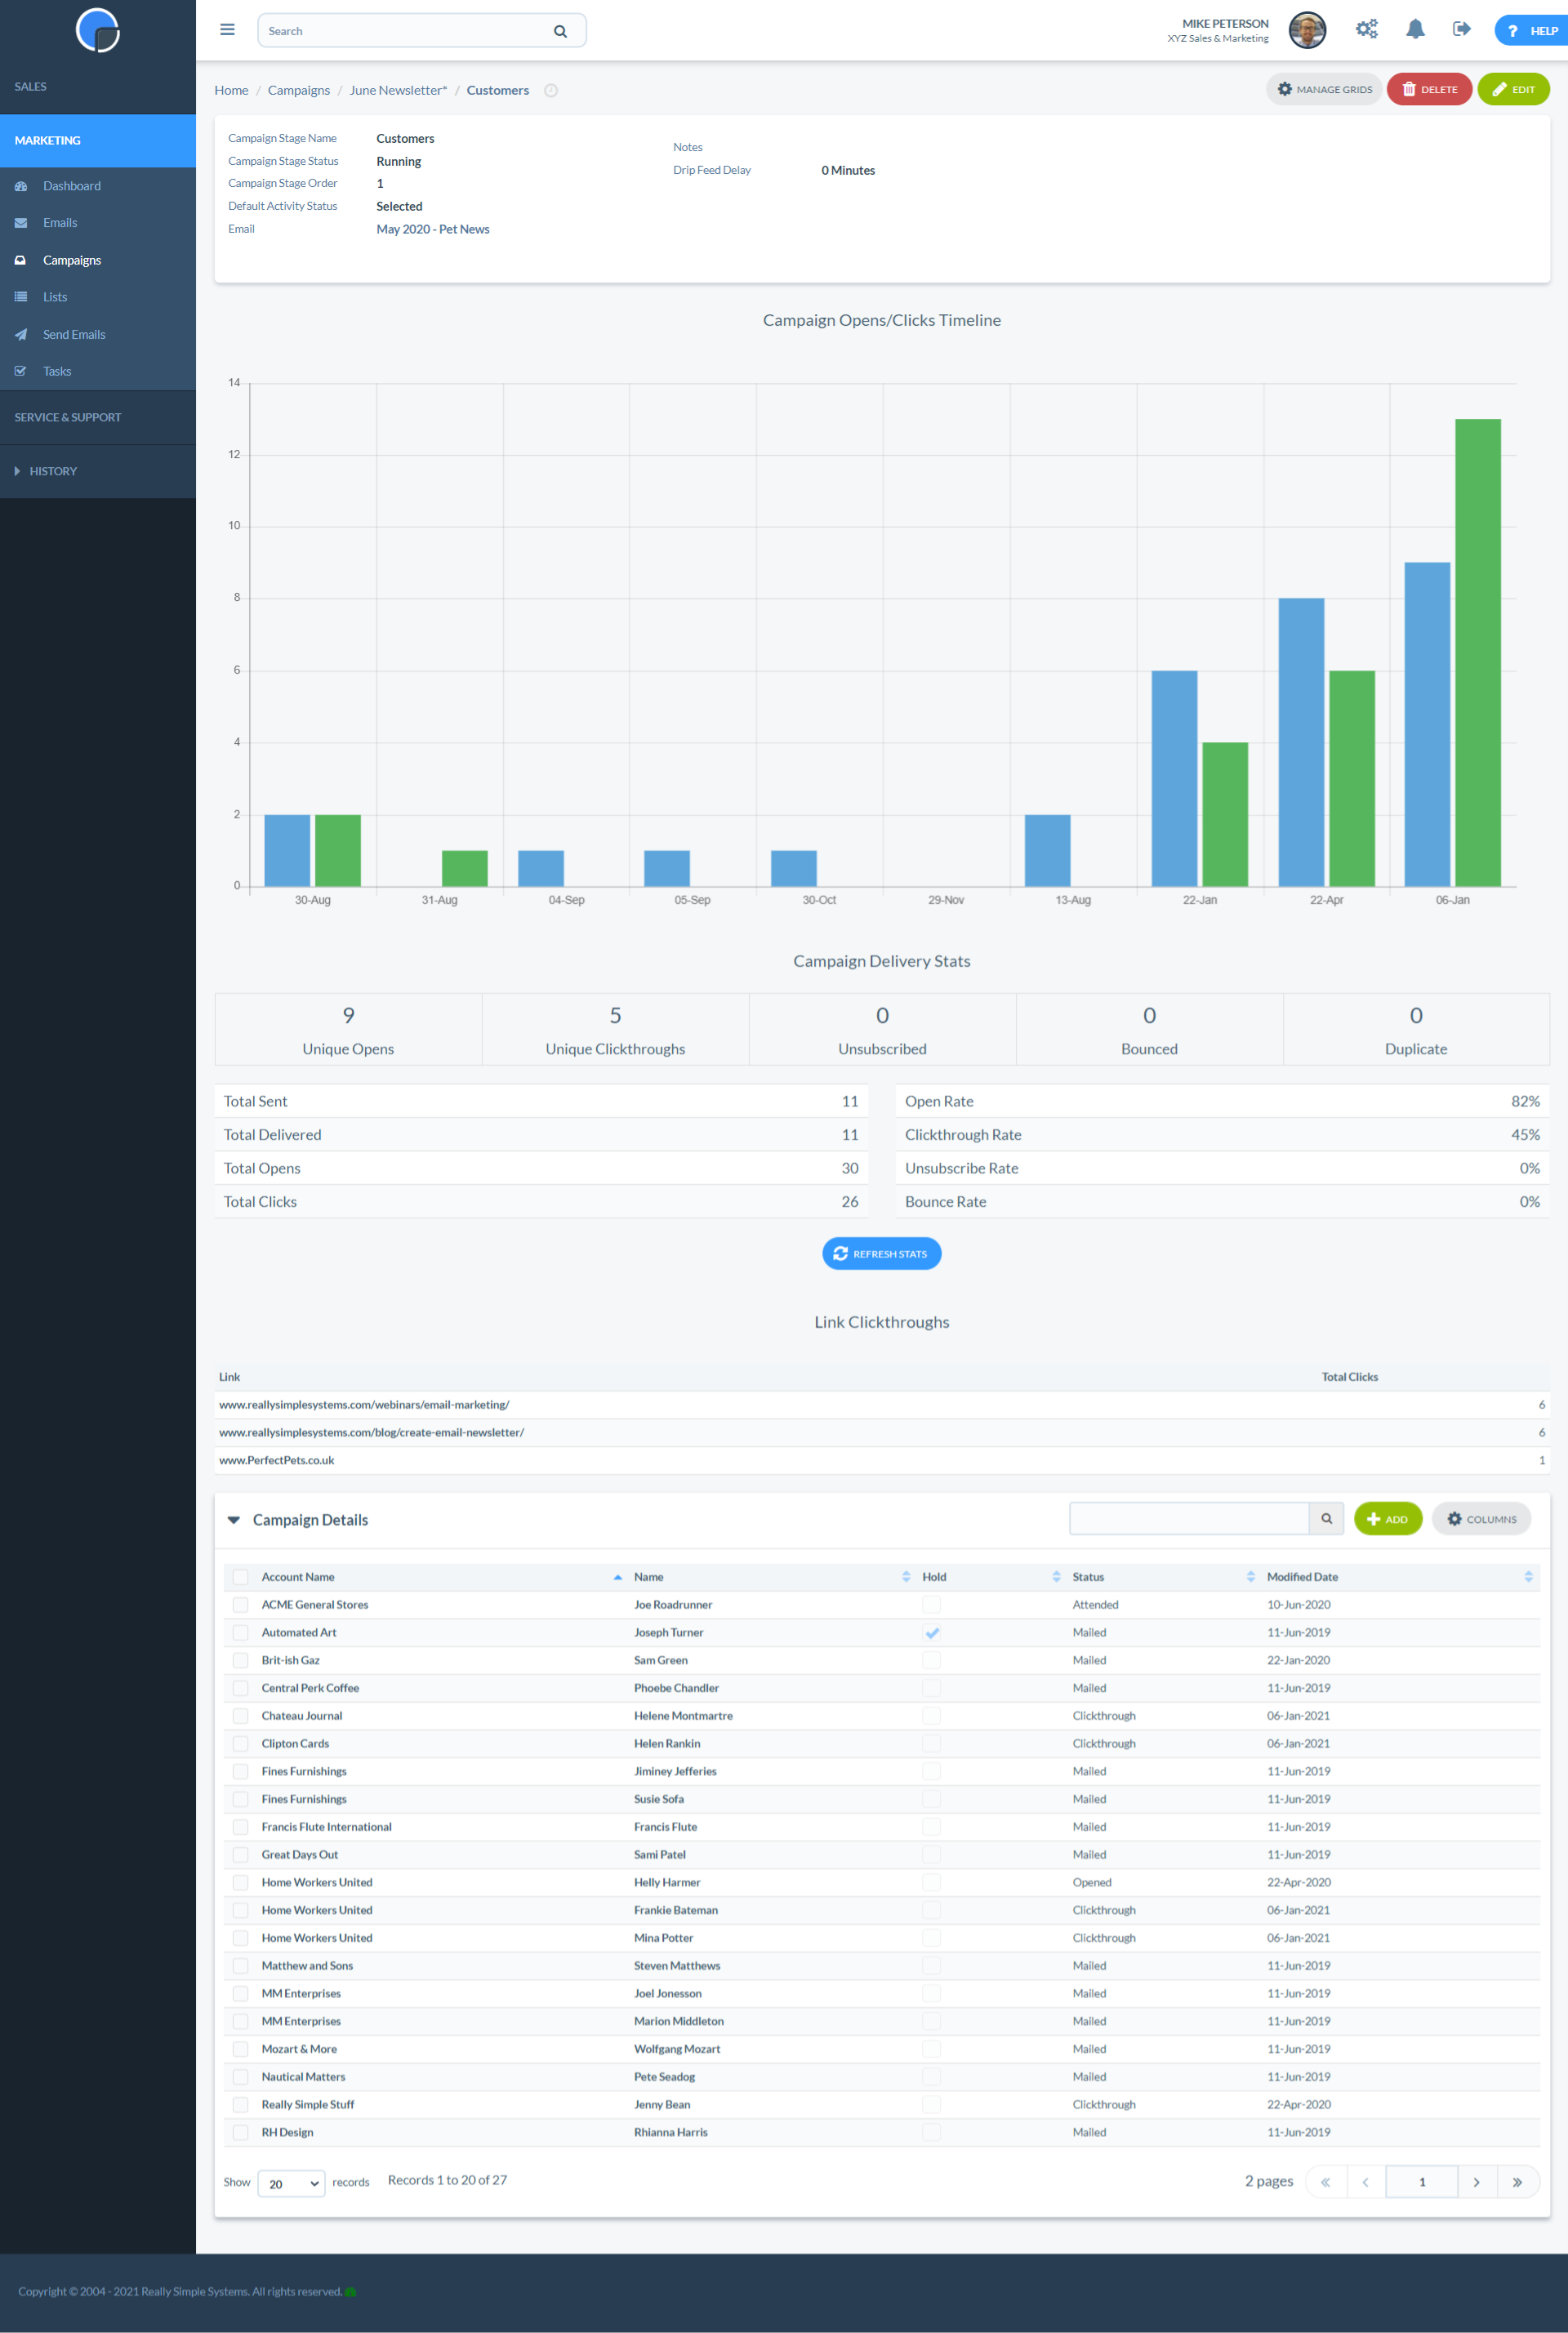
The Campaign Stage Page
The Campaign Stage page holds all the information about the Campaign, who it has been sent to and how they responded. The fields on the Campaign Stage record are as follows:
Campaign Stage Terminology
Let’s take a look at each of the fields on the Campaign Stages form:
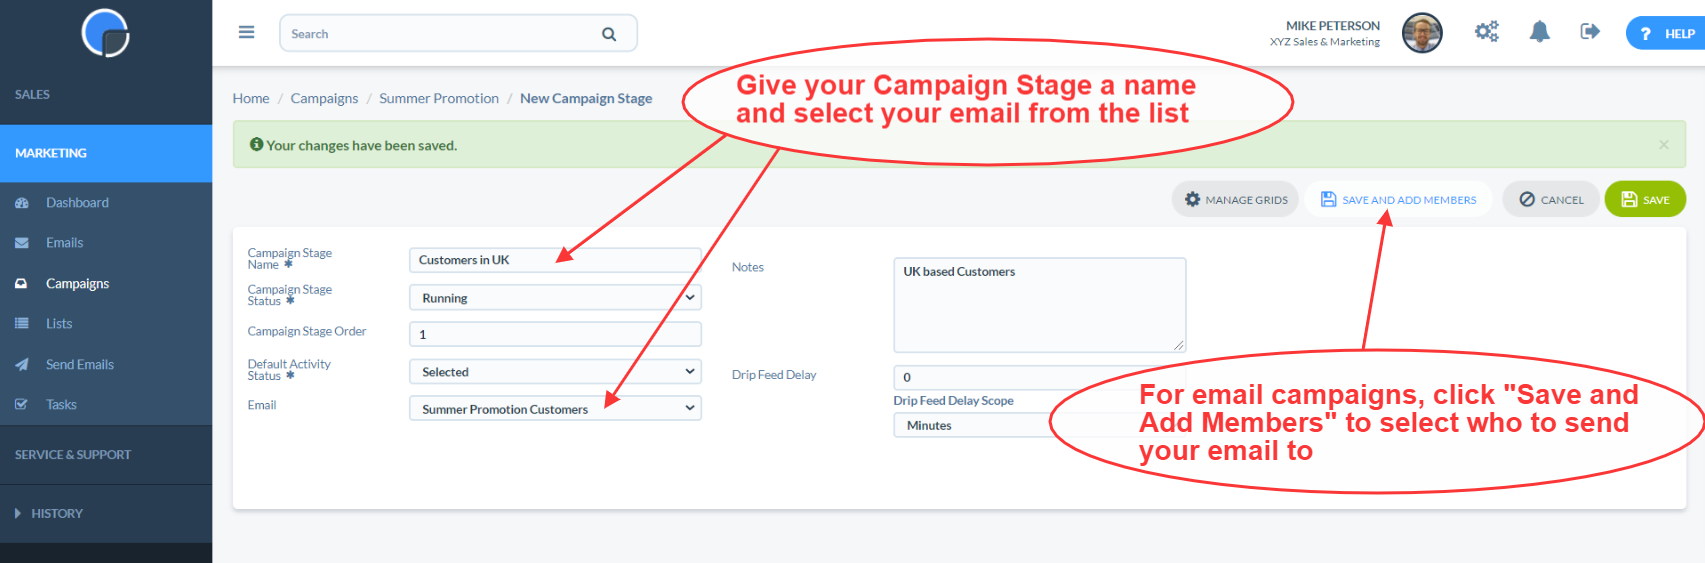
Campaign Stage Name
The name that you want to call the Campaign Stage, such as “Initial Letter” or “Follow Up Call”.
Campaign Stage Order
The order that this Campaign Stage runs in the Campaign. Enter any alphanumeric such as “02”.
Campaign Stage Status
Use this box to describe if the Campaign Stage is Running, Planned or Completed. You can define what Campaign Status are available by the dropdown table CampaignStatus which can be accessed from Settings / System Settings/ Custom Dropdown Lists /CampaignStatus.
Default Activity Status
This is the Activity Status that new Members (your Contacts) are assigned when added to this Campaign Stage. This is normally “Selected”, and is driven by the CampaignActivity dropdown list.
If this is an email campaign, the name of the email that will be sent. Select the email you wish to send from the dropdown list.
Notes
Use the Notes box to describe the Campaign Stage for future reference. Text entered in the Notes field will be shown when you hover your cursor over the Campaign Stage Name on data table.
Drip Feed Delay
If this is an email campaign and your are using Drip Marketing, enter the delay time, or Drip Feed Delay, of when you want the emails to be sent. For example, you might want the first email to sent immediately, so this would be set to 0, the second 30 minutes later, the third a day later and a final one a week later. The delay time is taken from the start of the campaign rather than the interval beteen two stages. So a drip feed delay of one day will be sent one day after the first stage has been mailed, not one day after the previous stage’s.
Campaign Stats
If the Campaign Stage is an email, once the Campaign has been sent, the graphs and stats show the performance of the campaign stage.
Campaign Details
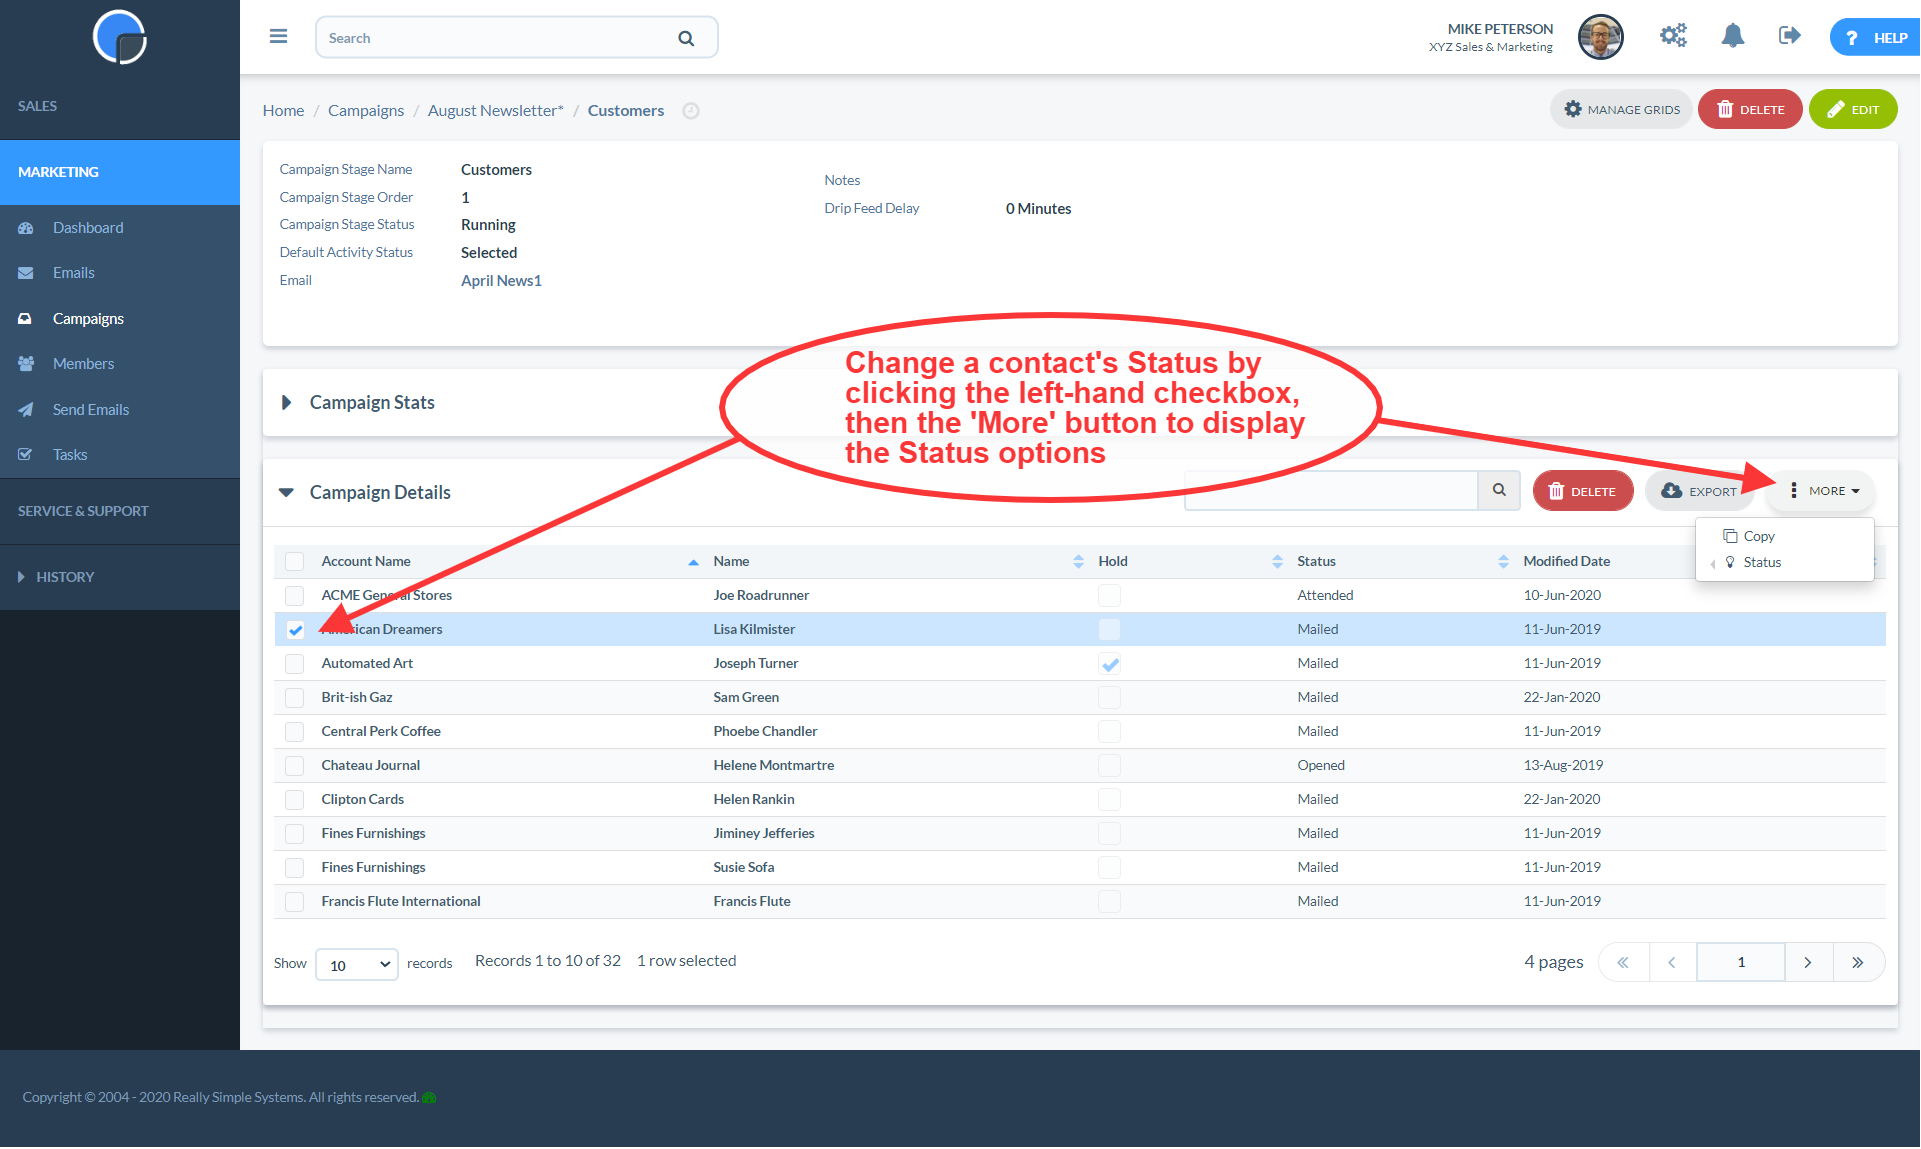
The Campaign Details grid lists all the Contacts, Or Members, in this Campaign Stage. Clicking the “+ Add” button on the top right hand side of the table will take you to the Maintain Members page, to add or delete Members (your Contacts) in this Campaign Stage. See Segmentations & Mailing Lists.
You can also delete individual Members from the Campaign Stage by ticking the checkboxes on the left of each Contact and then clicking the Delete button. This will take those Contacts out of the Campaign Stage, it won’t delete the actual Contacts themselves.
Mailing Status
In Campaign Details the column ‘Status’ indicates the status of that contact within the campaign. Before the Campaign has been sent out the status will be ‘Selected’. Once added to the Email Queue the status will be ‘Queued’, and once sent the status will be ‘Mailed’. See Email Member Status for all status options an definitions.
Ticking the contact checkboxes in the Campaign Stage will display further options on the ‘More’ button. You can copy the contact or change the Campaign Status values. Select a new Campaign Status, and save. For example, if you are running a corporate day and want to record acceptances, use this to change all those who have accepted your invitation to “Accepted”.
A summary of the Campaign Stages is shown on the Campaign Stage grid in each Campaign.
Creating a Campaign Stage
To create a new Campaign Stage, open your Campaign and on Campaign Stages grid click the “+ Add” button. This will open a new Campaign Stage page.
Give your Campaign Stage a Name, and in the ‘Email’ box select the email you wish to send. If you have not yet created your email, you can add this later.
You can then either just ‘Save’ the Campaign Stage or click ‘Save and Add Members’ to select the contacts you wish to mail.
Selecting Contacts for your Campaign Stage
Having created a new Campaign Stage you can select the contacts you wish to mail by using the ‘Save and Add Members’ button or, if you have already saved the stage, re-open it by clicking on the Campaign Stage name and then clicking the Maintain Members button.
Our Advanced Marketing tool lets you created sophisticated segments from your CRM database using a number of filters and criteria selection options. Please see Segmentations & Mailing Lists.