Mailing Lists & Segmentation Overview
With the SpotlerCRM Advanced Marketing tool, you can create sophisticated segmentations of your CRM contacts for your marketing campaigns.
You can do this by creating Mailing Lists that you can save and re-use, as in the Simple Marketing tool, or you can create a contact segmentations for specific Campaign Stages, using the Maintain Members feature. Maintain Members lets you build up a selection of contacts by filtering against your selected CRM data and cross-referring against your previous campaigns, your Mailing Lists and Consent Lists.
For example, you might want to mail your whole database or select a small defined group using your custom fields data, or maybe just those who clicked a link in your last campaign.
The Mailing Lists feature in your Simple and Advanced Marketing tool allows you to create sophisticated segments of your contact database.
You can create Static Lists that include all your contacts, or a selected group, that you can save, re-use and edit as you wish.
You can also create Dynamic Lists where you can set a filter criteria that automatically updates the list with any changes to your contacts at the time of mailing, for example, if a new customer has been added.
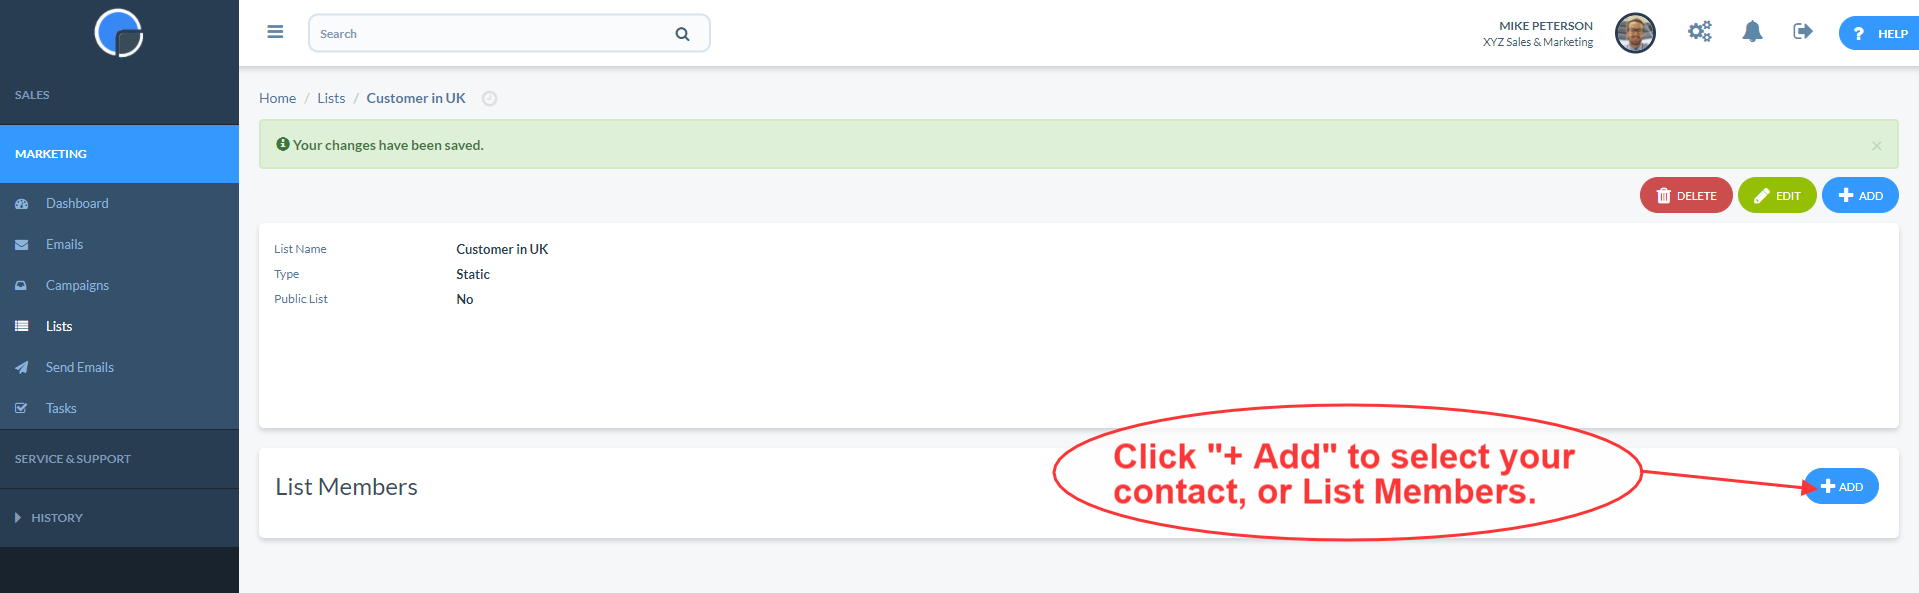
Create a Static List
To create a Static list, from the Lists summary grid click “Add”. Give your list a name and select the List Type, i.e. “Static”. Then Save.

If you are creating a list for capturing Mailing Consent from your contacts, set the List to Public. NB. If a List is set to Public to will show as an option on your Mailing Preferences page.

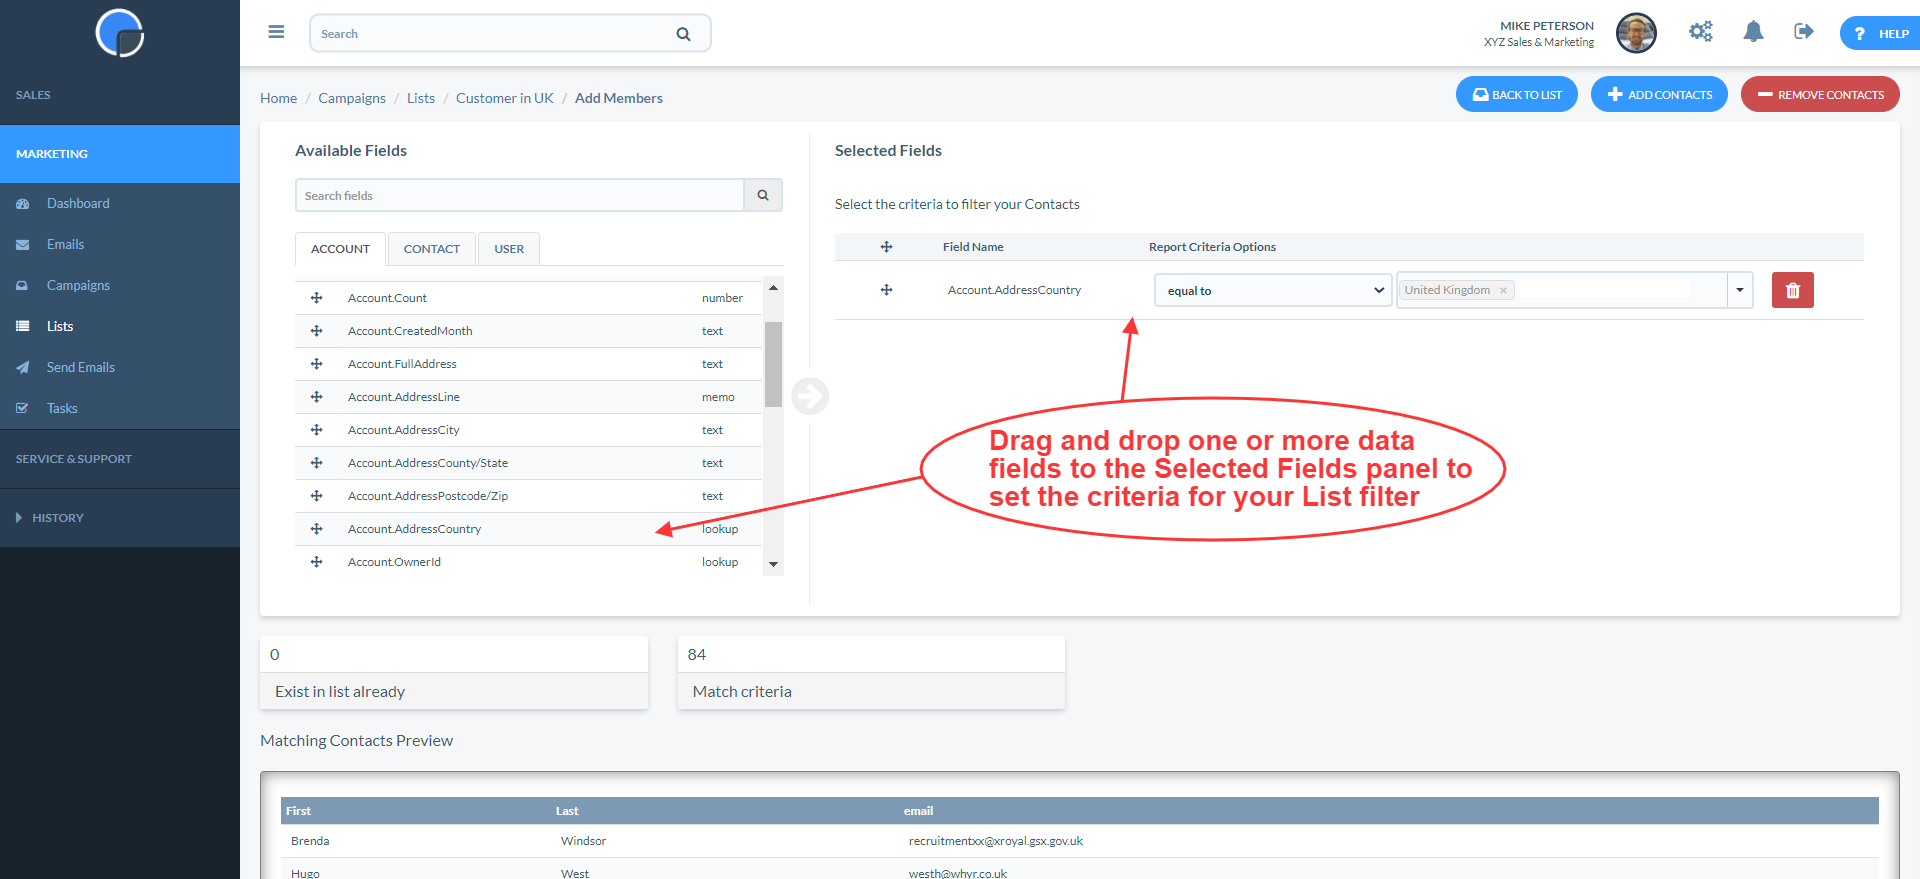
Then click “Add” to select which contacts, or List Members, you wish to add to the list.
This will open a page, similar to the CRM Reporting tool, where you can filter your contact database using the data fields in your CRM. In this example, we have filtered using the “Account.AddressCountry” field is “equal to” “United Kingdom”.
If you want to include all the contacts in your database simply leave the criteria fields blank and click “Add Contacts”.
At the bottom of the page you will see a box displaying how many contacts you have that match the criteria along with a preview of the list.
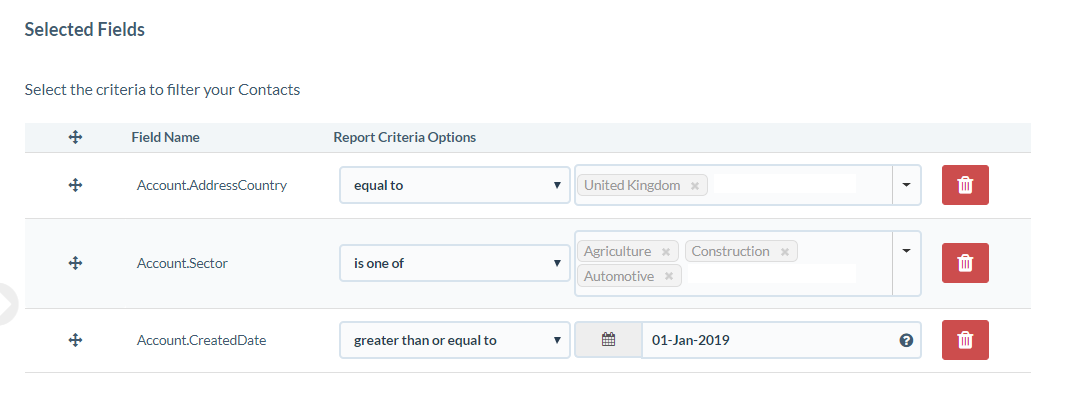
You can build up complex segments using multiple criteria filters to drill-down on your specific contact data.
In the example below, we’ve selected contacts based in the United Kingdom in the Agriculture, Construction or Automotive sectors that were added to the CRM on or after 1 January 2019.
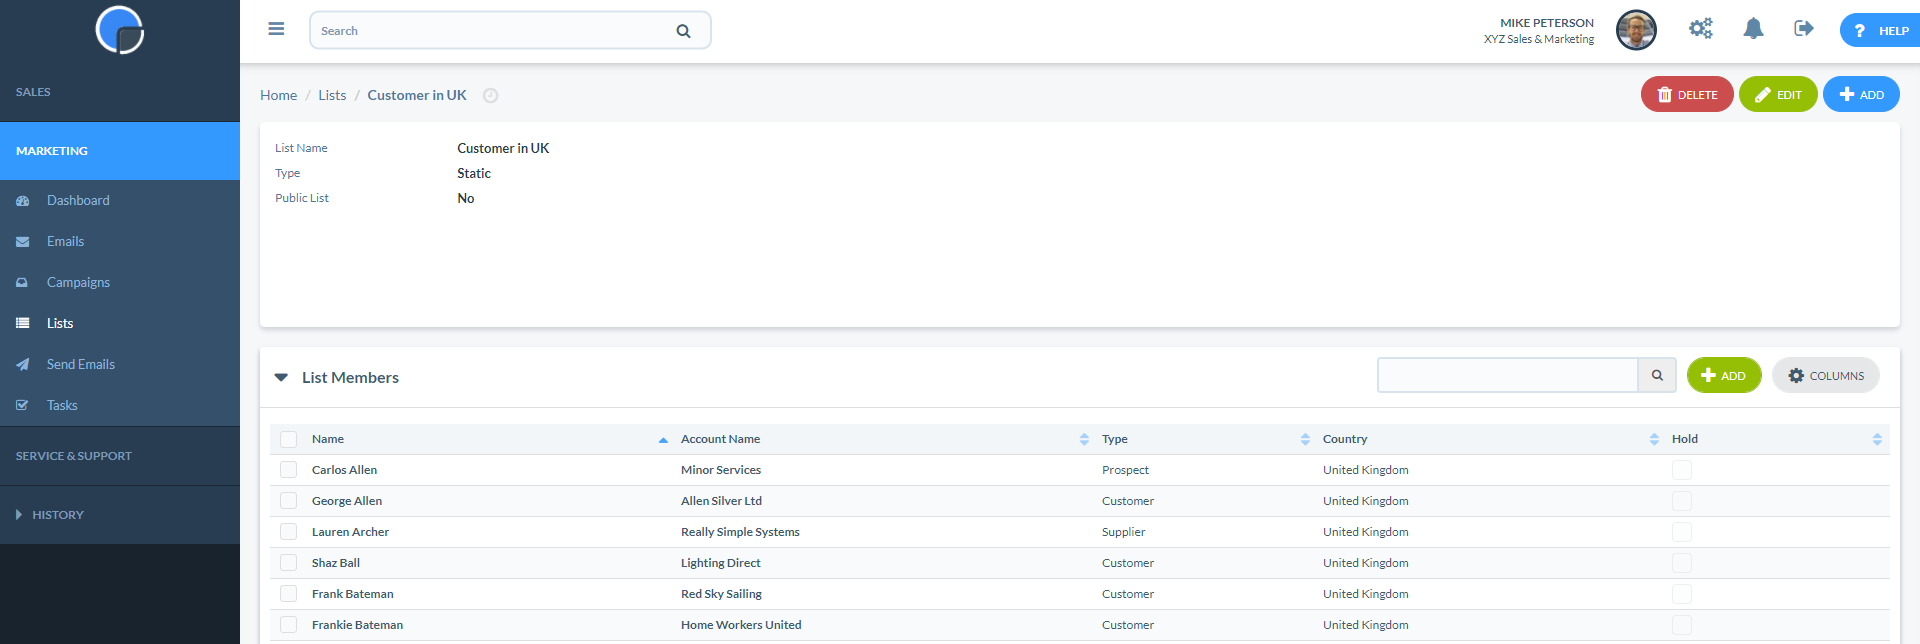
Once you are happy with your selection click “Add Contacts”. You can continue adding more members to the list, or you can delete ones using the same method and then clicking “Remove Contacts”. You can view you list by clicking “Back to List”.
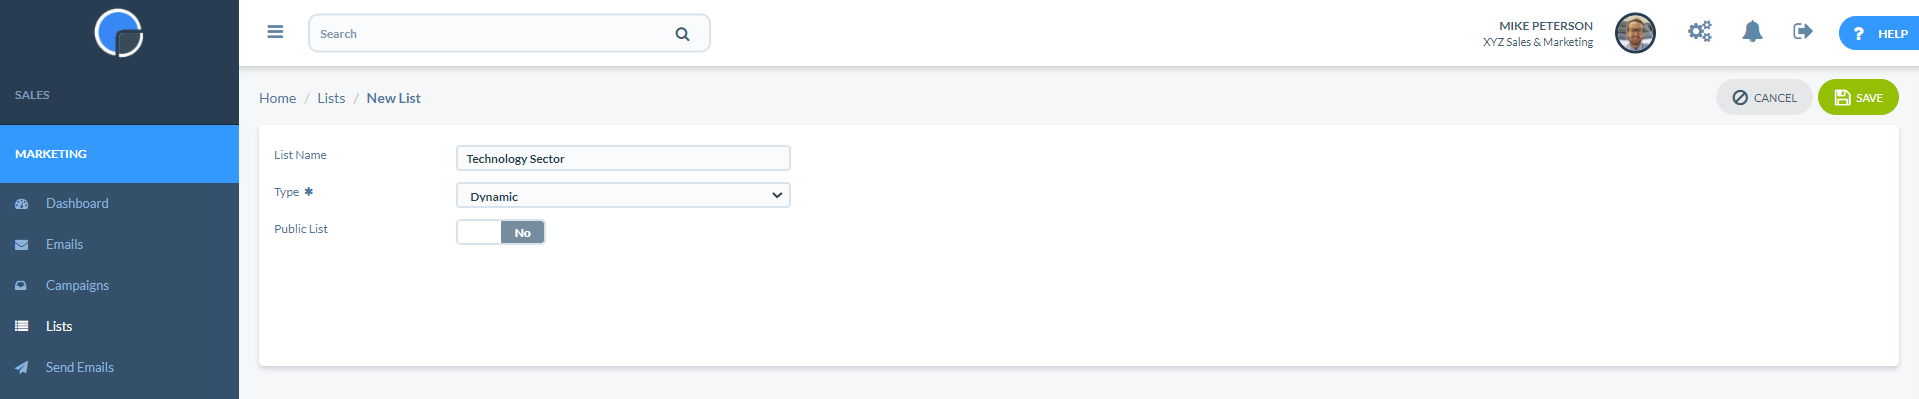
Create a Dynamic List
To create a Dynamic list, the process is similar to Static Lists. First, create a new list and give it a name but select “Dynamic” for the list type, and Save.
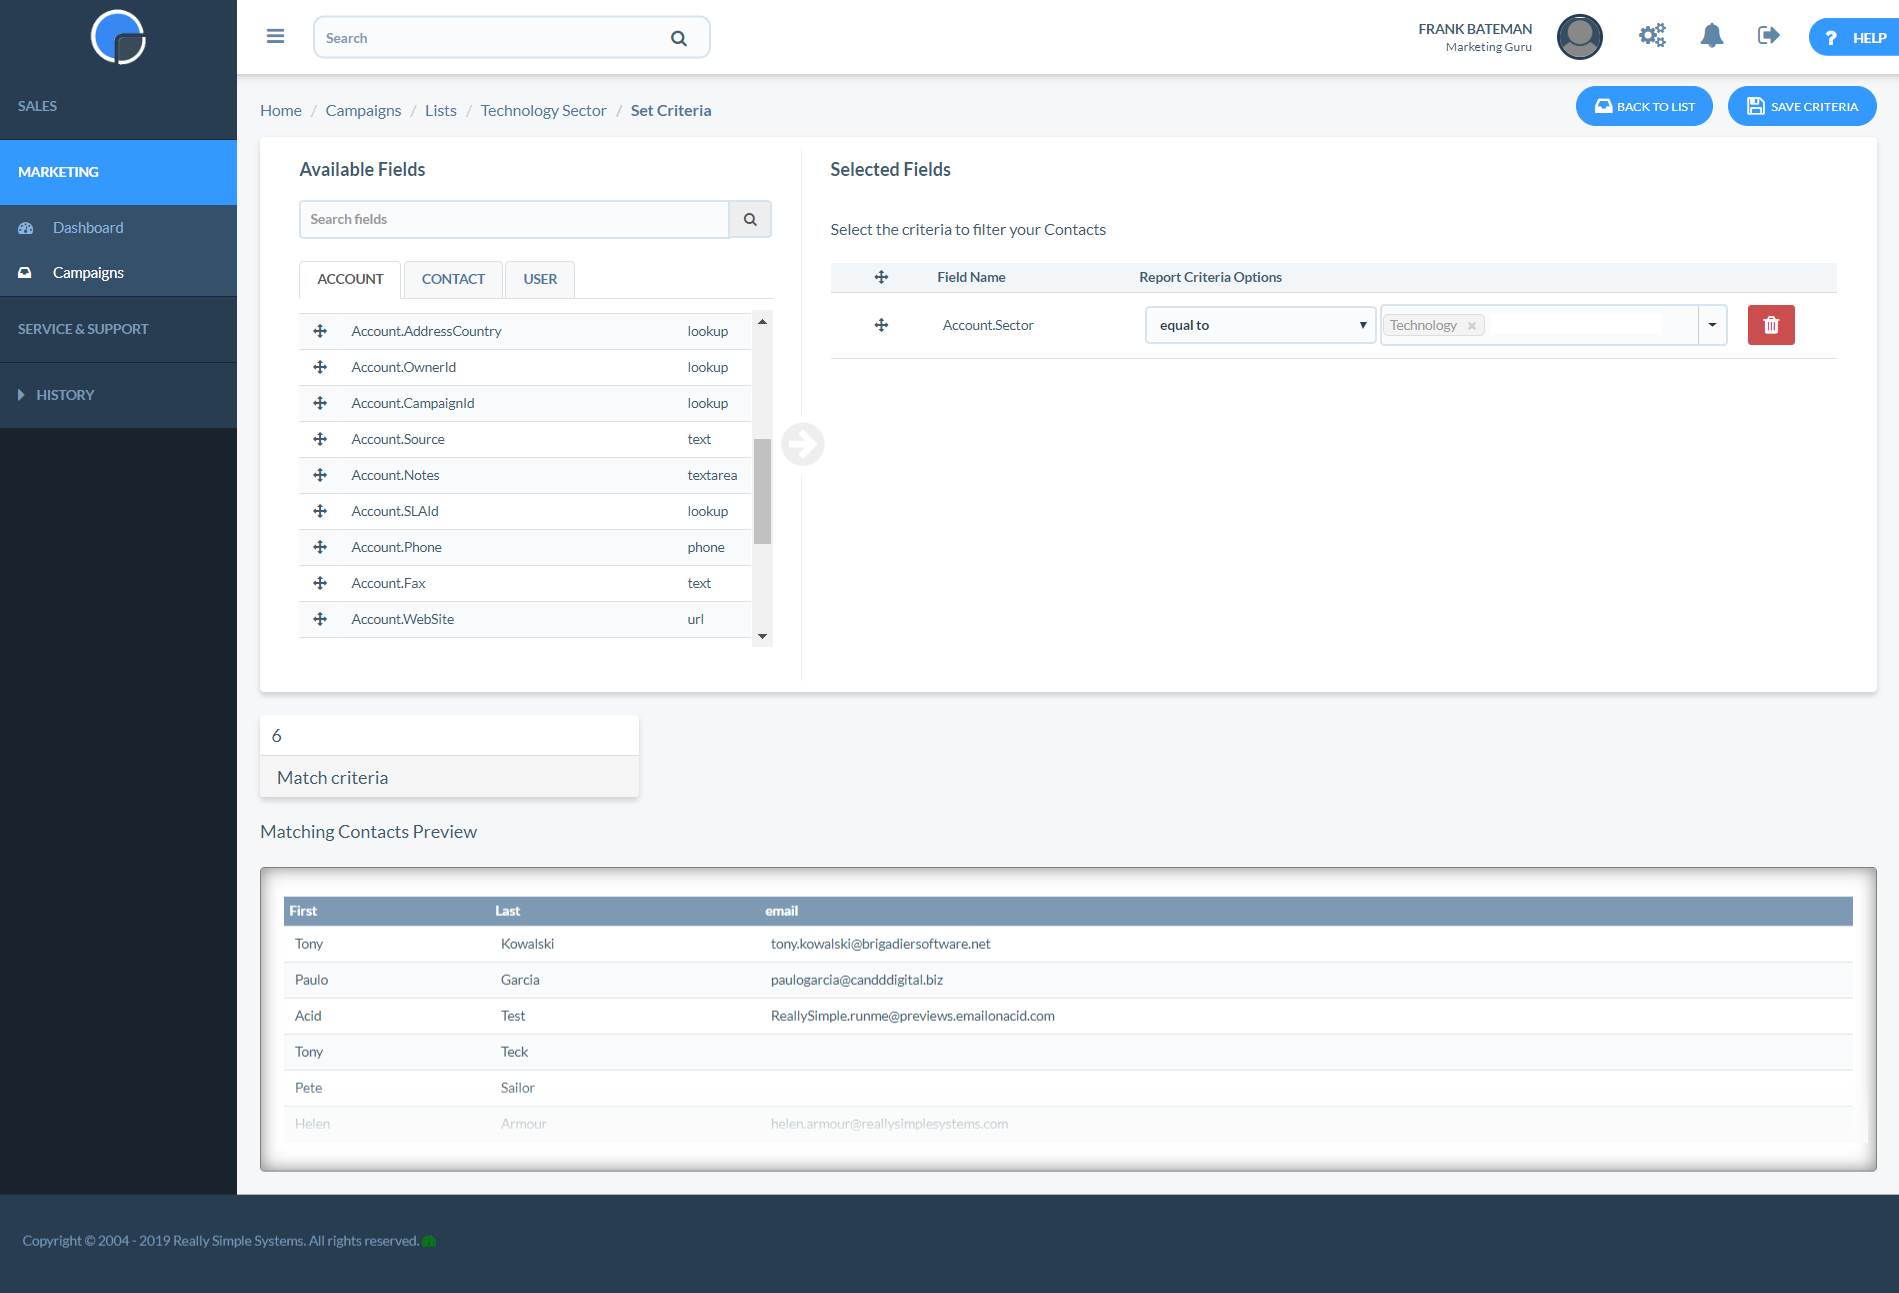
Rather than adding contacts to the list, you just set the criteria.
In this example, we have set the criteria to be “Account.Sector” is “equal to” “Technology”. Saving this criteria will mean the list will automatically update to include all contacts in the Technology sector at the time of sending the mailing.
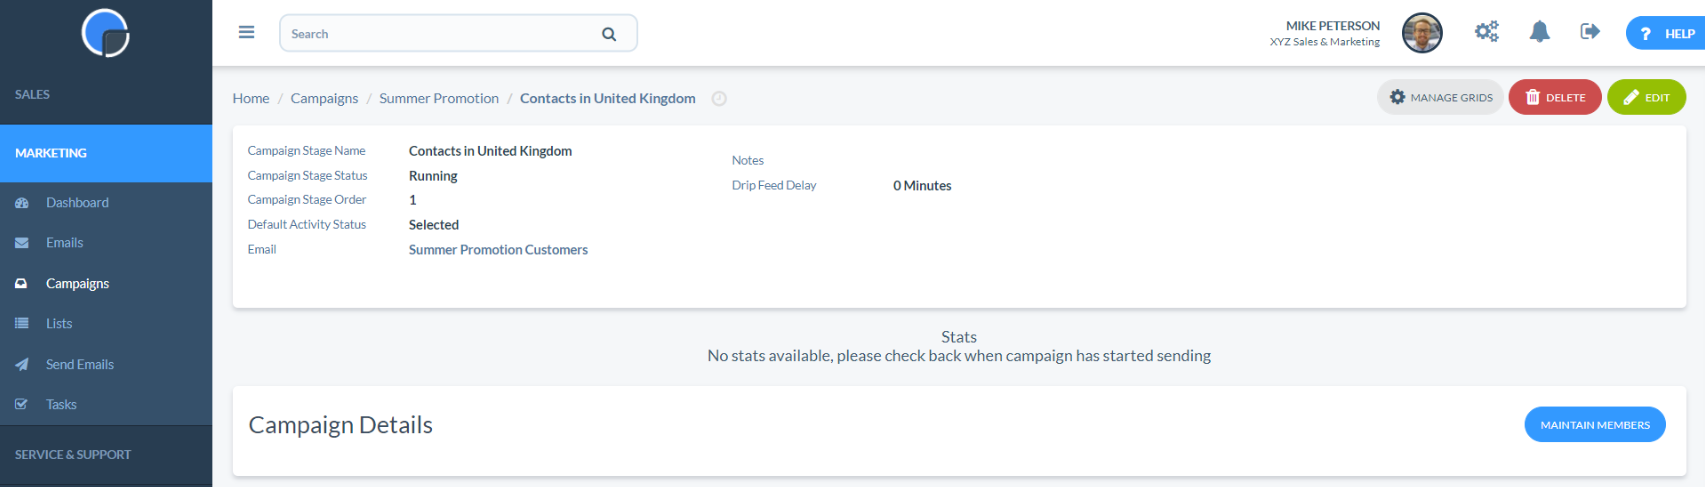
Add a List to a Campaign
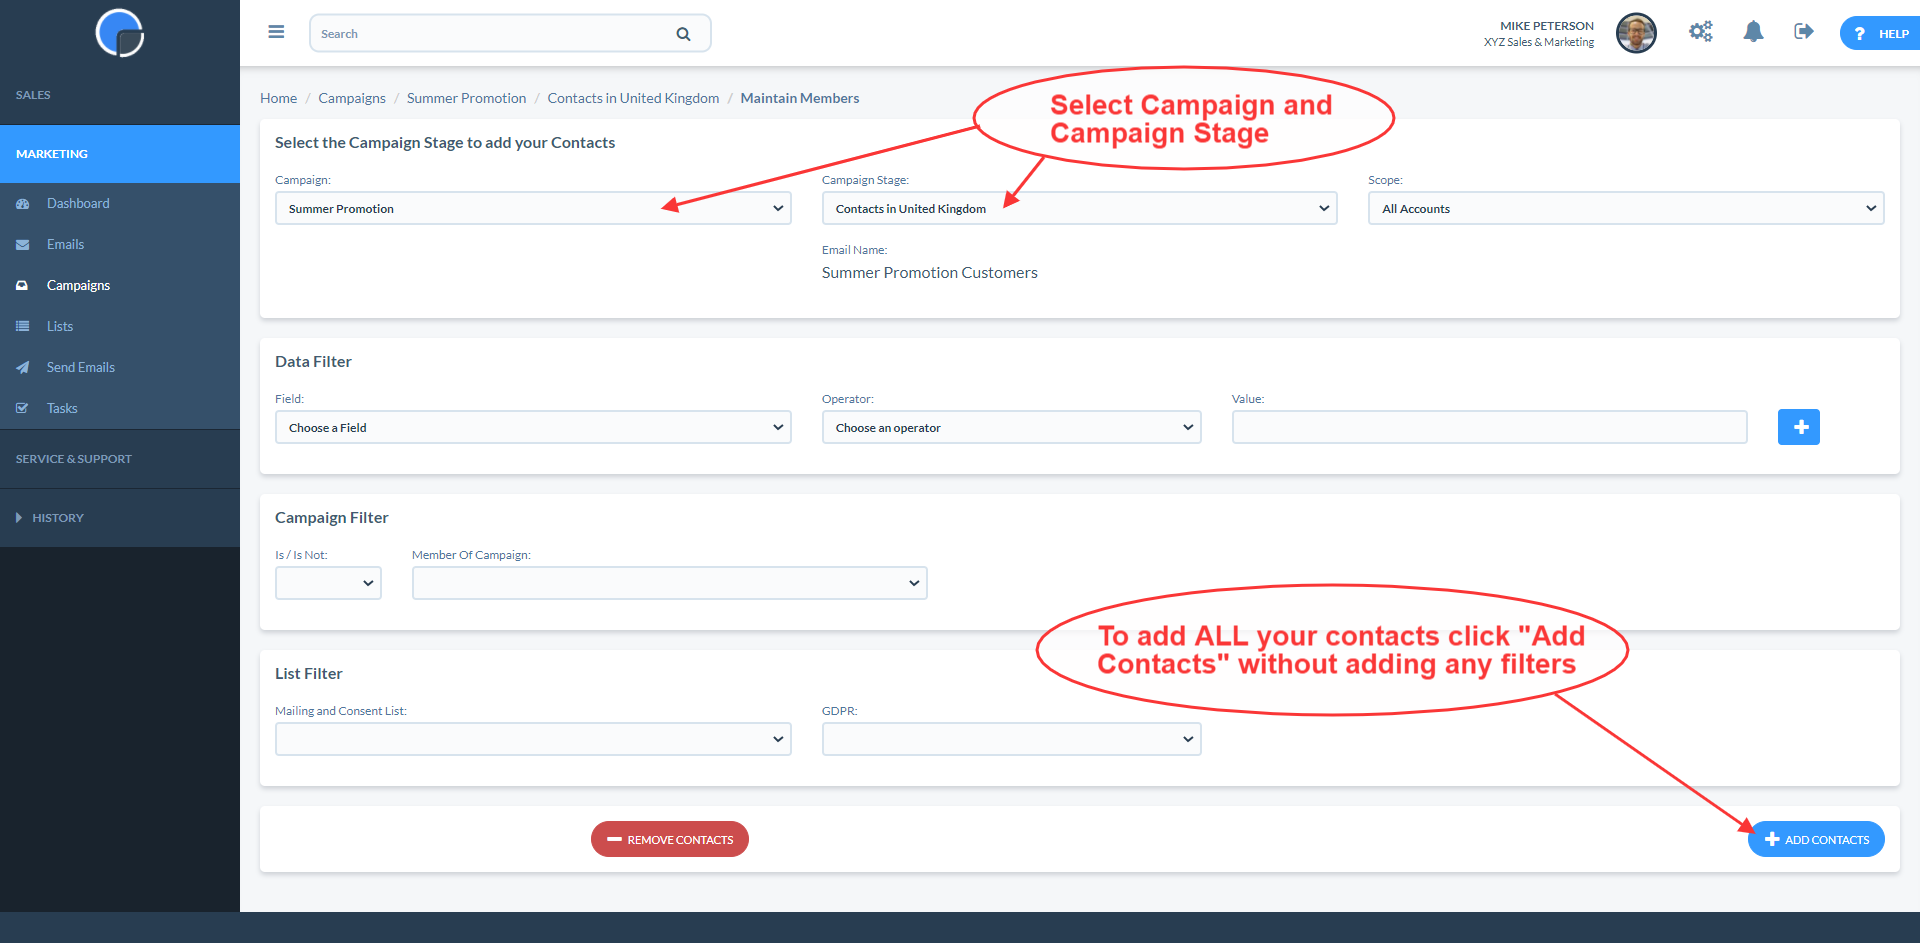
To use a List in a Campaign, from the open Campaign Stage and click Maintain Members.
Then using the List Filter, select your Mailing List from the dropdown menu.
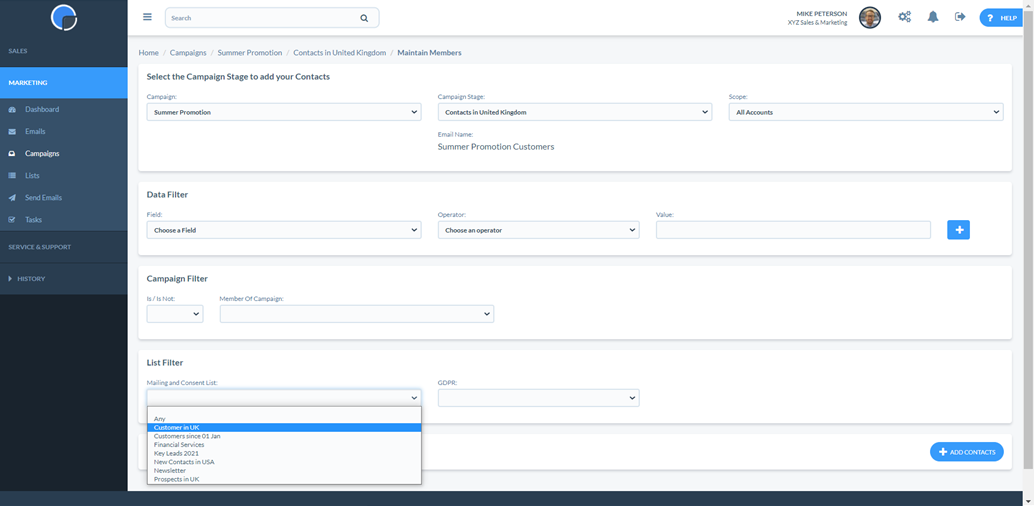
If you wish, you can also use Data Filters to further drill-down on your selection.
Segmentation Using Maintain Members
As well as Mailing List, our Advanced Marketing tool gives you the option to select contacts for each Campaign Stage. When added to a Campaign Stage we refer to them as Members. The Contact becomes a member of that Campaign but they can also be a member of multiple Campaigns.
Each Campaign Stage may have an unique segment of contacts that is selected just for that mailing. You can also cross-reference segmentations with your mailing lists to further drill-down on the filter and address your identified customer personas.
Adding Members
When you create a Campaign Stage you can add members by clicking the “Save and Add Members” button.
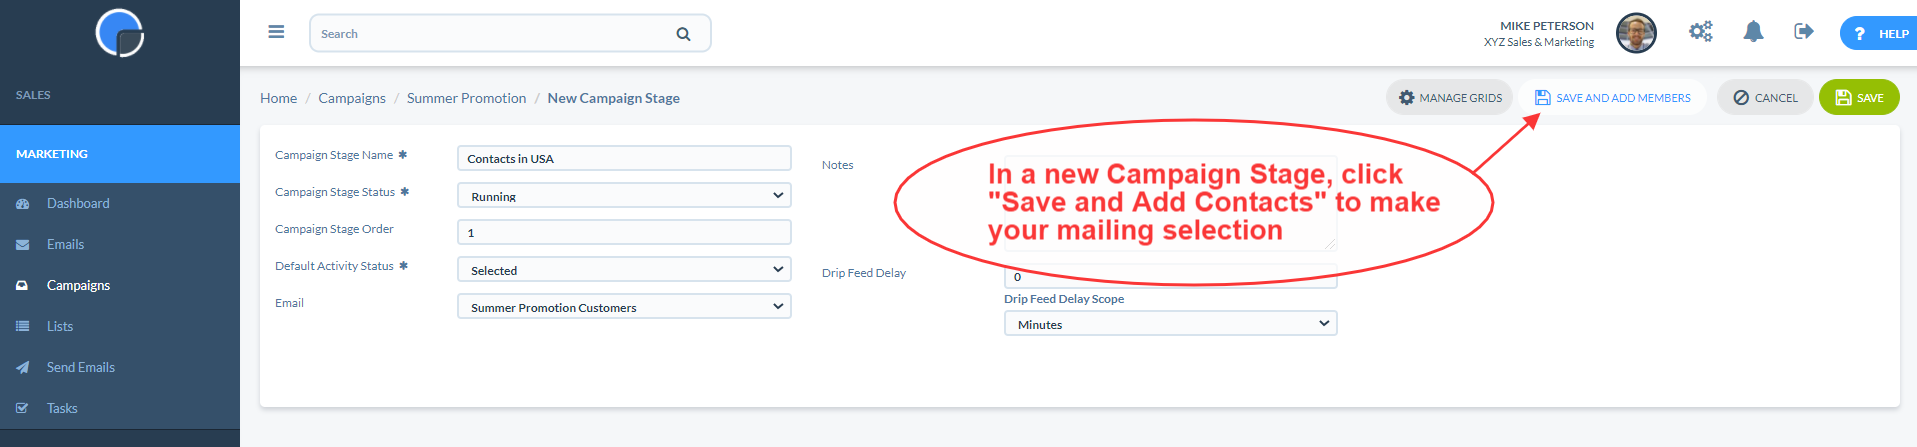
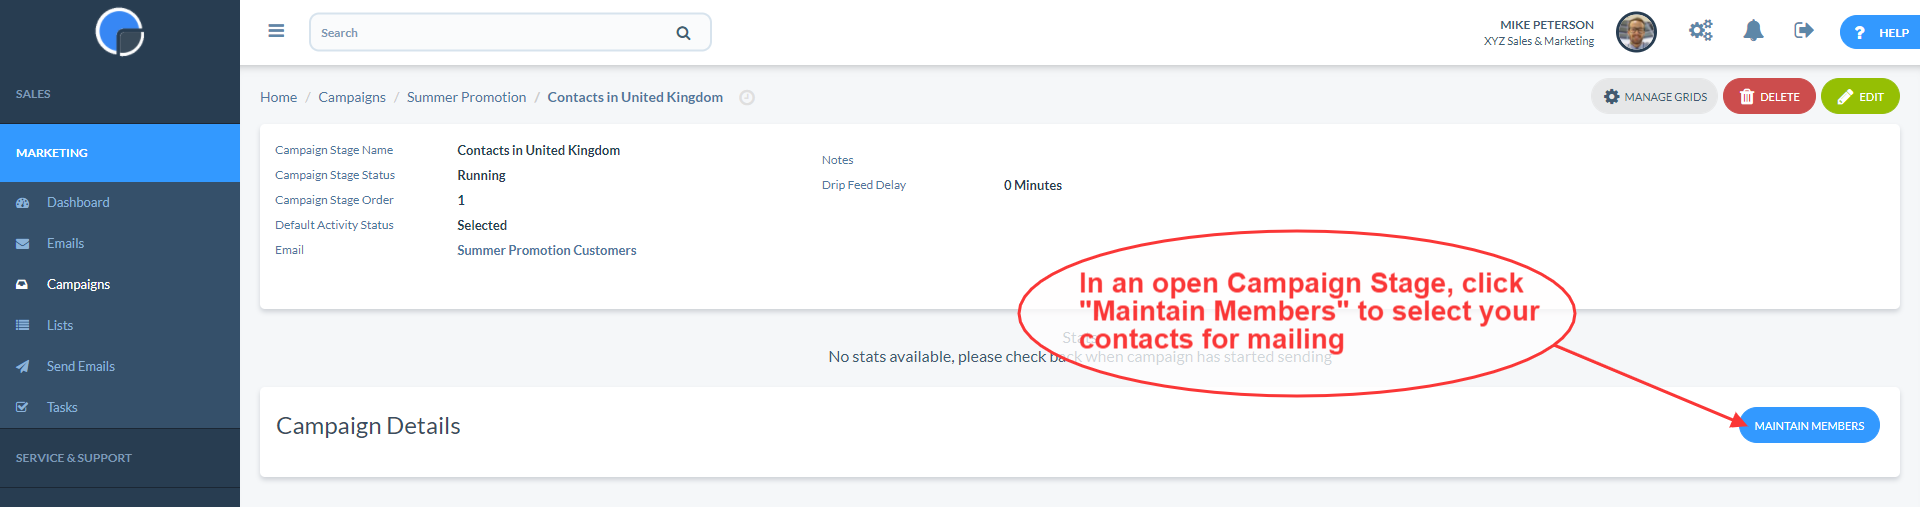
Or if you save the Campaign Stage and open it by clicking on the Campaign Stage Name, you can add members by clicking “Maintain Members”.
Filtering Contacts
Add all Contacts
To add ALL your Contacts to a Campaign Stage, in the Maintain Members screen click “Add Contacts” at the bottom of the page and don’t add any filters.
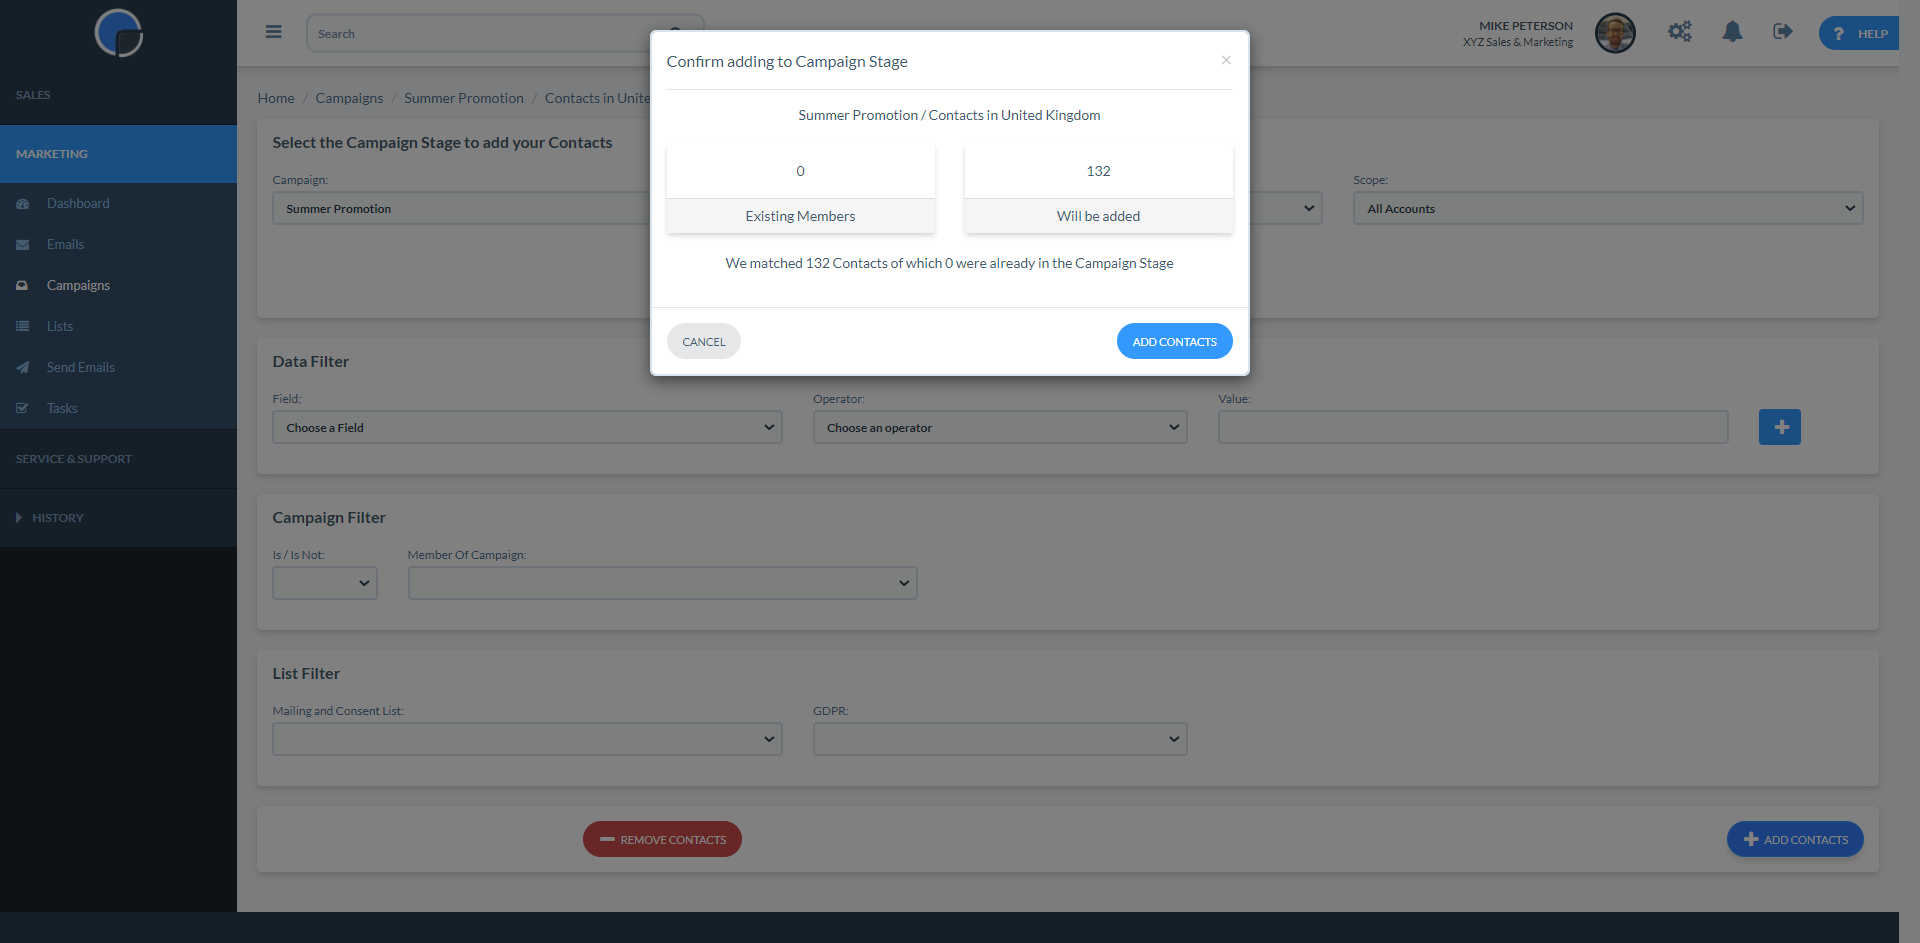
Clicking the ‘+ Add Contacts’ button will display the result of your selection. It will show how many Members you already have in the Campaign (if any) and how many more Contacts you will be adding. Click ‘Add Contacts’ to confirm the action.
Contact Segmentation
Alternatively, you can segment your CRM Contacts using the filter options:
Data Filter
With the Data Filter option you can select multiple criteria to segment your data using the field name, operator and value boxes. For example, to select only existing customers you might set the field name box to “Account.Type”, the operator box to “=” and the value to “Customers”. You can add more Data Filter rows to further segment your selection using the ‘+’ button.
You can build up complex profiles by adding and deleting Members using consecutive additions and deletions. You can also add Members after a Campaign Stage has started running.

Campaign Filter
If a Contact has previously been mailed in another Campaign or Campaign Stage you can select or deselect according to their behaviour. For example, if they clicked through on a previous campaign or did not open the mailing.

List Filter
The List Filter option lets you select or deselect contacts in your Mailing Lists or Consent Lists.
Selecting a List from the dropdown list will select just your contacts on that list. If you are also using Data Filters and/or Campaign Filters the selection will be cross-referred against your List to only select those contacts who meet all the criteria.
Consent Lists/GDPR
If you are filtering using Consent Lists and your selection includes contacts from geographic regions located in both GDPR compliant countries and those that are not, you can use the ‘GDPR’ box to select “Or is not subject to GDPR” to override the Consent List filter for those contacts. For example, if you want to mail only consenting contacts in countries where GDPR is applicable but also mail all contacts in other countries.

Applying the Segmentation
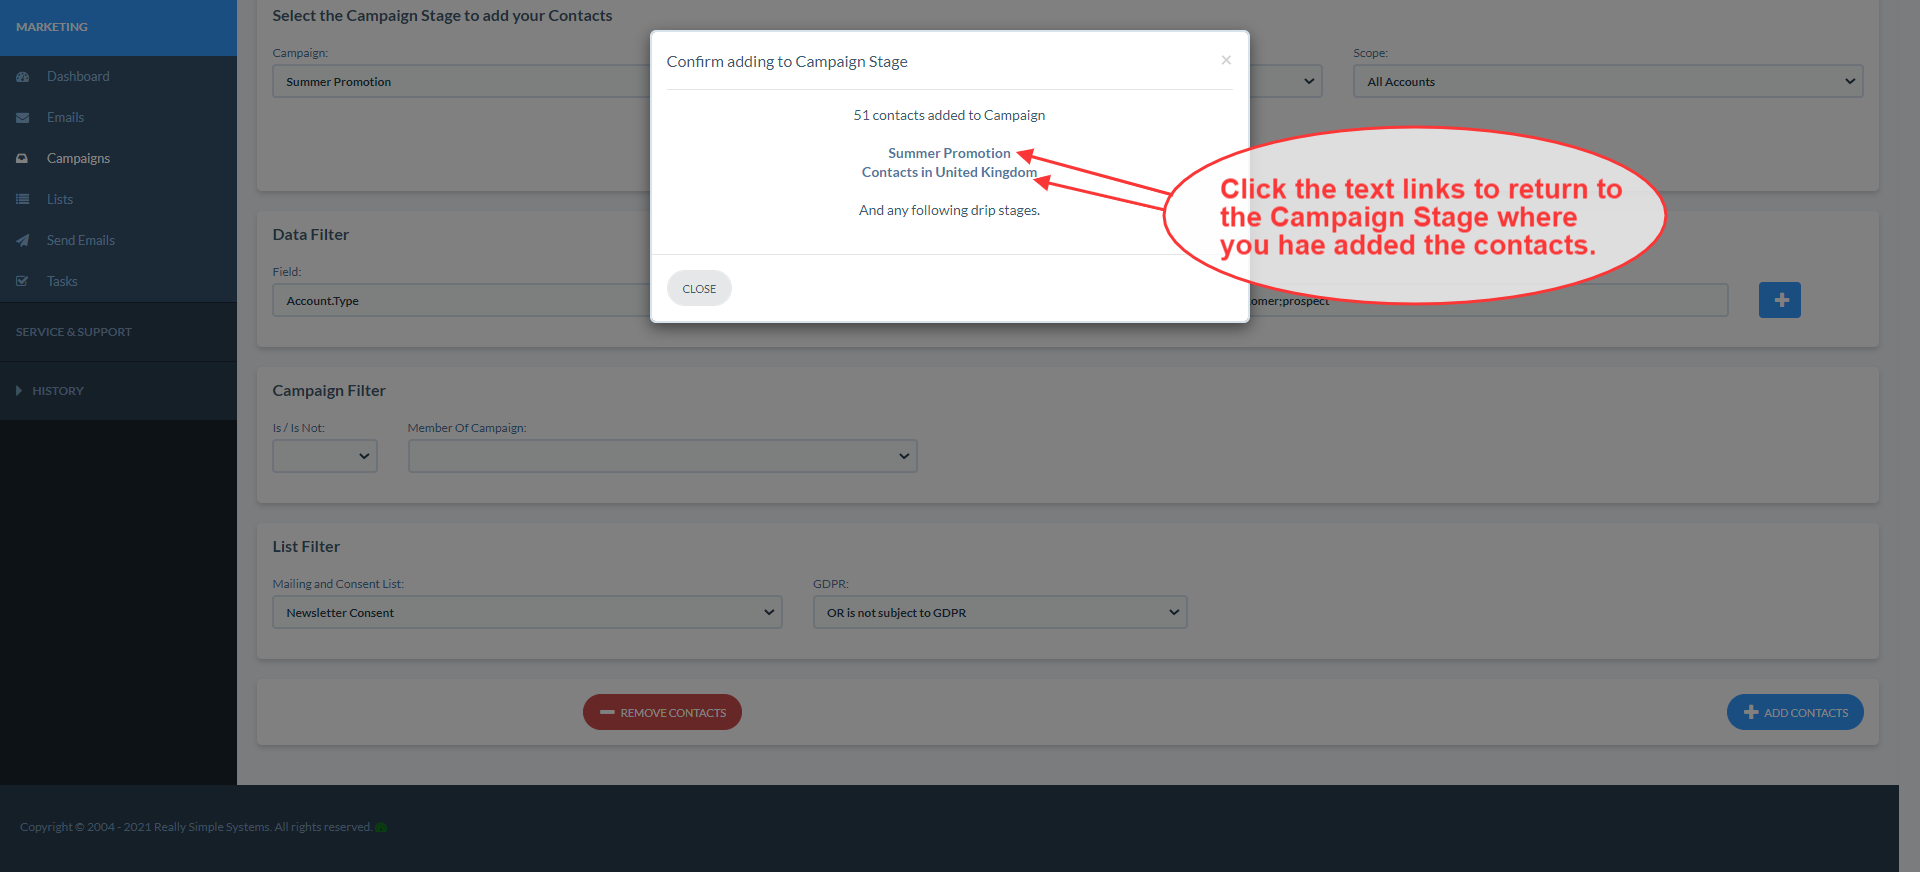
Clicking the ‘+ Add Contacts’ button will display the result of your selection. It will show how many Members you already have in the Campaign (if any) and how many more Contacts you will be adding. Click ‘Add Contacts’ to confirm the action.

Once you have added (or removed) your contacts, you can return to the Campaign or Campaign Stage by clicking the text links in the pop-up box.
Email Member Status Updates
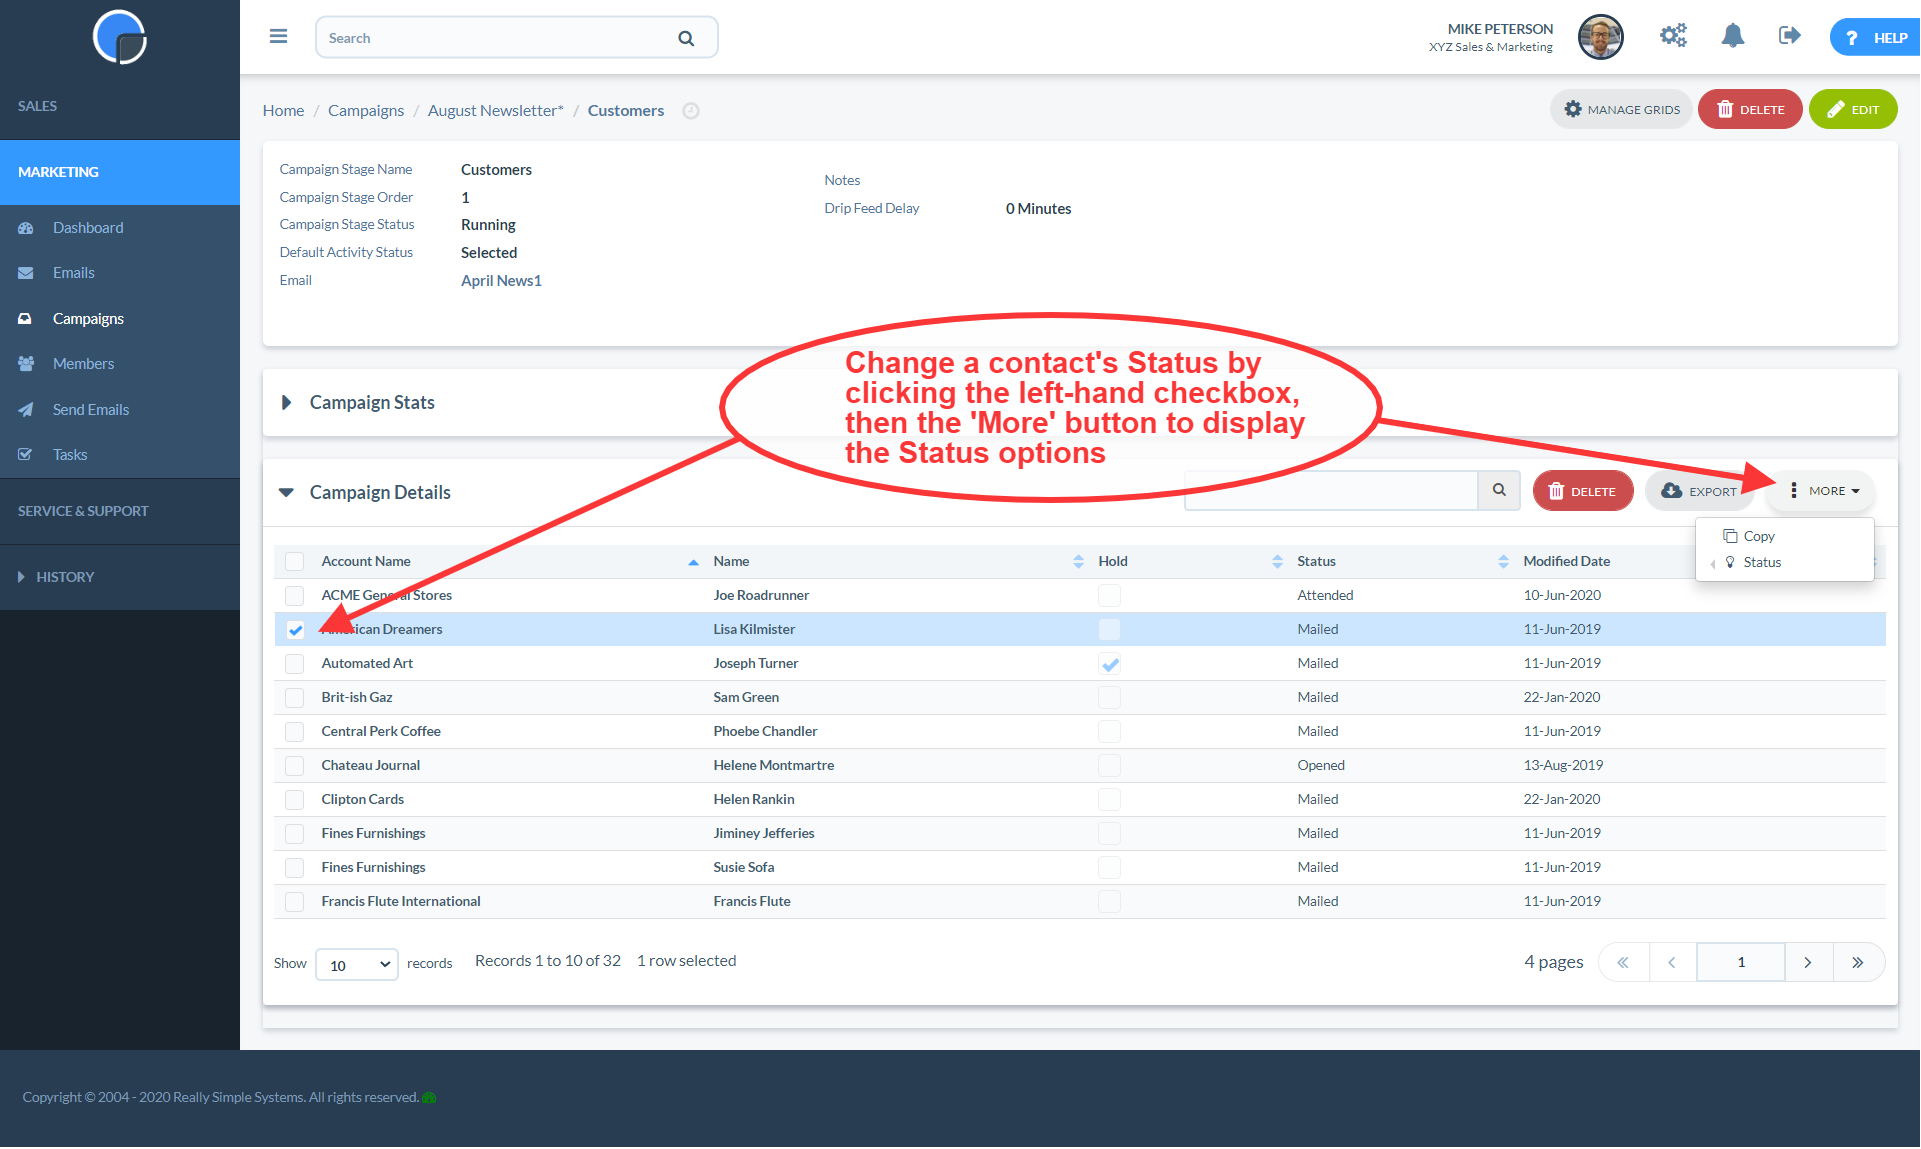
The Email Member Status indicates what stage a contact is at in the Campaign, for example, ‘Queued’ for when they are in the Mailer queue waiting for the for the email to be sent. You can manually change an individual Email Member Status by viewing Members from the Campaign Stage page, from an Account page, and from a Contact page.
If the Campaign Stage is an email, then the Member’s Status will be updated to reflect Opens, Bounces, Unsubscribes and Click throughs.
To edit the Status, click in the checkbox on the left hand side of the grid. This will bring up new editing options. click the “MORE” button and on the Status option select teh status you want, for example “Queued”.
Send Emails to an Individual Contact
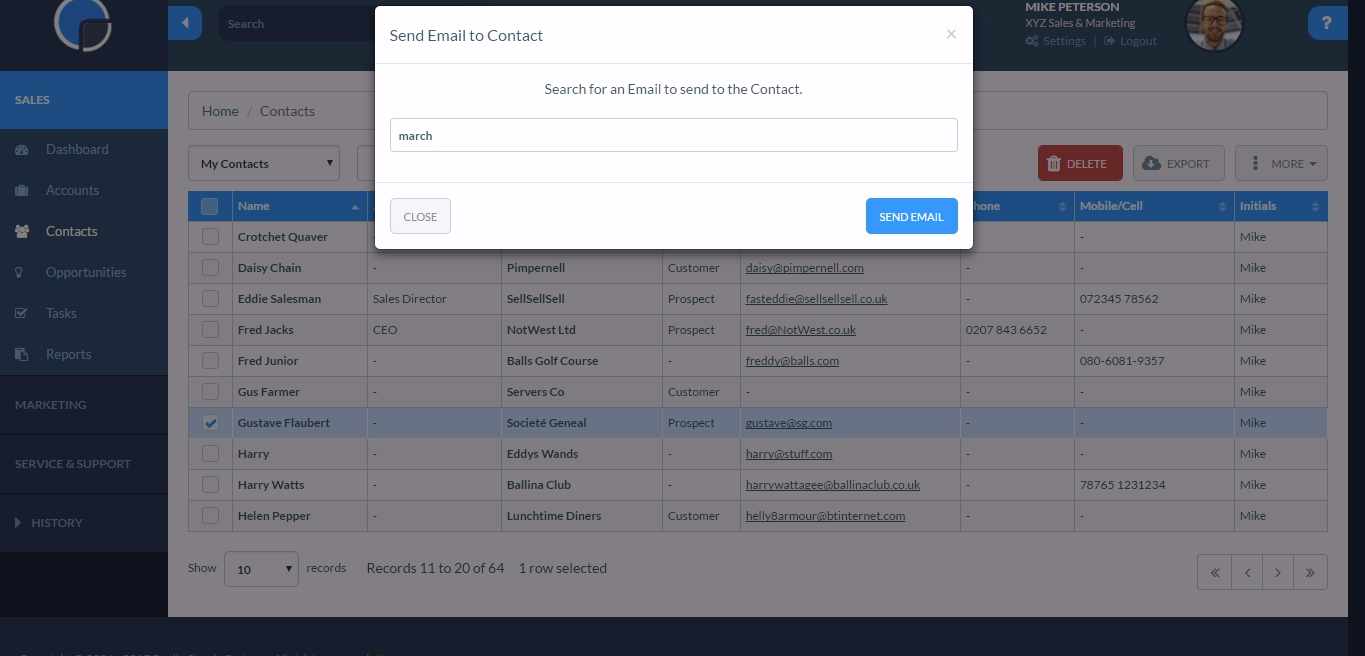
With our Advanced Marketing tool you can also send selected emails to an individual contact, or a selection of contacts, without creating a campaign.
On your Contacts table/grid, click the checkbox next to the name of the contact(s) you wish to mail, then click on the ‘More’ button. Select the option ‘Send Email’ and this will bring up a search box. Search for the email you wish to send then click the blue ‘Send Email’ button to complete the procedure. This will send the email immediately to the contact.
Add an Individual Contact to a Marketing Campaign
With our Advanced Marketing tool you can also add an individual Contact directly to a Campaign.
In the Contacts grid/table, click the checkbox against the name of the Contact you wish to mail, then click on the ‘More’ button above the grid. Select “Add to Campaign” and this will bring up a search box. Enter the search term for the Campaign Stage you wish to send, then click the blue action button “Add to Campaign”.
This will immediately add the Contact to the Campaign Stage and set the mailing status to queued, so adding the email to be sent to your mailer queue.
