Simple Marketing Overview
Campaign Wizard
The Simple Marketing tool includes a Campaign Wizard that will take you through the required steps to create and send an email marketing campaign, i.e. creating an email, adding a mailing list, scheduling and sending.
Campaigns Summary Grid
On the Simple Marketing main menu, clicking Campaigns will display a list of the Campaigns you have created. If you have not yet created any campaigns the grid will be blank.
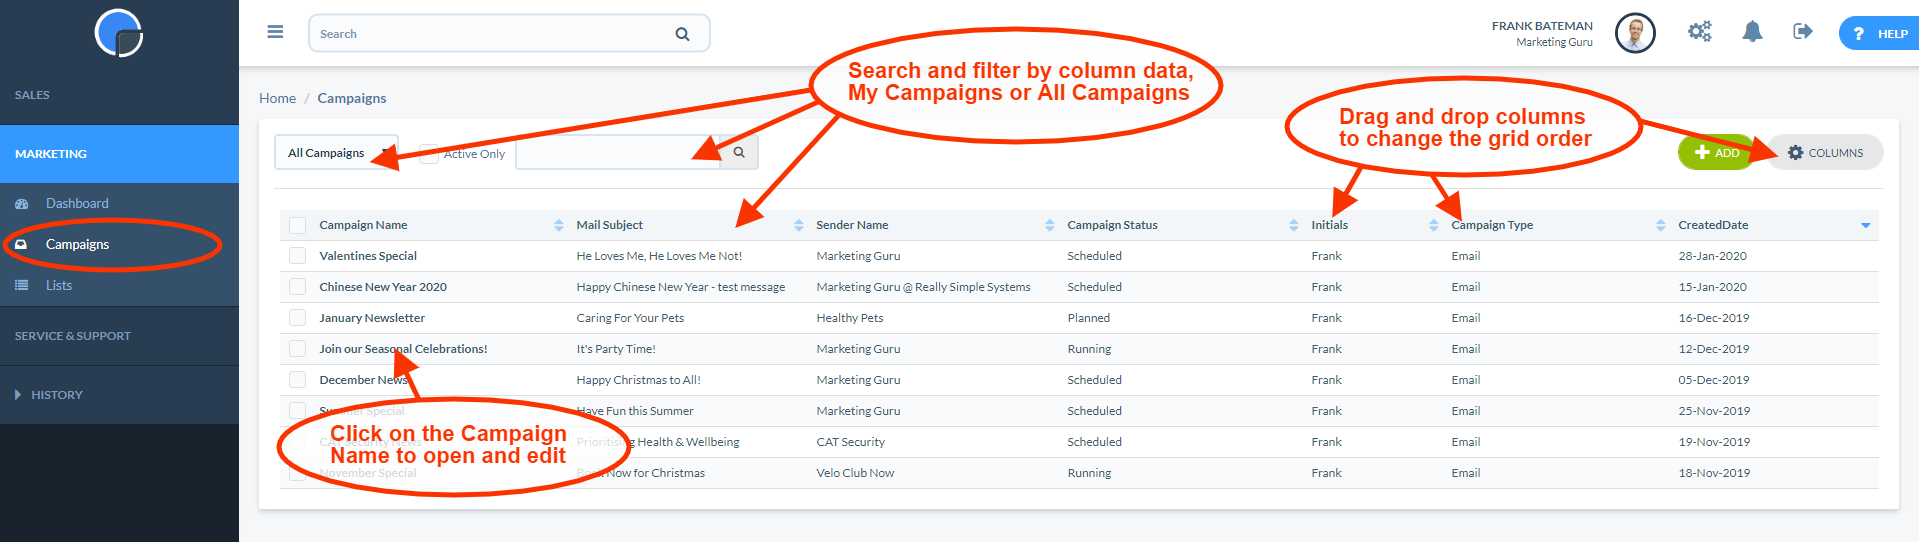
As with all your CRM summary grids you can click on any of the column headers to sort by that column. Depending upon your team roles and security settings, you can choose to see My Campaigns, My Group’s Campaigns or All Campaigns using the dropdown menu above the column headings. You can search on all the displayed fields in the grid using the search bar above.
You can select/de-select which columns are displayed by clicking the ‘Columns’ button and selecting the data fields you require. You can change the order of the columns by “dragging and dropping” from the title bar. If all the columns selected don’t fit your screen size a “+” box will appear on the right of the grid – click this to open and view all the data.
To view or edit a Campaign, click on the Campaign Name to open it.
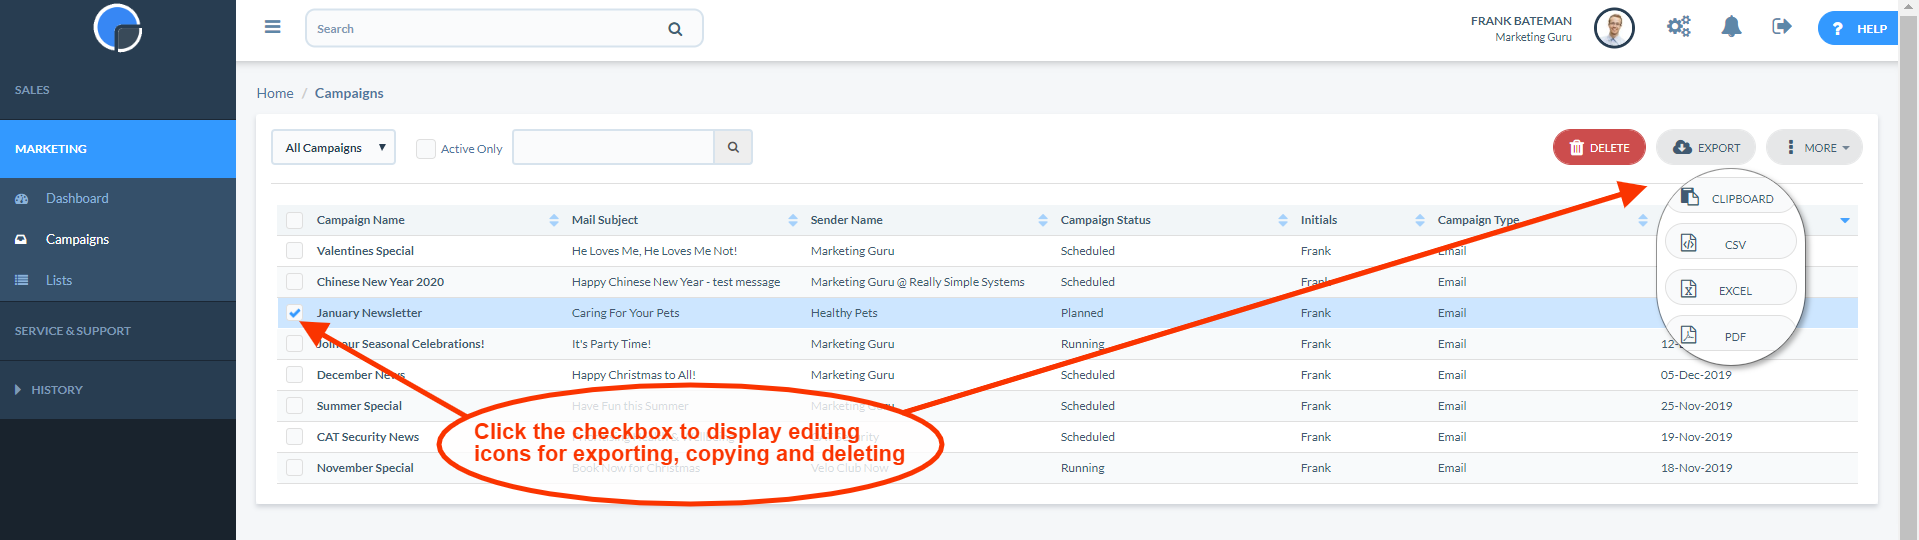
Click the checkbox on the left-hand side to select a Campaign and new editing icons will appear at the top of your page, e.g. to copy, delete or export.
Creating a Campaign
To create a new Campaign and send an email, click the “Add” button and give your campaign a name e.g. January Newsletter.
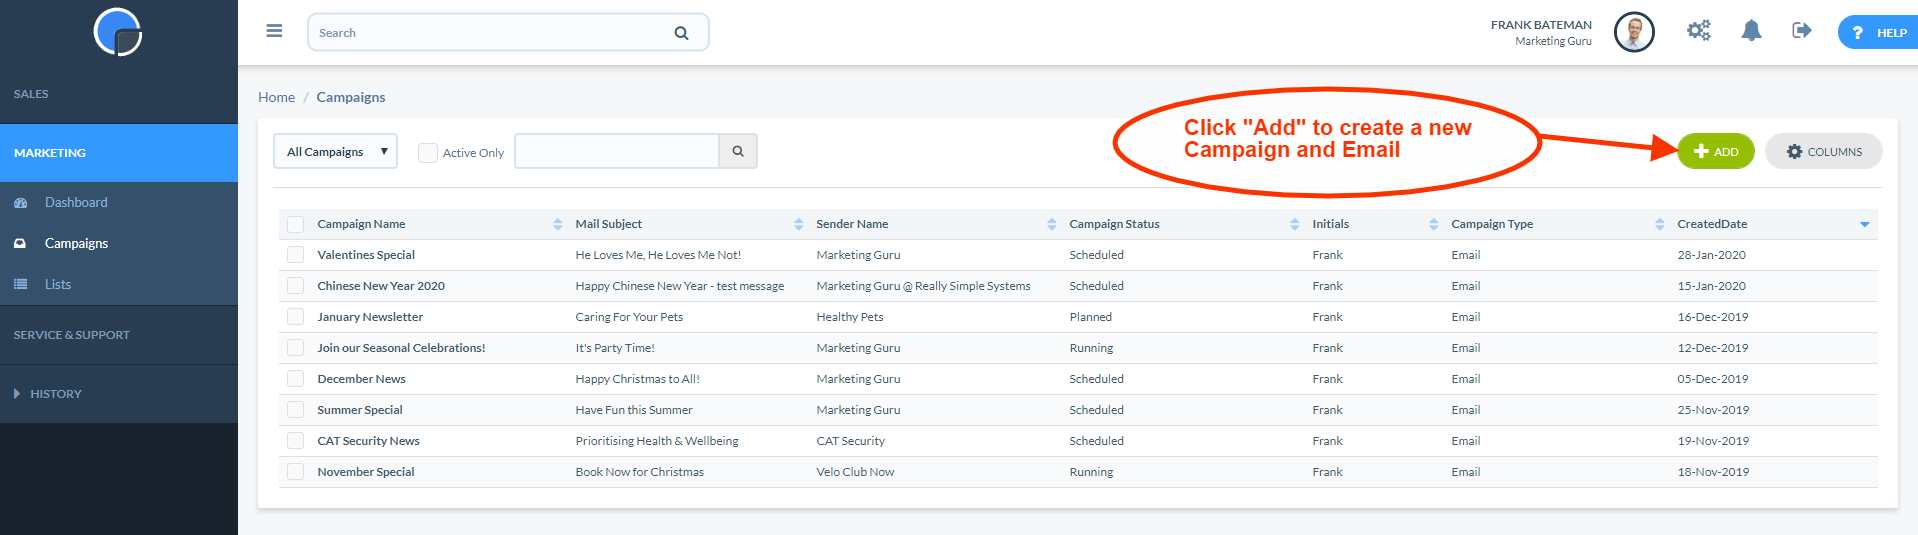
Then click Save.
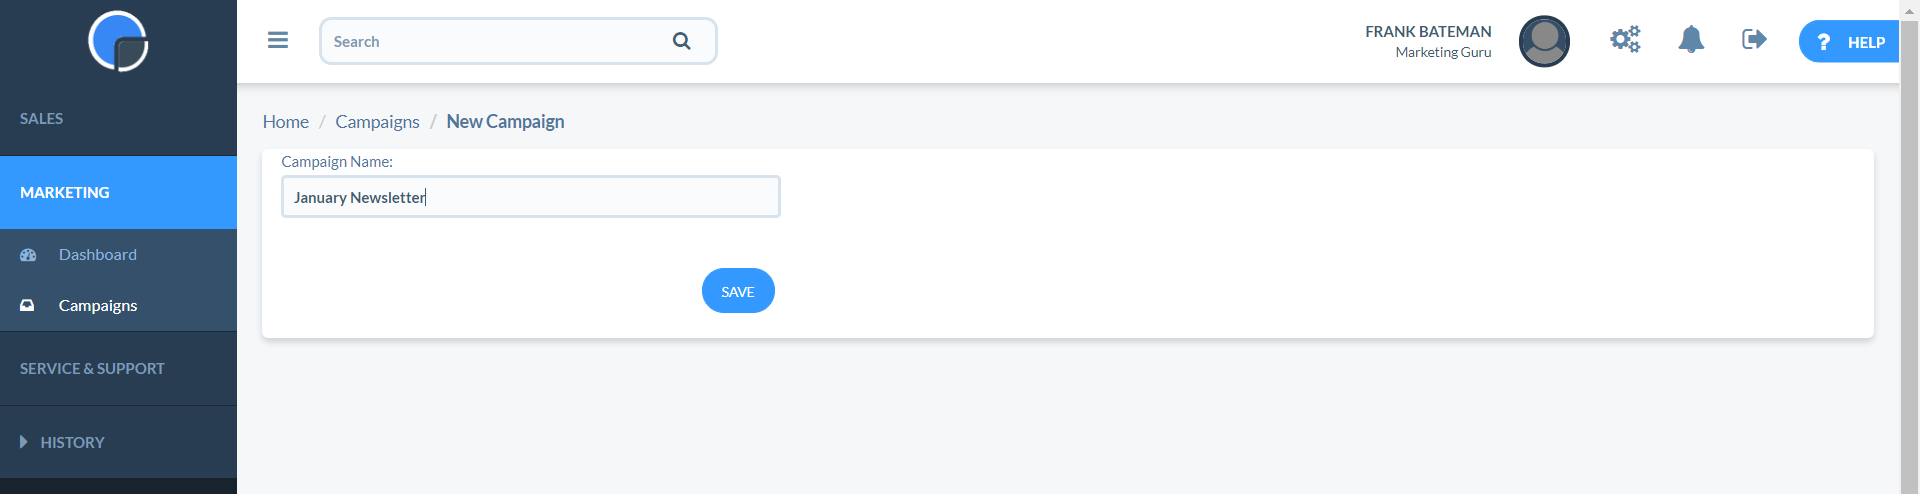
Clicking the Save button will open the Campaign Wizard tool that will take you through the stages of creating and sending an email.
Designing Your Email
Find more detailed information on Designing Emails.
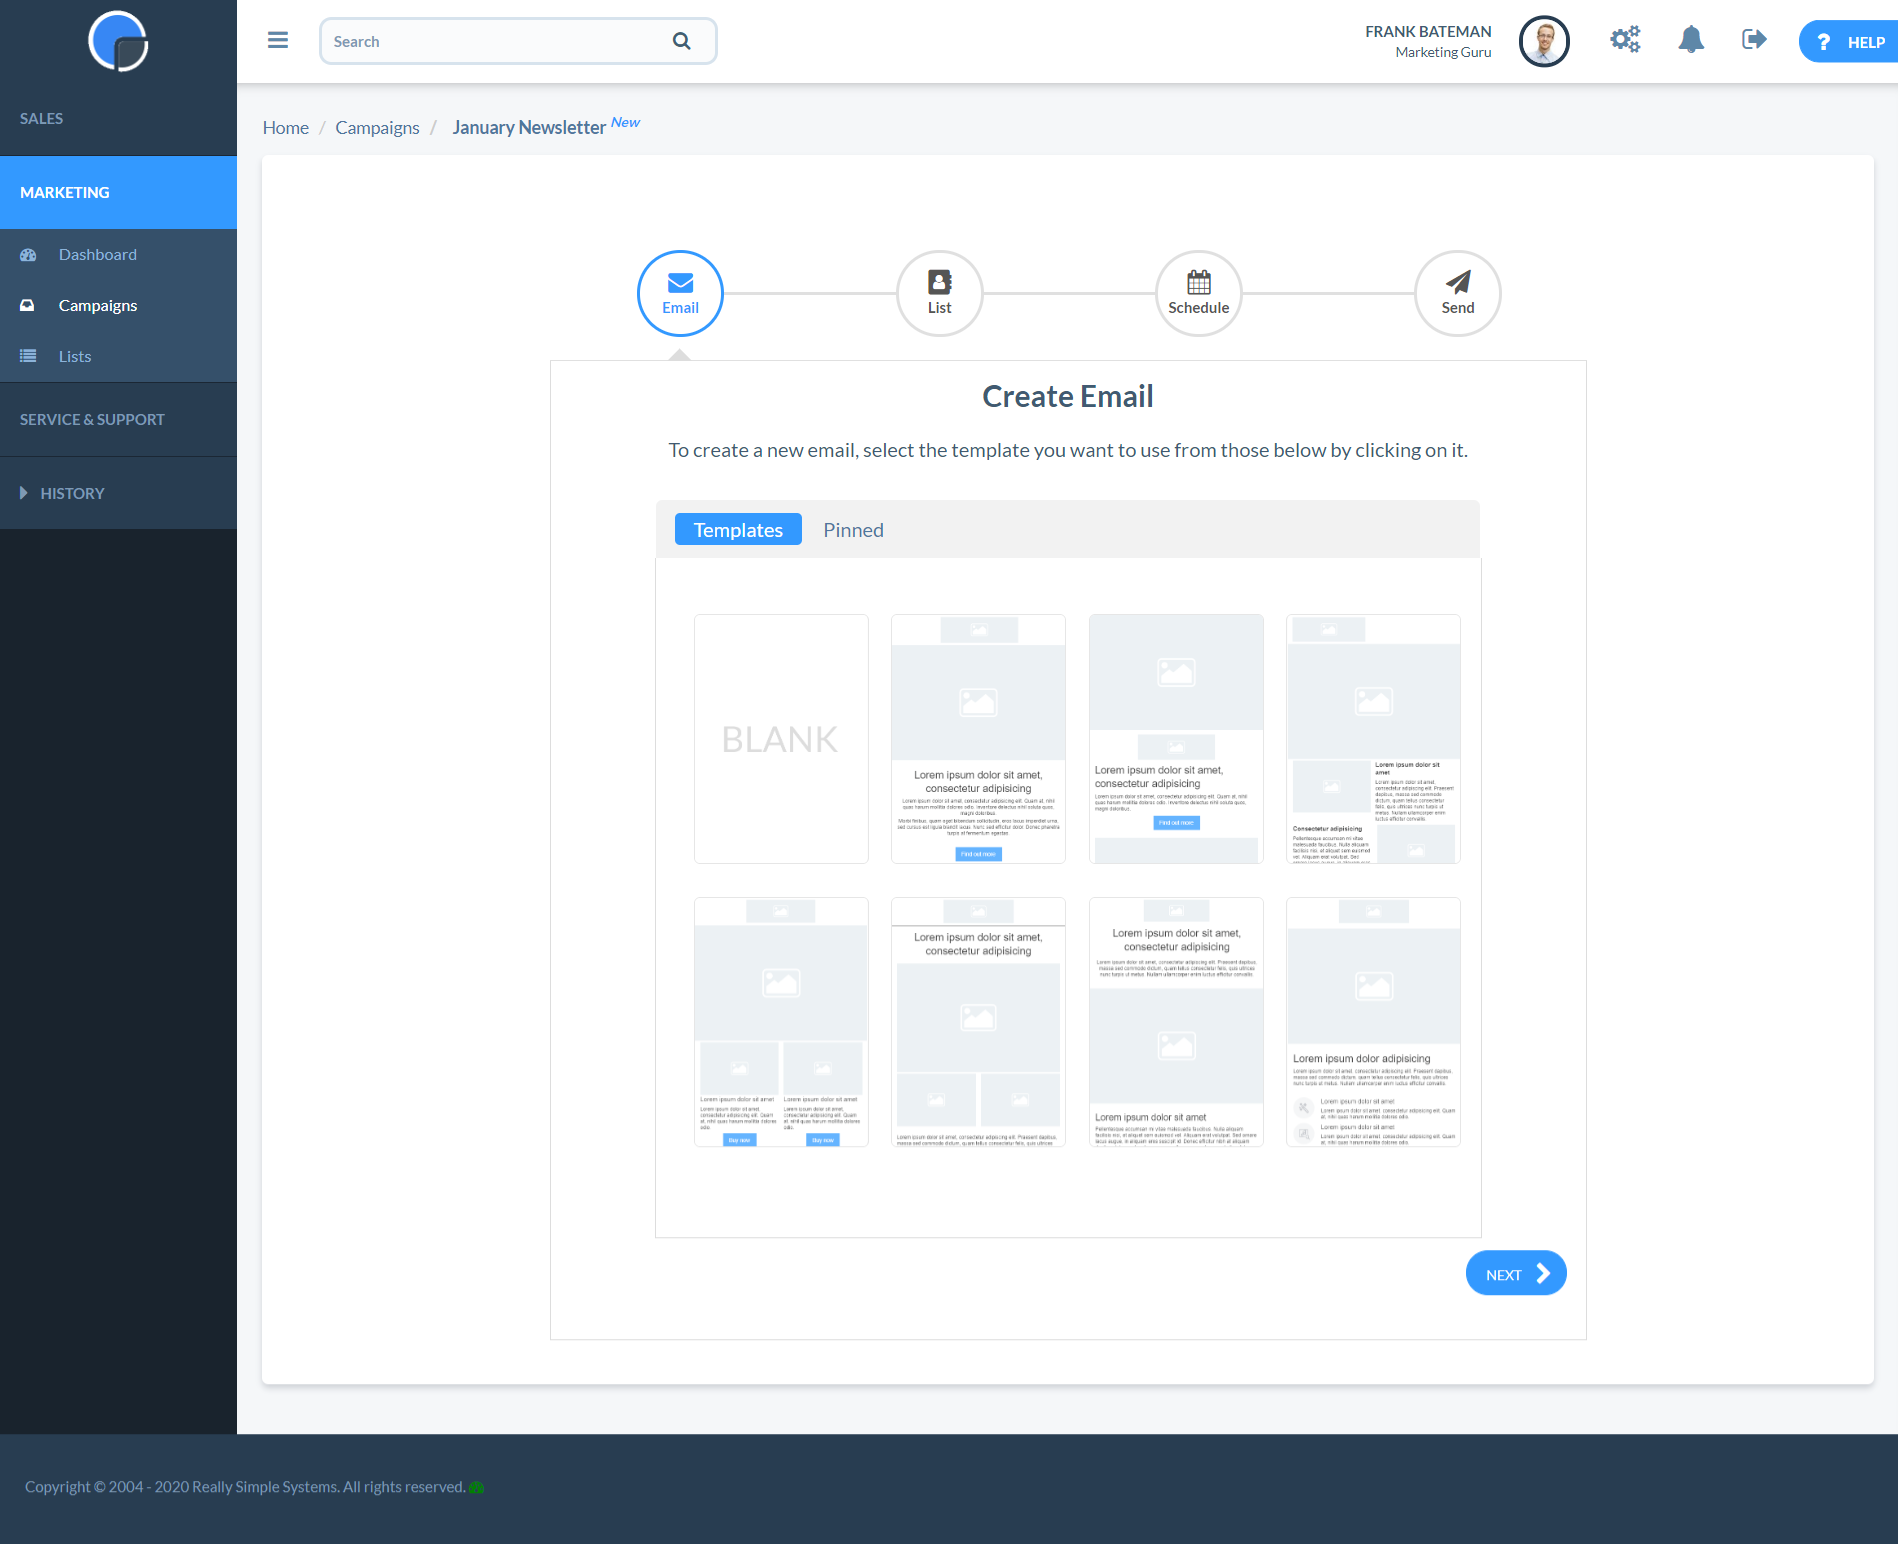
With the Campaign Wizard open, the first thing to do is create your email. From the Templates shown, click to select the layout you wish to use, or the blank template. This will open the Email Designer.
You will see there is also a tab named “Pinned” where you can save your own template designs.

Pinned Templates
You can select to save your email design to the Pinned Templates by clicking the small pin icon next to your campaign name.

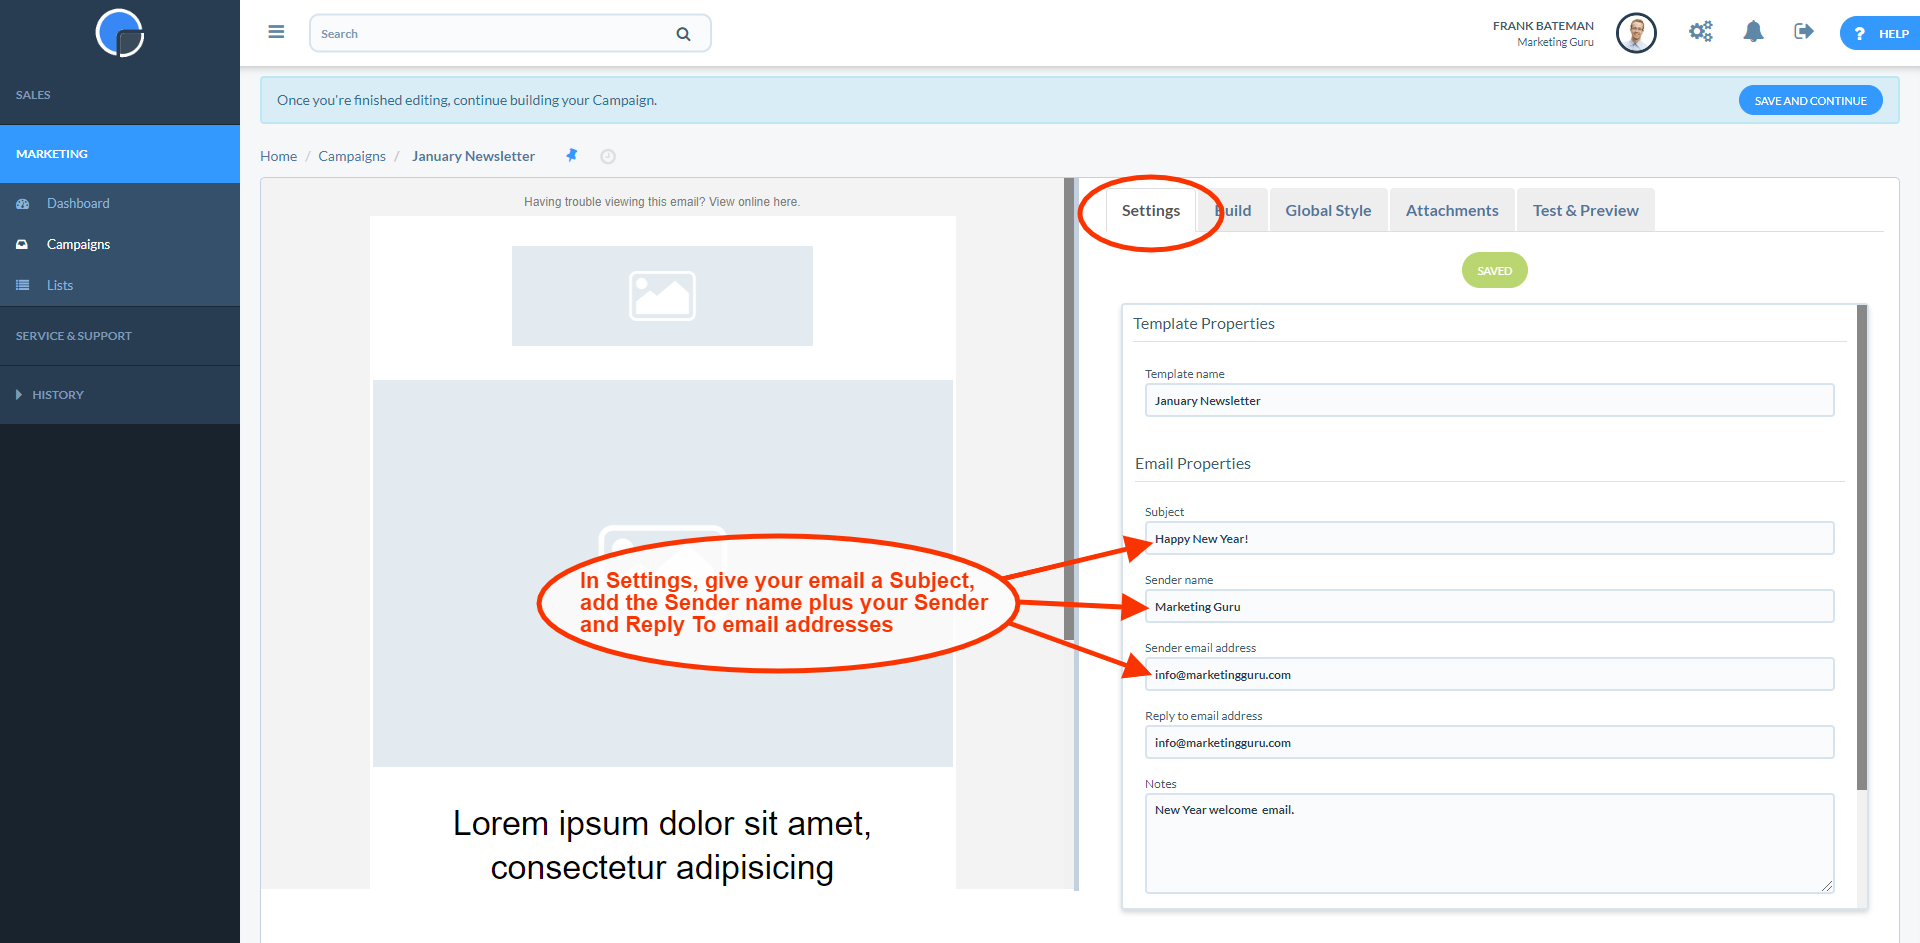
Settings
In the Email Designer, go to the Settings tab and complete the details, giving your email a Subject (the email subject that will appear in your contact’s inbox), Sender Name (e.g. your company name) and add an email address for the Sender and Reply To records, then Save.
N.B. You can come back to these later if you wish but you won’t be able to send the email until these are completed.
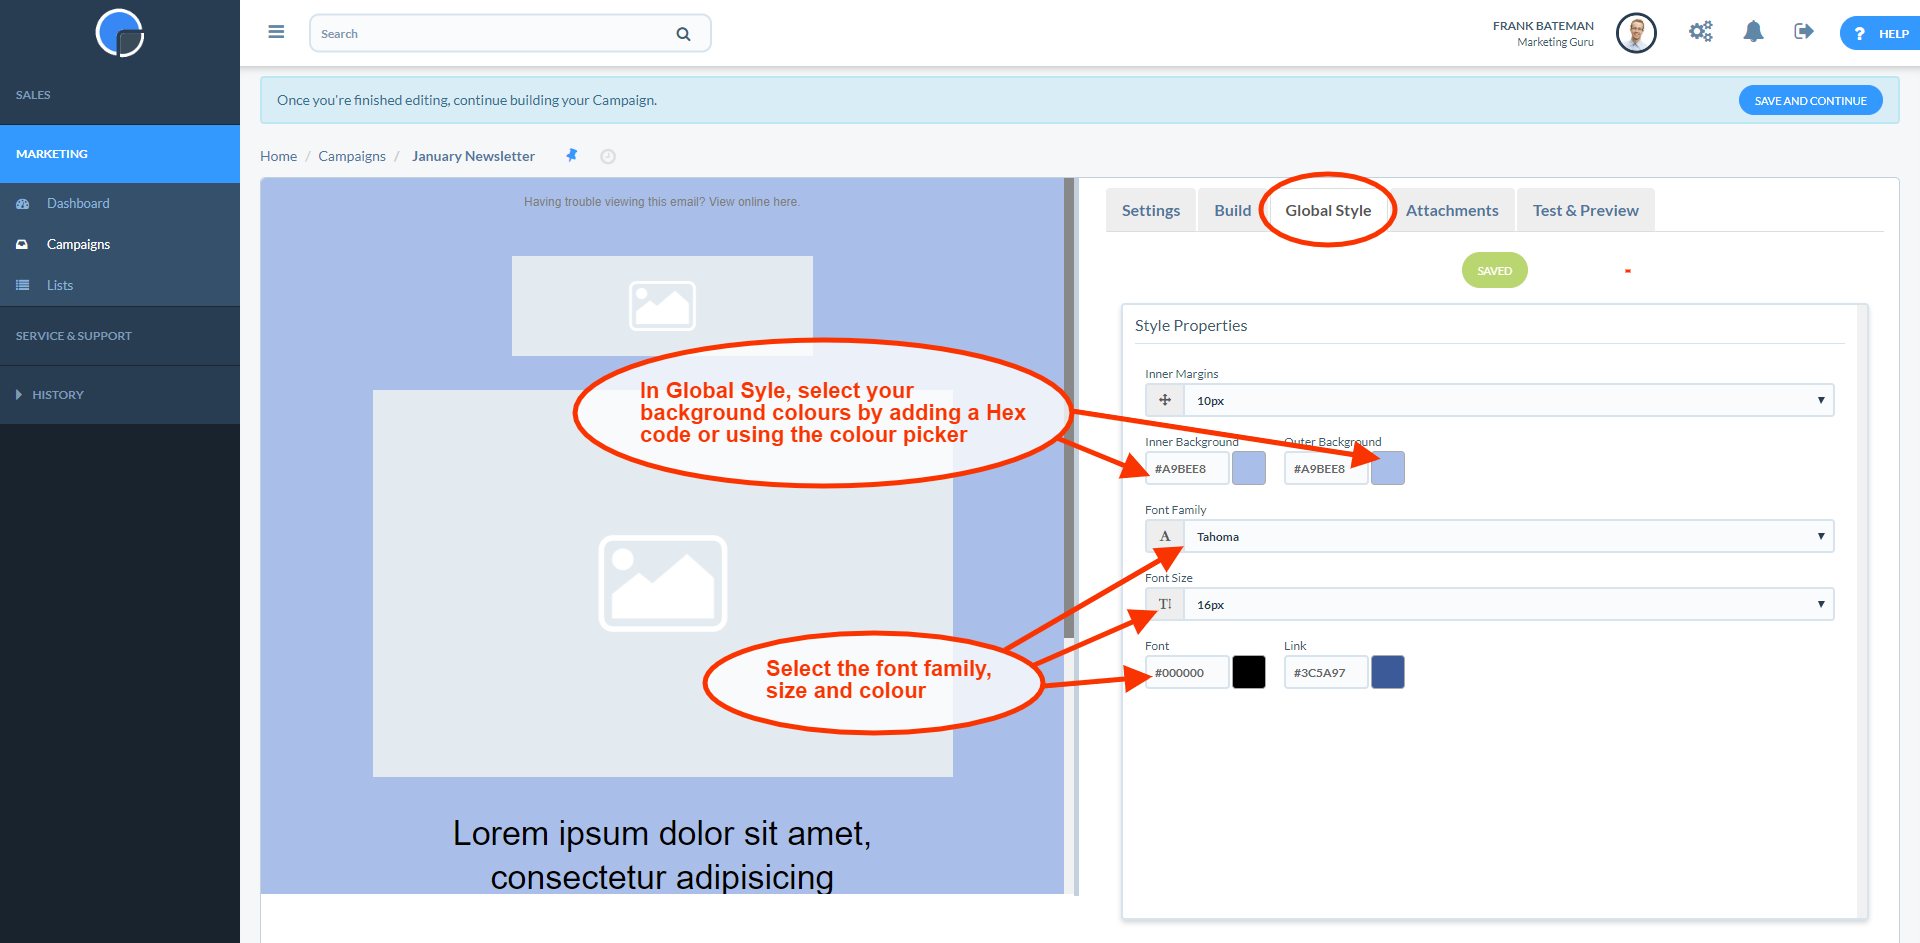
Global Style
In the Global Style tab you can set the font, colours and margins you wish to use across your email. You will also be able to make changes within the individual sections in the design, but this sets the overall styling or your email.
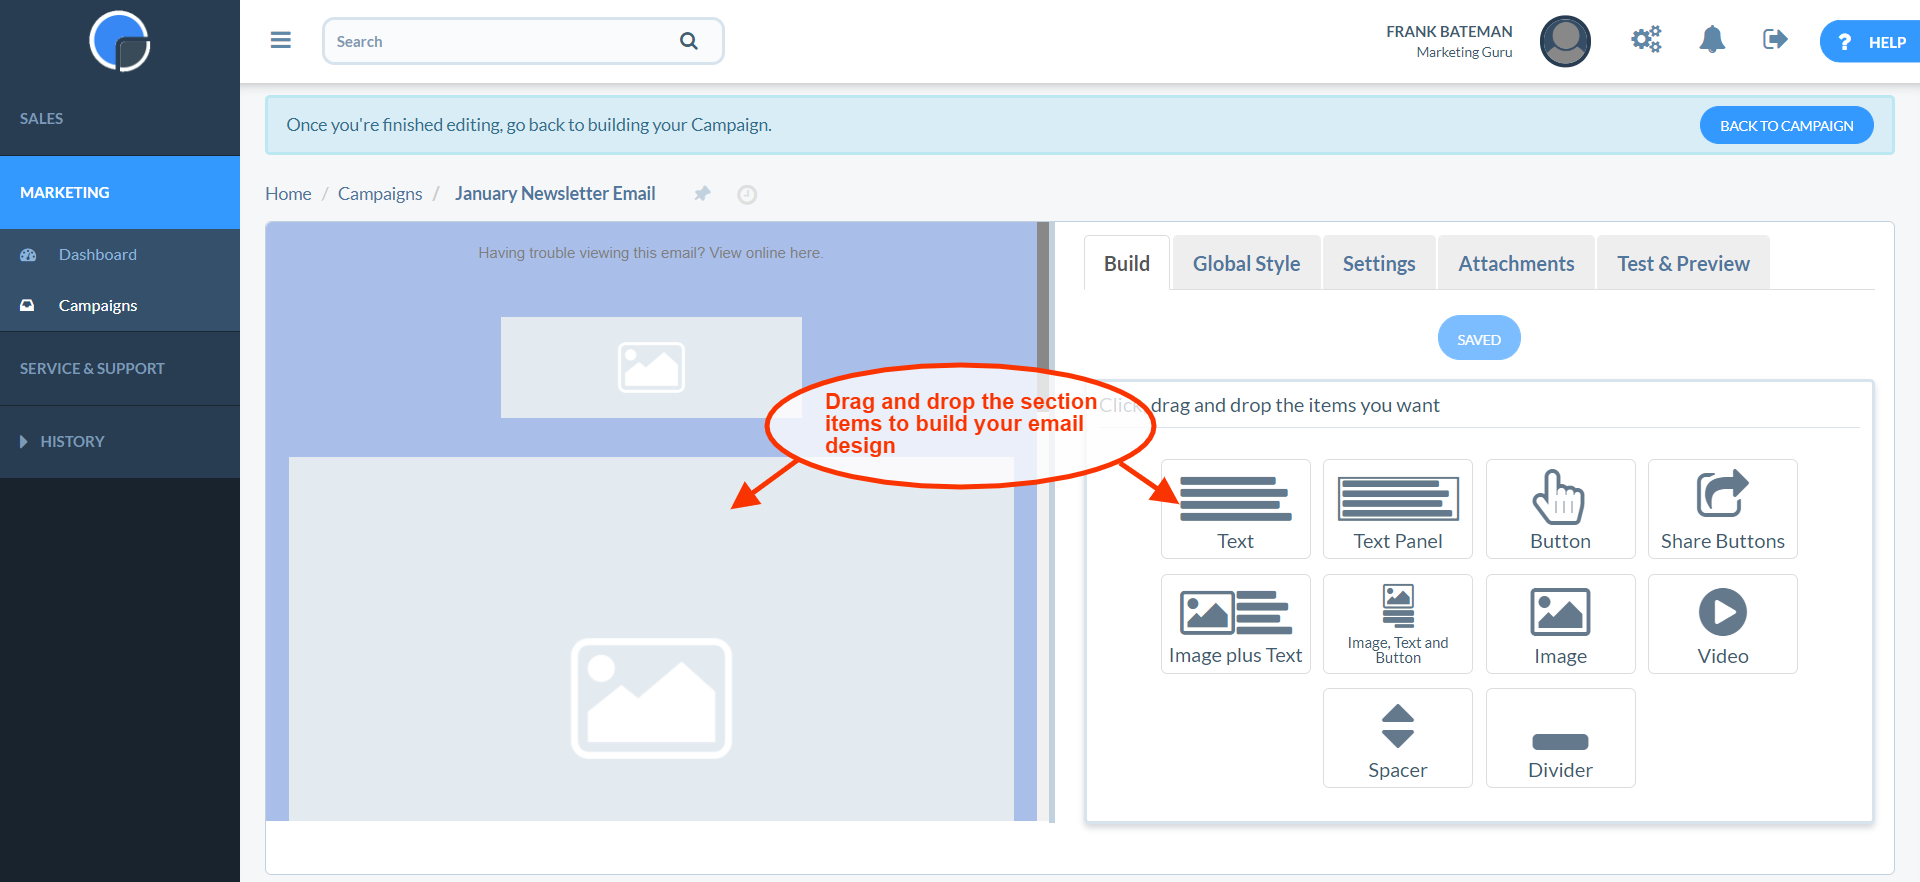
Build
Clicking on any of the elements in the email design will open the appropriate section in the Build tab to add your Content, e.g. to add images and text, and to edit the Style and Settings for that section.
You can also add more sections to the template by dragging and dropping a Build section to your design, e.g. videos, buttons and spacers. You can delete any sections you don’t want by clicking on it and then clicking the “x” in the top right-hand corner.
Once you have completed your design click to Save.
Attachments
In the Attachments tab you can add documents to your email by dragging and dropping a file to the panel or by selecting a file from your computer. Valid document types include PDFs, image files such as JPGs and PNG files, Word docs, and Zip files.
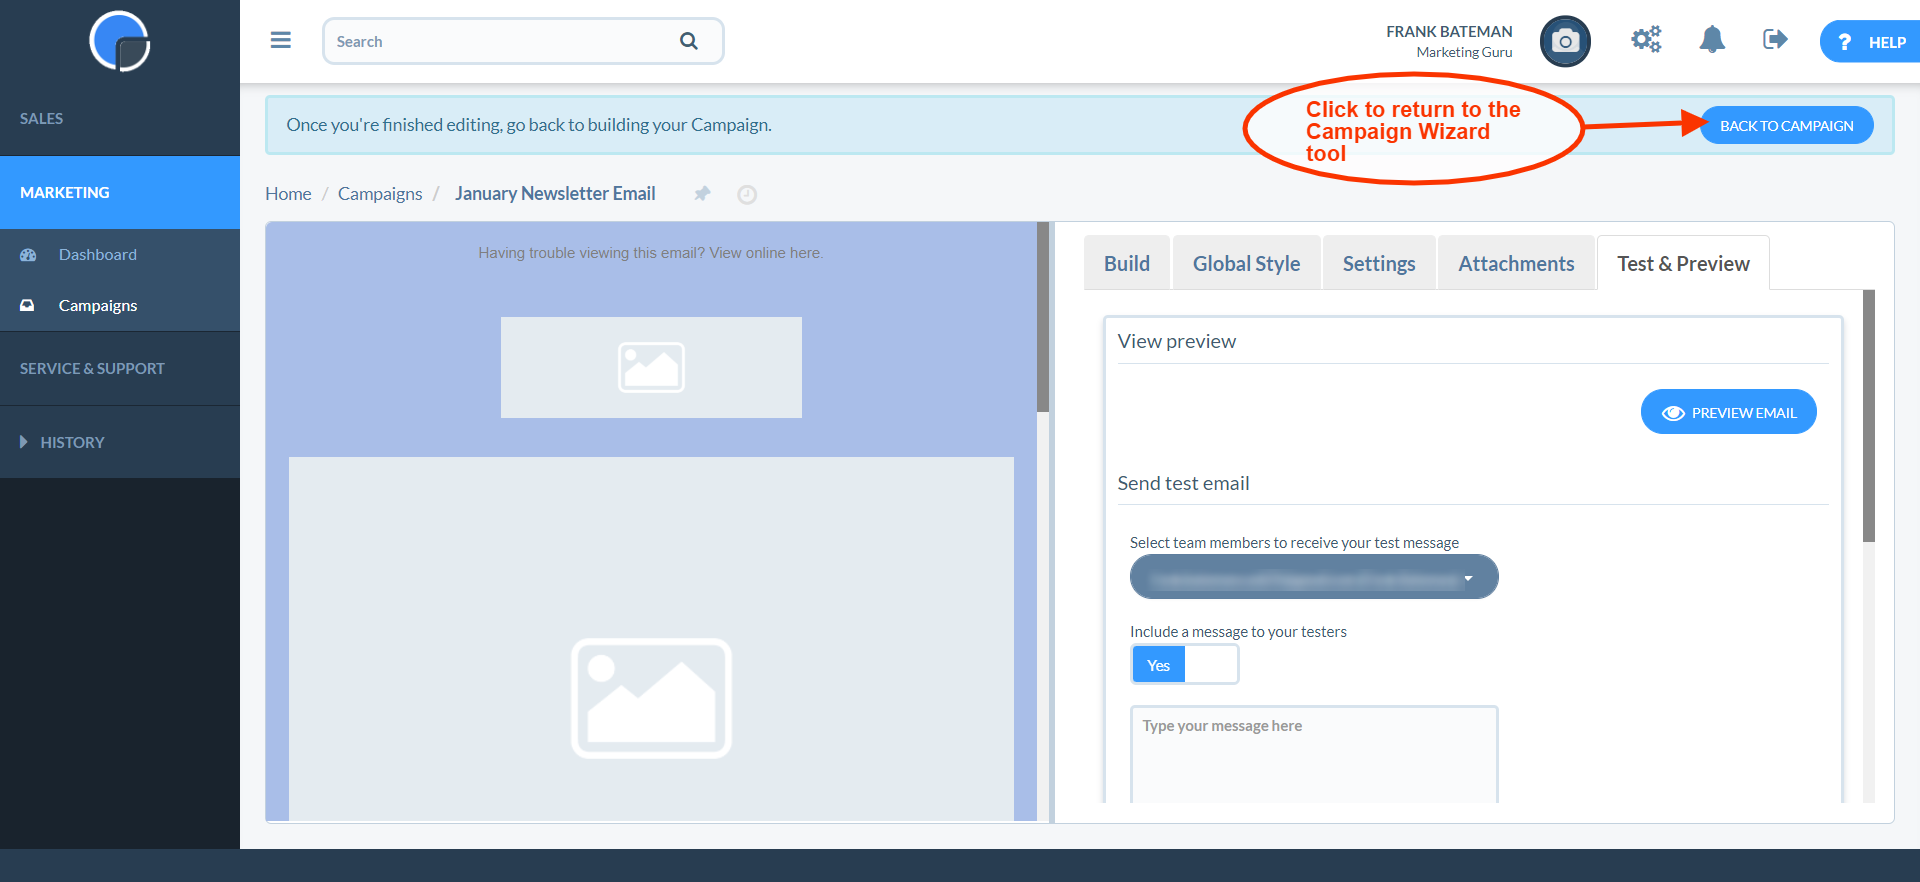
Test & Preview
In the Test & Preview tab you can preview your email to show you how your design will look when opened on both laptops and phones. You can return to the Build tab if you need to make any adjustments.
You can also test your email by sending it to yourself as well as any colleagues.
When you have finished designing and testing your email, click “Back to Campaign” at the top of the page to return to the Campaign Wizard tool.
Find more information on Designing Emails.
Setting Up and Using Mailing Lists
Find more detailed information on Mailing Lists.
The Lists tool in your Simple Marketing plan allows you to create sophisticated segments of your contact database. You can create a “Static” list that includes all your contacts, or a selected group, that you can save, re-use and edit as you wish. You can also create “Dynamic” lists where you can set a filter criteria that automatically updates the list with any changes to your contacts, for example, if a new customer is added.
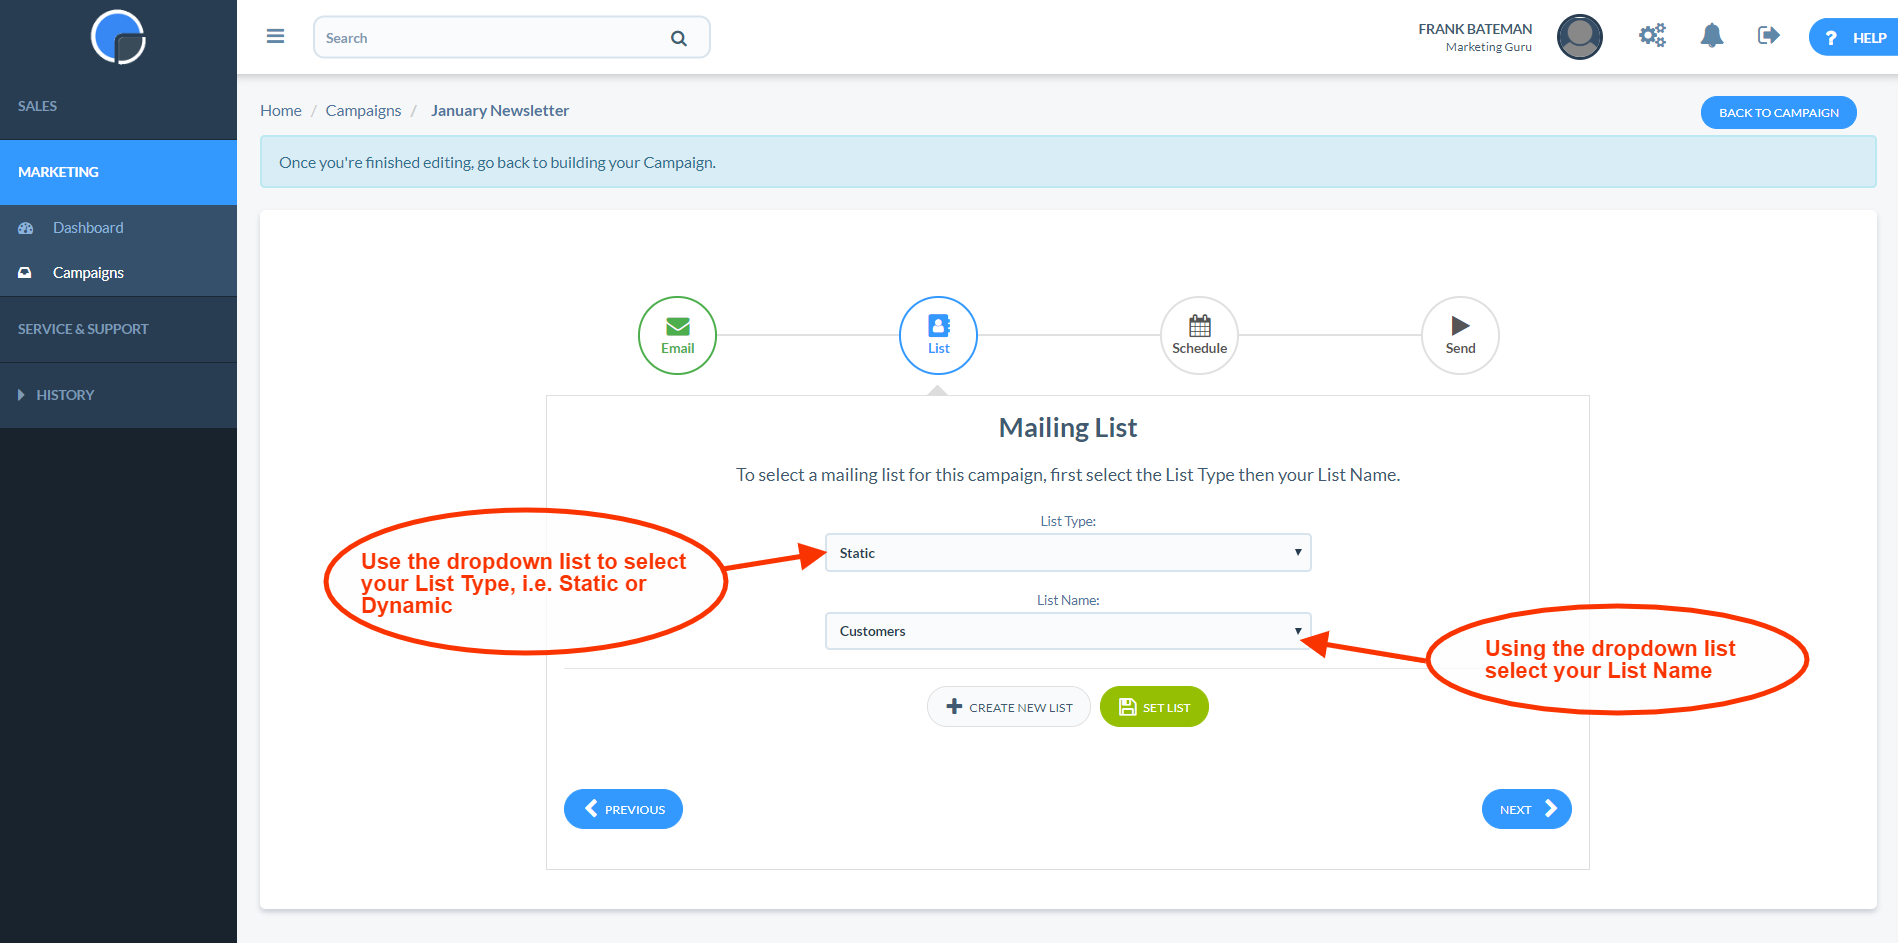
Select a List
Using the dropdown menu, select the List Type you want to use, i.e. a “Static” or “Dynamic” list. Once selected, a second dropdown menu will appear displaying the List Names you have saved for that List Type.
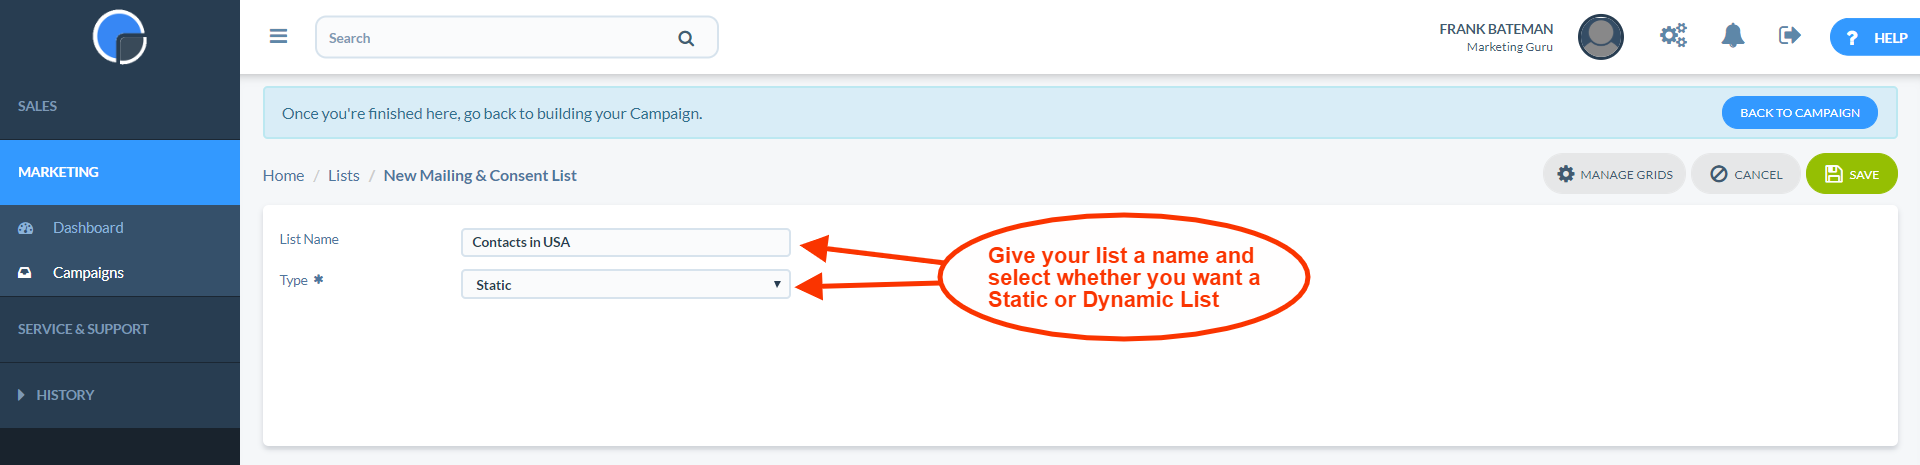
Create a New List
To create a new list, click on the Create New List button, give your list a name and select the List Type, “Static” or “Dynamic”. Then Save.
Then click “Add” to select which contacts, or List Members, you wish to add to the list.
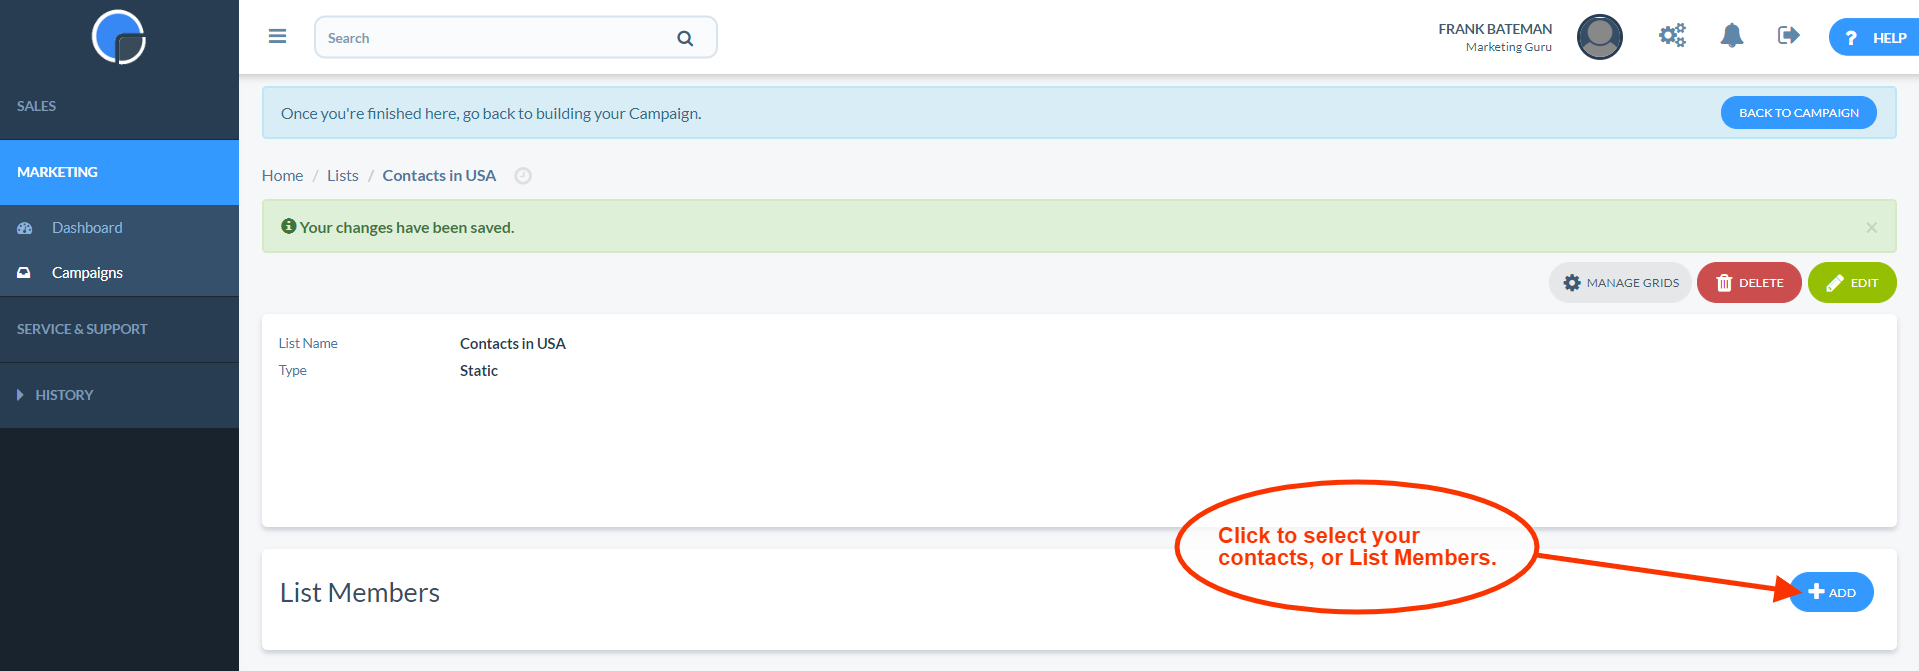
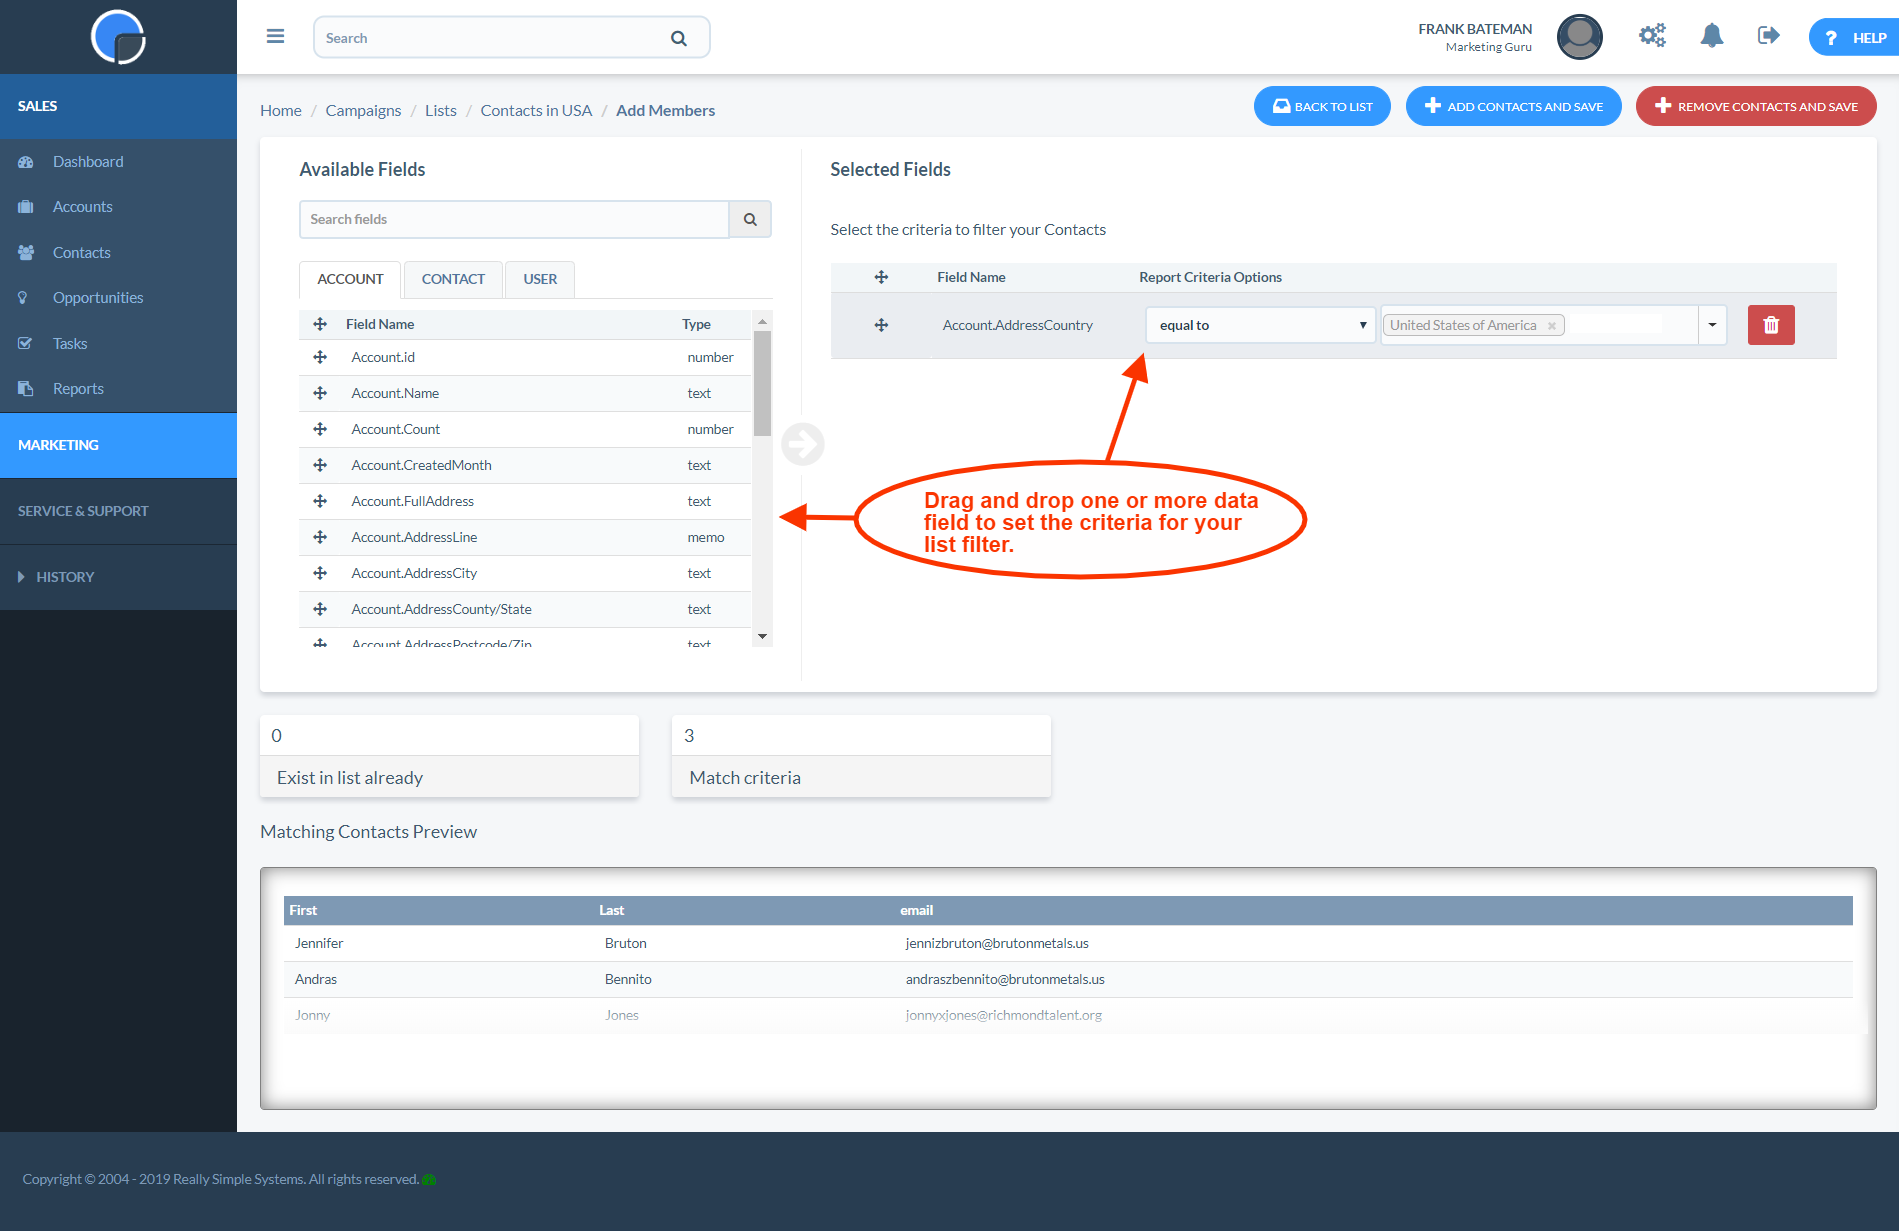
This will open a page, similar to the CRM Reporting tool, where you can filter your contact database using the data fields in your CRM.
In this example, we have filtered using the “Account.AddressCountry” field is “equal to” “United States of America”. If you want to include all the contacts in your database simply leave the criteria fields blank. At the bottom of the page you will see a box displaying how many contacts you have that match the criteria along with a preview of the list.
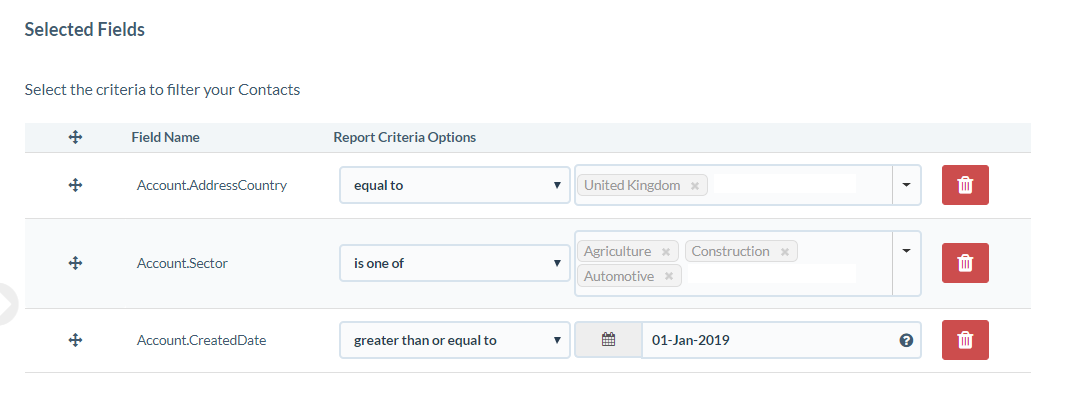
You can build up complex segments using multiple criteria filters to drill-down on your specific contact data. In the example below, we’ve selected contacts based in the United Kingdom in the Agriculture, Construction or Automotive sectors that were created in the CRM on or after 1 January 2019.
Once you are happy with your selection click “Add Contacts”. You can continue adding more members to the list, or you can delete ones using the same method and then clicking “Remove Contacts”. You can view you list by clicking “Back to List”.
Dynamic Lists
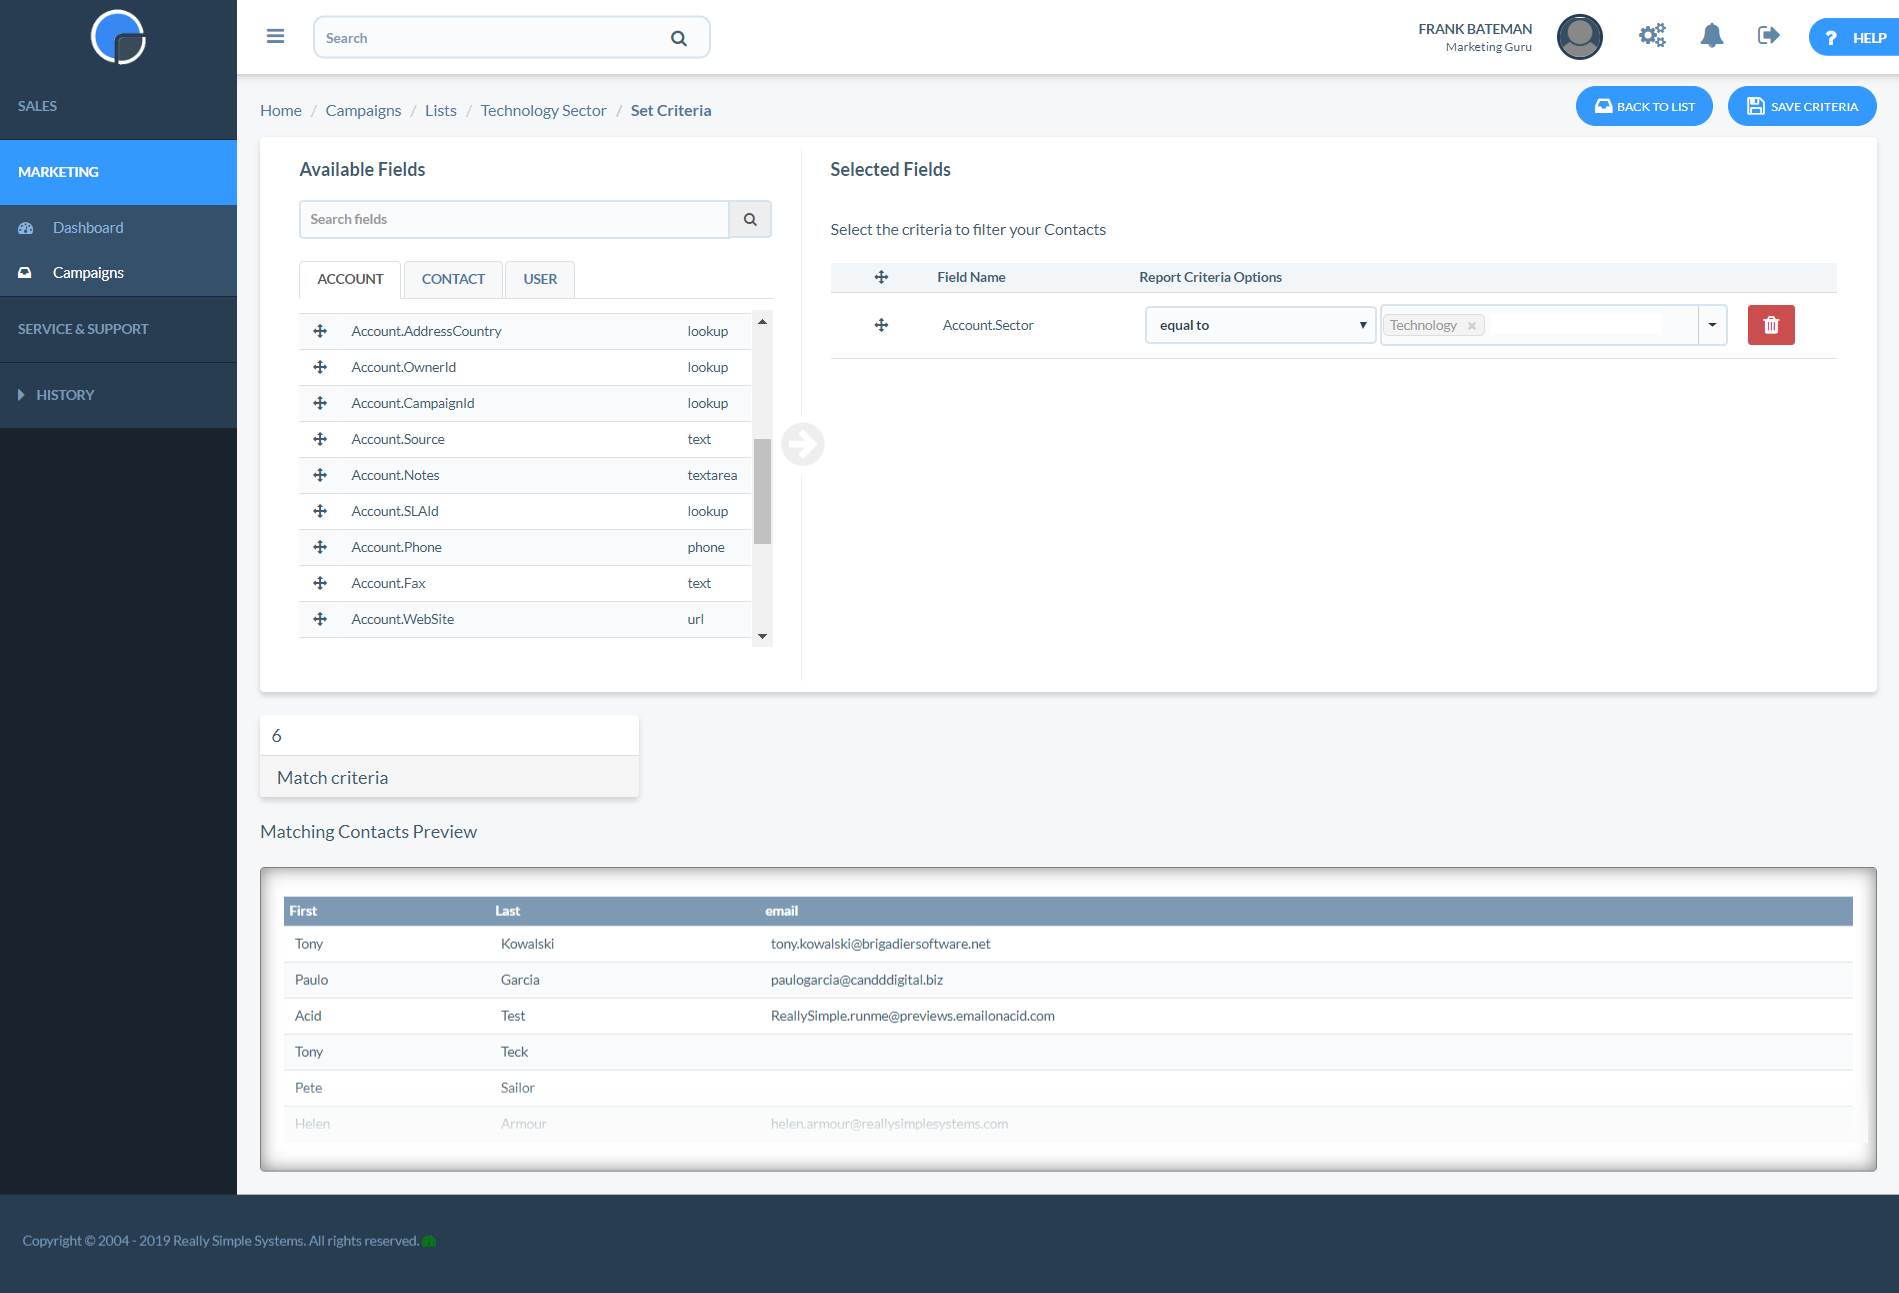
To create a “Dynamic” list the process is similar. Create a new list and give it a name but select “Dynamic” for the list type, and Save.

Rather than adding contacts to the list, you just set the criteria. In this example we have set the criteria to be “Account.Sector” is equal to Technology. Saving this criteria will mean the list will automatically update to include all contacts in the Technology sector at the time of sending the mailing.
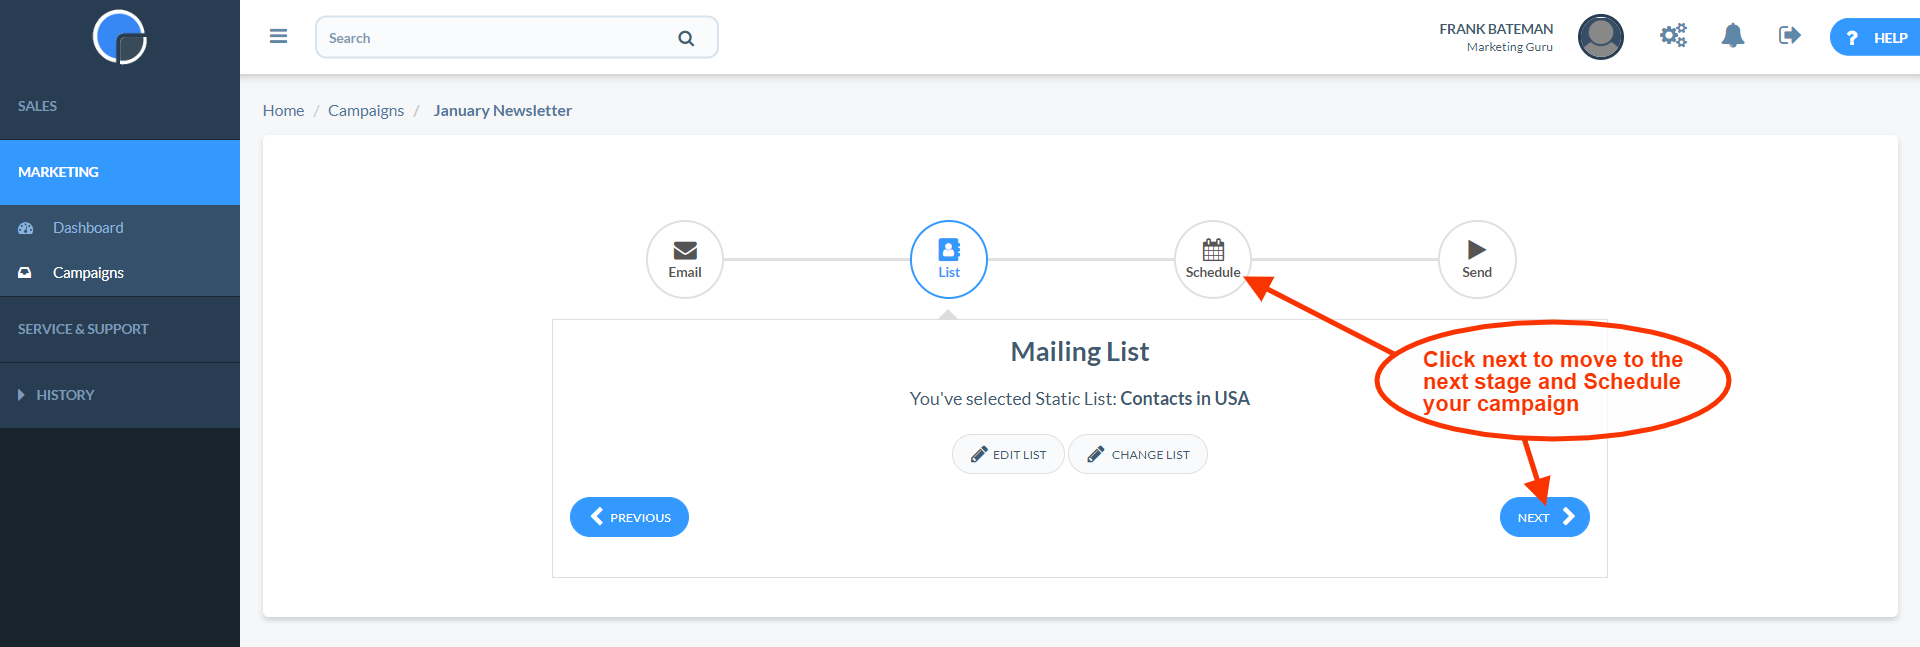
Once you have set the Mailing List, click next to move to the next stage and schedule your campaign mailing.
Find more information on Mailing Lists.
Schedule & Send Emails
Find more detailed information on Scheduling and Sending.
In the Schedule page, selecting the Schedule option will bring up a date picker where you can select the date and time to send your message. Alternatively, you can select to Send Now.
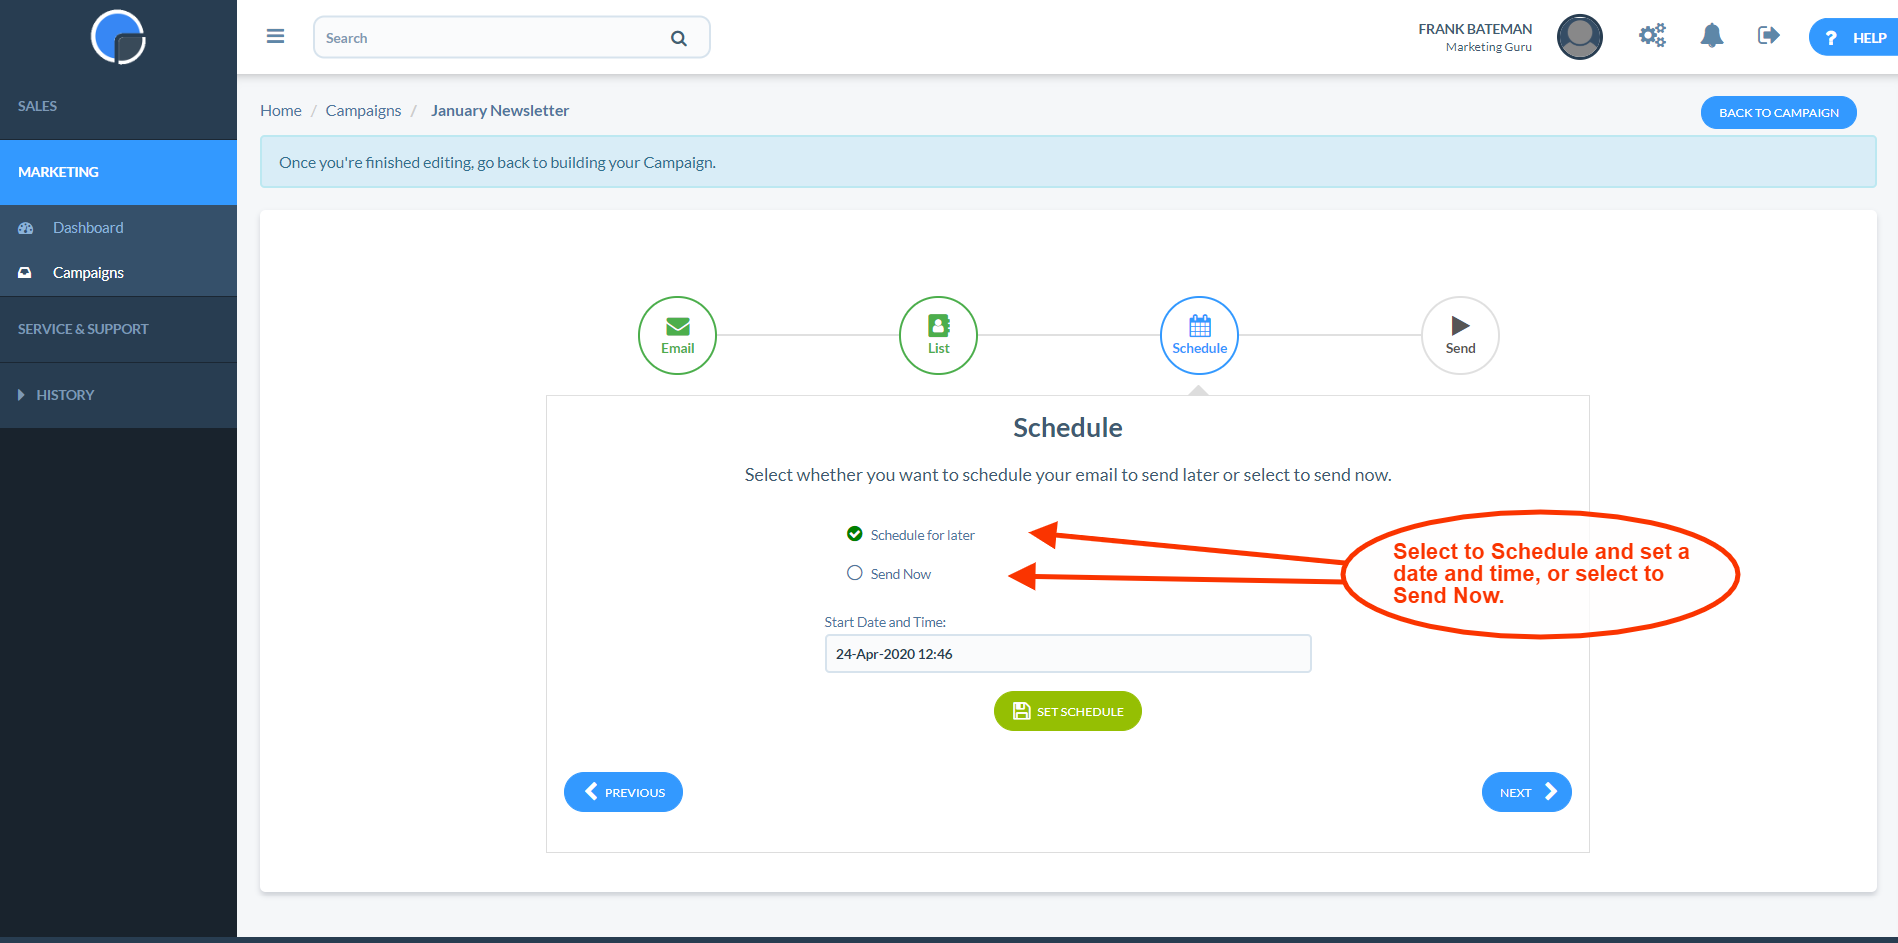
Click Next to move to the final stage of your campaign.
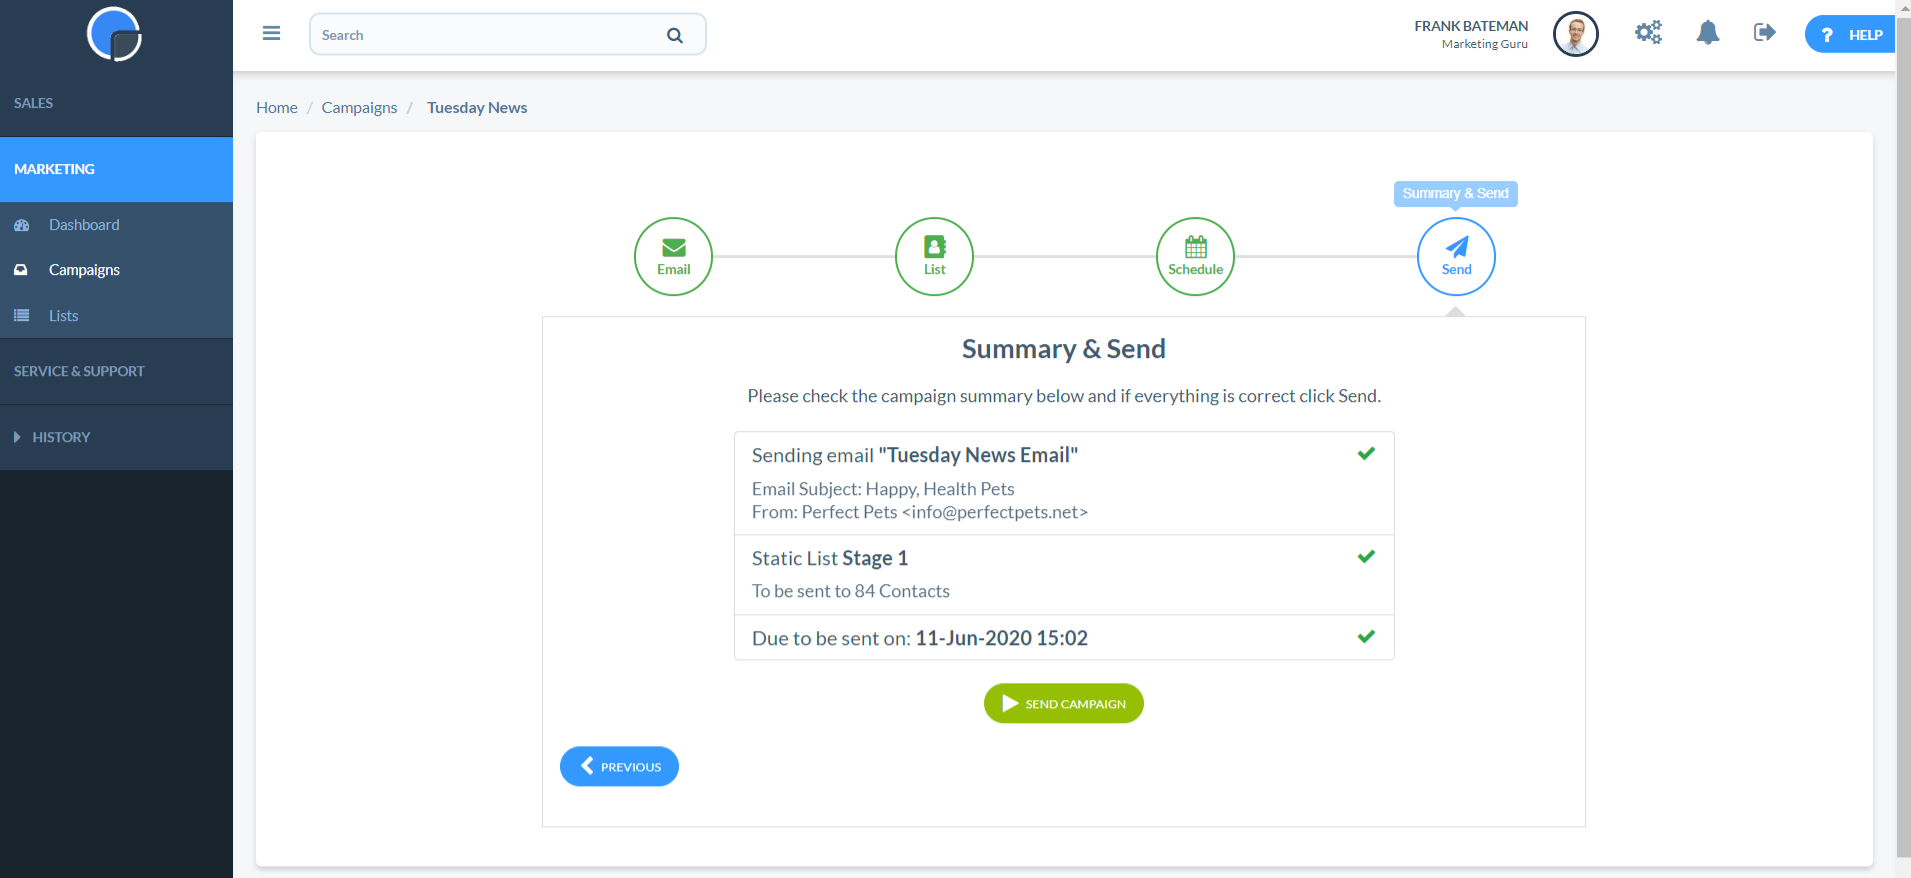
Summary & Send
In the Send stage of the Campaign Wizard you will see a summary of your campaign, showing your selected email, the selected mailing list and the scheduled date and time. Clicking “Send” will add your email to the mailer queue to be sent in a controlled process on the date and time you have selected.
Find more information on Scheduling and Sending.
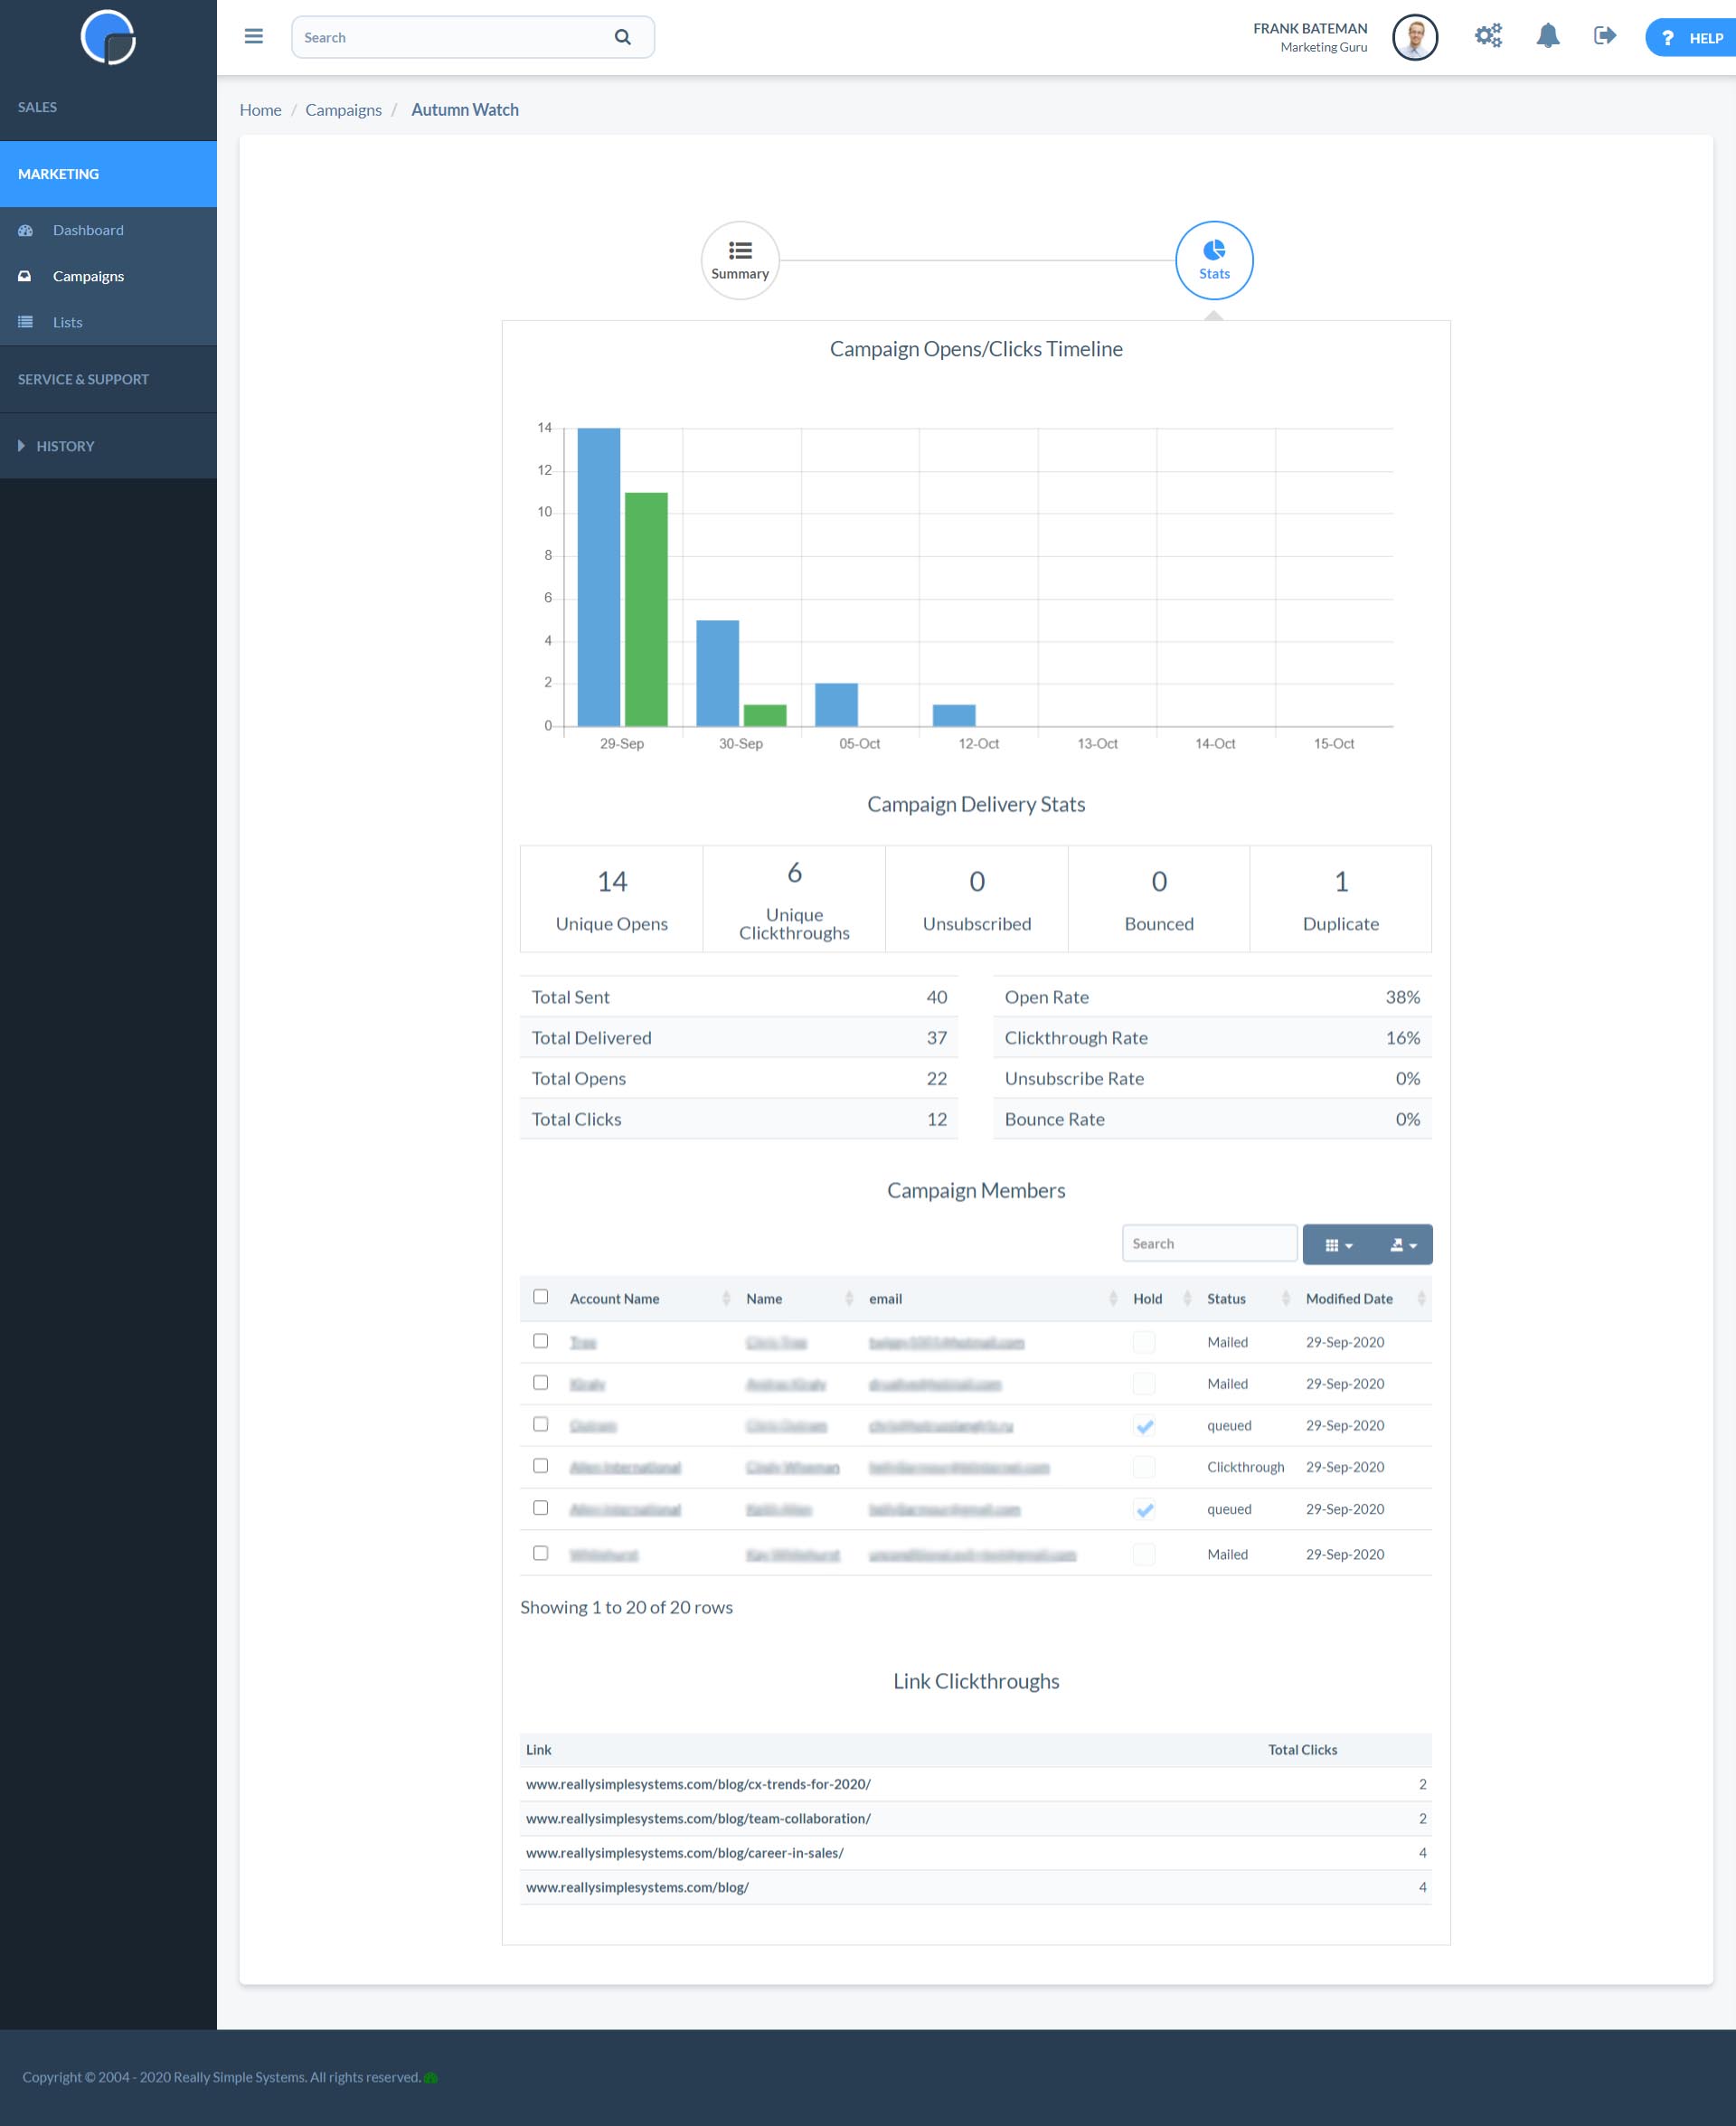
Campaign Stats
Find more detailed information on Statistics.
Once your campaign has been sent you can open it to view the mailing statistics and see how your campaign performed.
Find more information on Statistics.