Managing Contacts
Watch our tutorial video “How to Add a Contact”.
Contacts are the individual people within your Accounts (the companies and organisations you do business with).
Adding Contacts
When adding Contacts, open the relevant Account (or create a new one). Scroll down to the Contacts grid/table and click the ‘+ Add‘ button. Alternatively you can enter the Contact’s details directly into the empty lines on the Contact grid, then click the ‘save’ icon.

Really Simple Systems CRM is designed specifically for B2B (business to business) markets, so Contacts always belong to Company Accounts. If your business is B2C (business to consumer) you can create an Account with and individual’s name and add the Activities & Tasks to that.
N.B . If you want to link an Opportunity, Task or Activity to a specific Contact within your Account you can create a Custom Field in our Dropdown List called ‘ContactName’.
Editing Contacts
To edit an existing Contact, click on the contact name to open the contact form and then click Edit. Edit the contact form and save. The form allows you to record who is the decision maker on the account and if they have a different address from the company account. If you are using the Marketing tool, you can set the contact to “hold” so they do not receive you marketing emails. The contact will automatically be set to “hold” if they have unsubscribed from your emails.

Moving Contacts
If any of your Contacts move company you may want to move them to another account. To move a Contact, click the checkbox next to the contact’s name in the summary table, with this action a new function button ‘More’ will appear above the table. Click the ‘More’ button and select ‘Move to’ from the dropdown list.

Clicking ‘Move to’ will open a pop-up box for you to search for the Account you wish to move them to. Search for the Account you want, click the Account name and click ‘Move’.

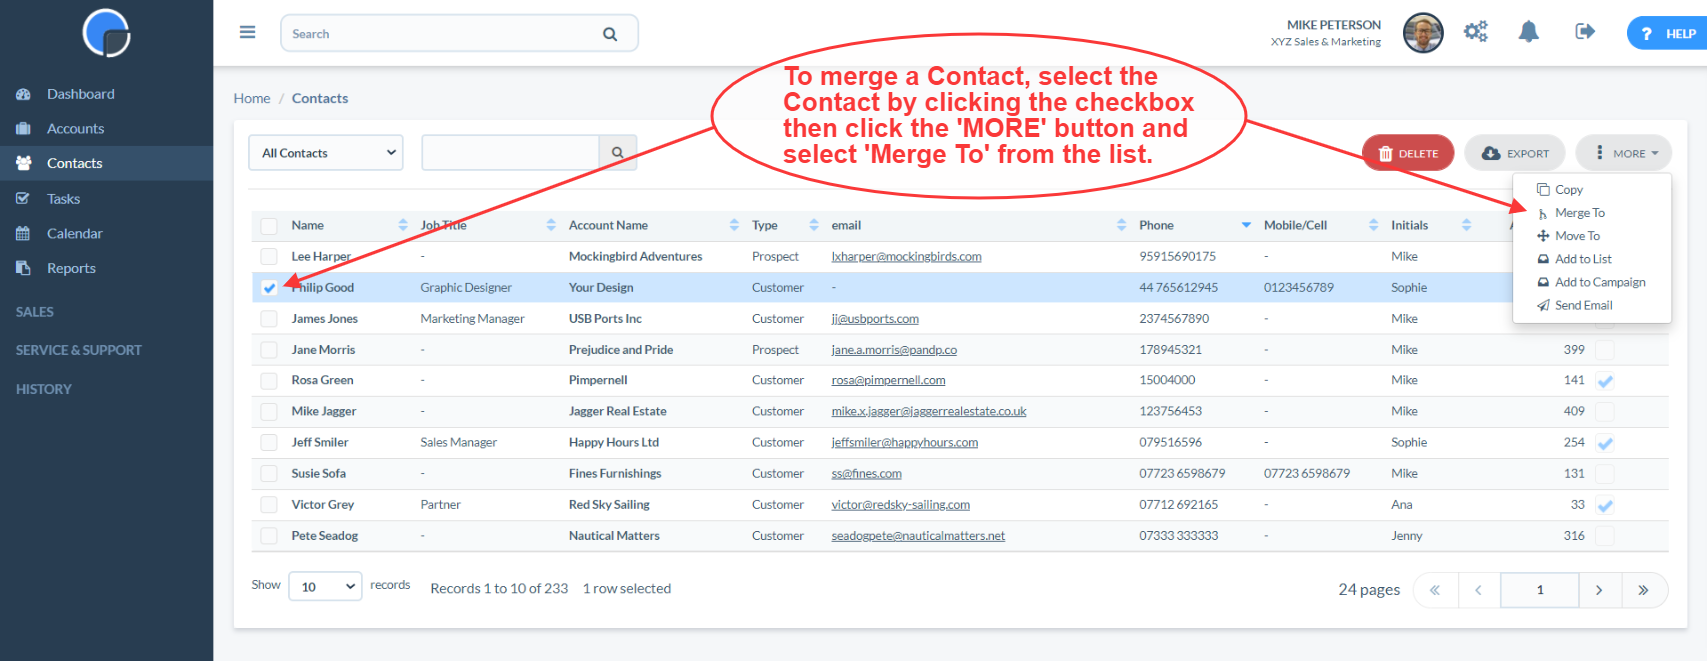
Merge Contacts
You can merge a Contact, similarly to how you can Merge Accounts. By clicking the checkbox next to the Contact name a new function button ‘More’ will appear above the table. Click ‘More’ and select the ‘Merge to’ option. This will display a popup box were you can search and select the Contact you wish to merge to.
Please note:
- Only 2 records can be merged at one time.
- Data from the source record will not overwrite the data in the destination record, unless the field is blank.
Copy Contacts
You can also copy a Contact following the same process as for moving and merging, then selecting the ‘Copy’ option form the dropdown list.
Add Contact to a Campaign / Send Email to Contact
If you are using the Marketing tool, in the same way as you might move a Contact, you can also add them to a Campaign and/or send them an Email.
Click the checkbox next to their name in the Contacts grid/table, then click on the ‘More’ button. Select the option you want, i.e. Add to Campaign or Send Email, and select the Campaign or Email required using the search box. Click the blue action box to complete the procedure.

Add a Contact to a Consent List
You can add an individual contact to a Mailing & Consent List, if consent has been given. In the Contact record, scroll down to the Mailing & Content section and click ‘+Add’. Use the dropdown list to select the Mailing & Consent List you wish to add them to, add the date of consent, and the consent description.
