How do I get started with my CRM?


Key Definitions

  • Accounts are the names of the companies and organisations that you deal with. These include your customers, prospects, partners and, if you want to, your suppliers, press publications and analyst organisations. An example account would be a company like BHP Minerals.
  • Contacts are the people who work in your accounts. For instance, you might have a contact called John Brown who works in BHP Minerals.
  • Opportunities are potential sales that you have identified in an account. For example, you might have an opportunity to sell 5,000 widgets to your Account BHP Minerals.
  • Tasks are things you need to do, for example, call John Brown back on 15th August.
  • Activities are records of things that you have done, for example the summary of a telephone conversation with BHP Minerals.

2. Your Dashboard

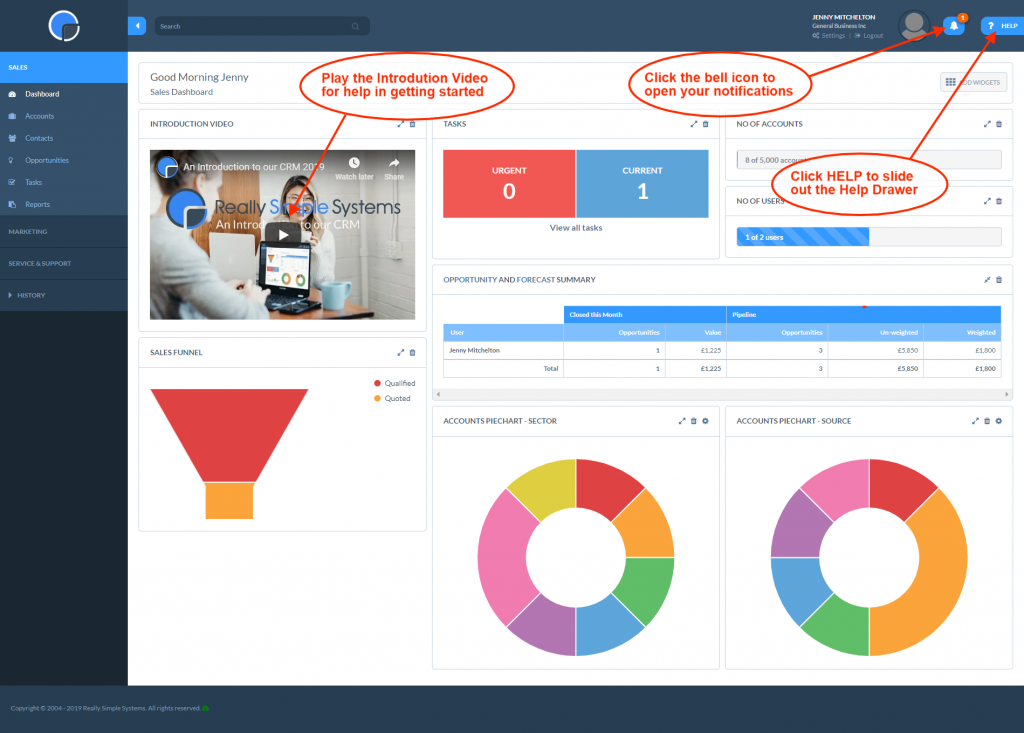
When you first login to your new CRM system you’ll be taken to the Sales Dashboard. We have pre-loaded some demo data so you can see how your CRM will look once your add your own data. You can delete these Accounts at any time by going to Settings, Data Management then clicking Delete Demo Data.

If you are a new user you’ll be invited to take a walkthrough of the CRM dashboard. This will show you how to access the key elements of the page. If you wish, you can come back to this later by clicking the link on the Help Drawer, see below.
CRM Getting Started - Really Simple Systems CRM

Introduction Video

To help you get started we recommend you watch our tutorial Introduction Video. This will explain the main features of the CRM and how to use them.

Help Drawers

Your CRM includes a pull-out Help Drawer on each page that will explain how to use that particular page or feature. To open the Help Drawer click on the blue “? HELP” tab in the top right-hand corner of your screen. Where appropriate, the Help Drawer includes video tutorials and links to this Customer Support Hub for further information.

If you wish to replay the dashboard Introduction, open the Help Drawer and click on Replay Sales Introduction.
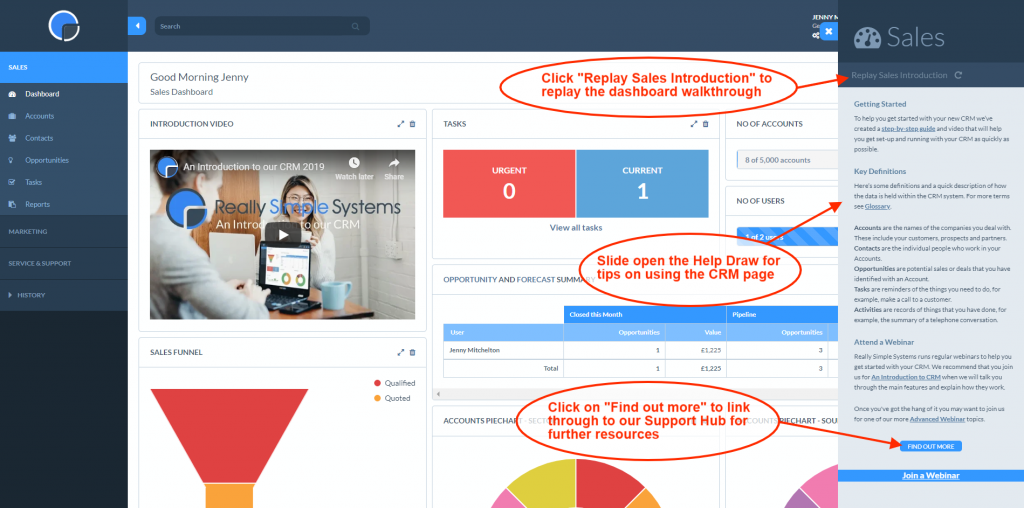
Slide out the Help Drawer for tips on using the CRM page

Notifications

Clicking the bell icon will open your notifications. At first these will include links to help you get started including an invitation to attend our weekly introductory webinar. We will keep in touch from time to time with relevant information to manage your CRM system.

Custom Dashboard

You can create your own custom dashboard by adding, editing and deleting the widgets to suit your business needs. Click on the Add Widgets button in the right-hand corner of the screen. Move your mouse over the widgets and click to Add or Remove each widget, then close. You can resize the widgets and move them on your screen by dragging and dropping with your mouse.
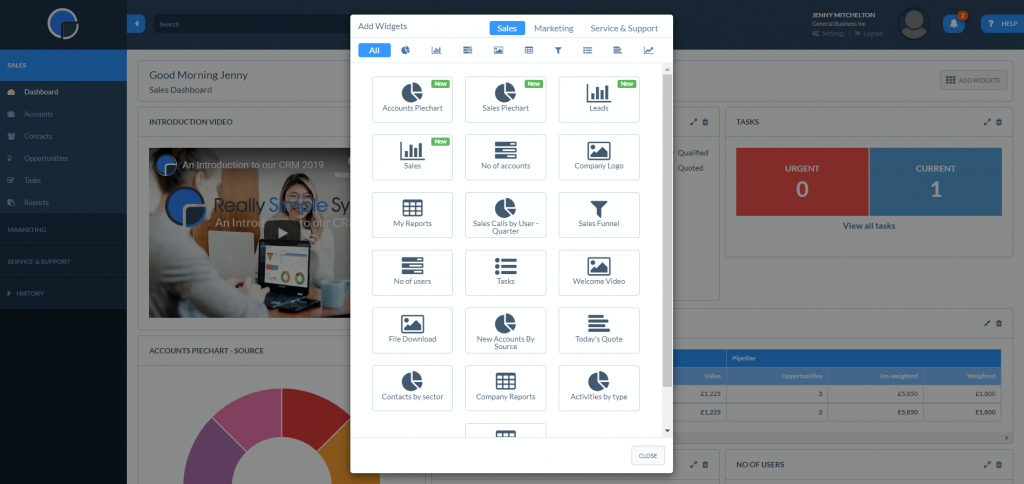
Add/Remove Widgets on your Custom Dashboard

Configurable Widgets

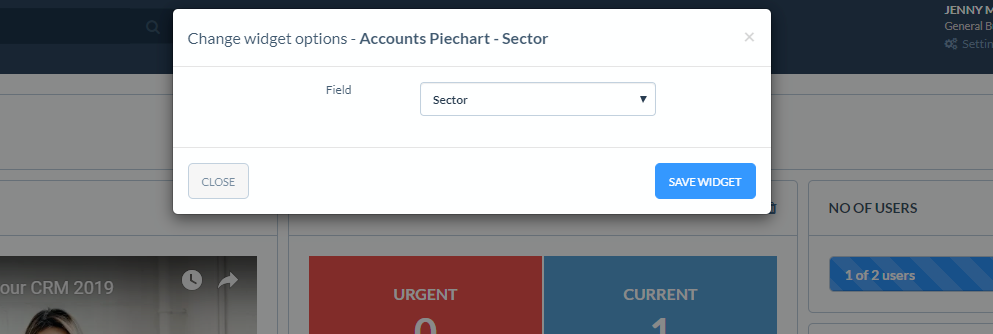
Some of your dashboard widgets can be configured to show different data, for example the Sales Piechart. You’ll see there is a settings cog in the top right hand corner of the widget which, when clicked, will display the options available. You can delete a widget by clicking the trash icon in the right-hand corner.
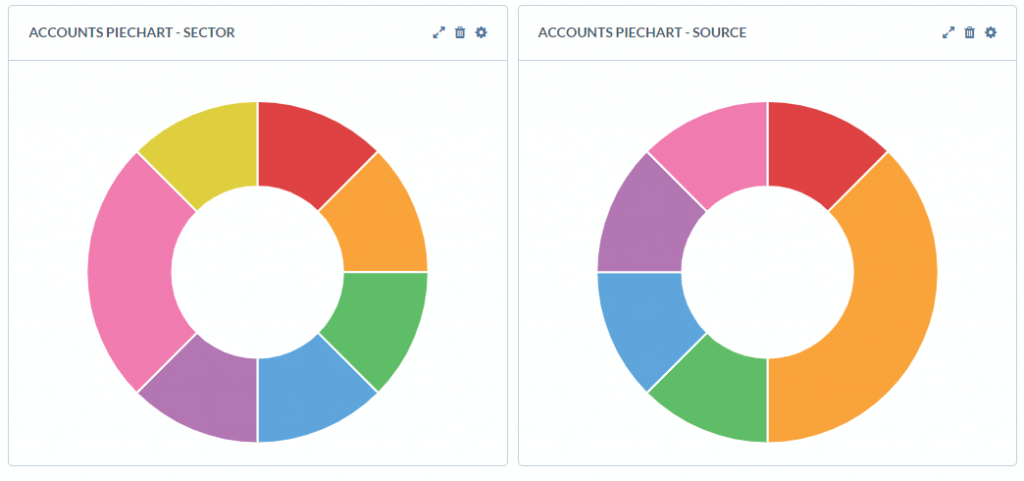
Custom dashboard widgets: Click the cog icon to edit a widget

Custom dashboard widgets

Custom Charts

Customers using our Enterprise plan also have the option to create their own Custom Chart widgets (coming soon).

Search Functions

At the very top of the page, in the blue/grey section, there is a Global search bar that will search across all the data in your CRM. The search will commence as you start to type your search term.

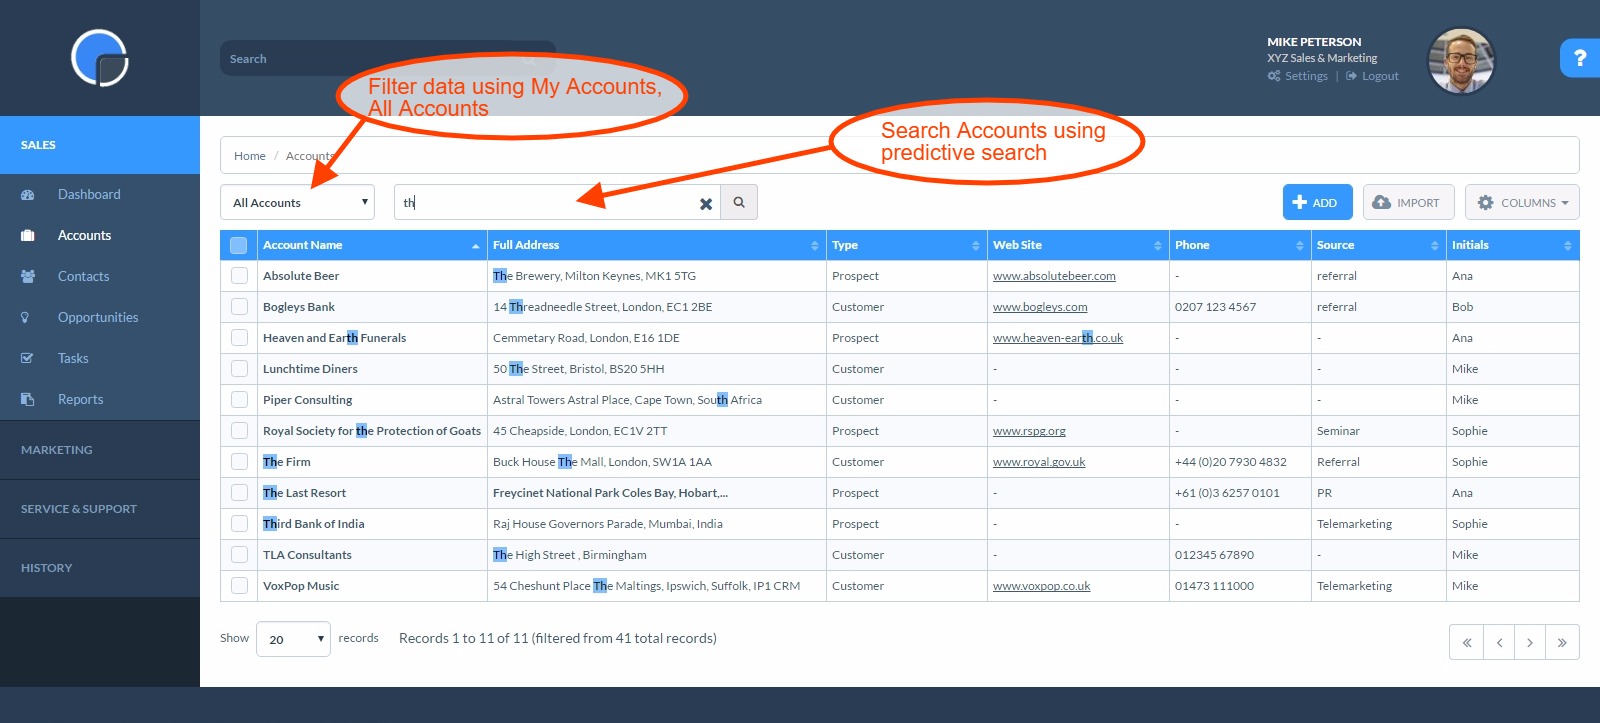
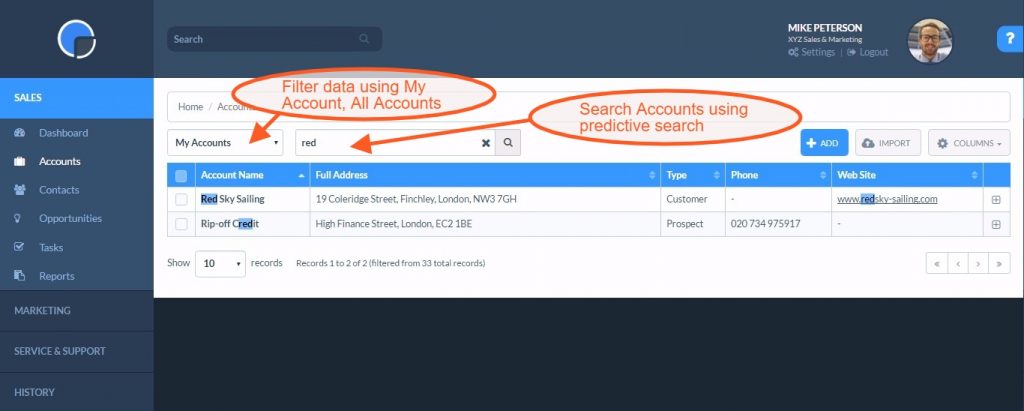
There is also a search box at the top of each of the data tables/grids, e.g. Accounts, Contacts, Opportunities. Using the predictive search feature you can search for any detail within the account by typing a keyword in the search box. The predictive search will return a list of any accounts that match your search as you type and these will be filtered the more on the word you type.
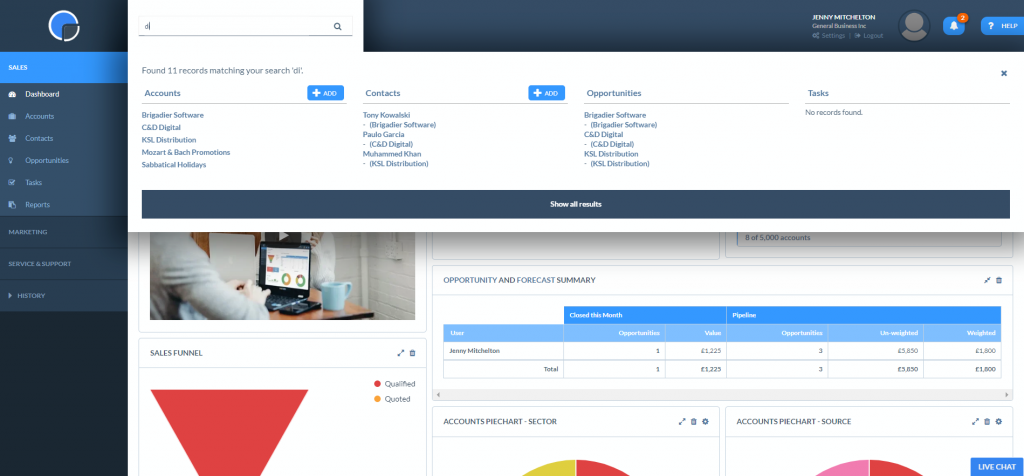
Search across all CRM data with the top search bar

3. Add Company Accounts

Watch our tutorial video “How to Add an Account”.


One of the first things you will need to do is to add some Accounts, or company records, to your CRM. Accounts are the organisations you deal with. You can then add your Contacts, the individuals you deal with at a company, to the Account.

Add Accounts Individually

On the left-hand Main Menu, click on Accounts to view your Accounts – here you’ll see the demo accounts that have been pre-loaded in your CRM. You can delete these at any time by going to Settings, Data Management, and then Delete Demo Data.

If you are just starting out and have just a few Accounts to load you can add them one at a time using the ‘+ Add’ button. Complete the details for the new account and Save. The only mandatory fields are the Account Name and Account Owner. The Account Owner is the person in your organisation responsible for managing that account. The CRM will automatically create a dropdown list of your CRM Users in the Account Owner field for you to select from.

Create an Account in your CRM

Bulk Data Import

If you already have data stored in another format (e.g. spreadsheets, Outlook, another CRM system) you can import the data in bulk to your CRM. Do refer to our Data Import page and watch the video to help you.

You will need to prepare your data as a .CSV file. If you use any specific terminology to describe your data fields you may also want to read up on Custom Settings for your CRM (see Step 5 above).

When you are ready to start importing your data, in Settings, at the top of your screen, go to Data Management then Import Data. Find out more about Importing Data.

Navigating the Accounts Page

If you have more than one user you can sort your Accounts by My Accounts, My Group’s Accounts and All Accounts, using the dropdown menu located next to the Search bar.

You can sort your Accounts data by clicking on the column titles (e.g. Account Name, Source), or you can search for the information you want using the Search bar. Using the predictive search feature you can search for any detail within the account by typing a keyword in the search box. The predictive search will return a list of any accounts that match your search as you type and these will be filtered the more of the word you type.

You can personalise the tables/grids in your CRM to suit your business needs, see Custom Data Tables.

Search Accounts - CRM getting started

More information on Navigating the CRM.

Intelligent Data Import

The Intelligent Data Import will look to match your data with the pre-set fields of your CRM. You can also create Custom Fields to fit your business needs and set up custom dropdown lists, using Custom Dropdown Lists within each field.

Need Help?

If you get stuck, just send your spreadsheet with the data in it to our customer support team.

4. Editing Company Accounts

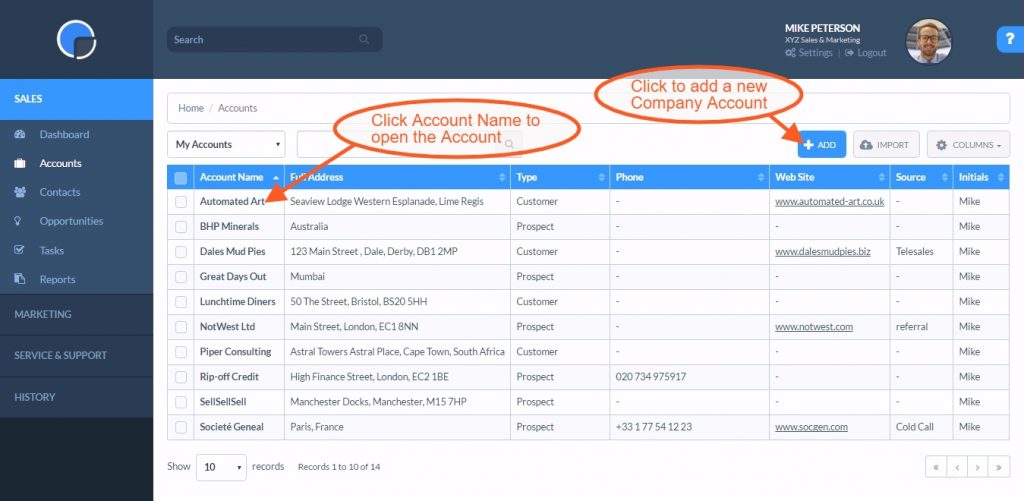
From the Accounts home page, click on the Account Name to open the account. You can add new Accounts by clicking the ‘+ Add’ icon.

Opening a Company Account - CRM getting started

Click Edit to amend the Account details, and Save. An asterisk denotes a mandatory field. To customise the dropdown fields using Custom Dropdown Lists.
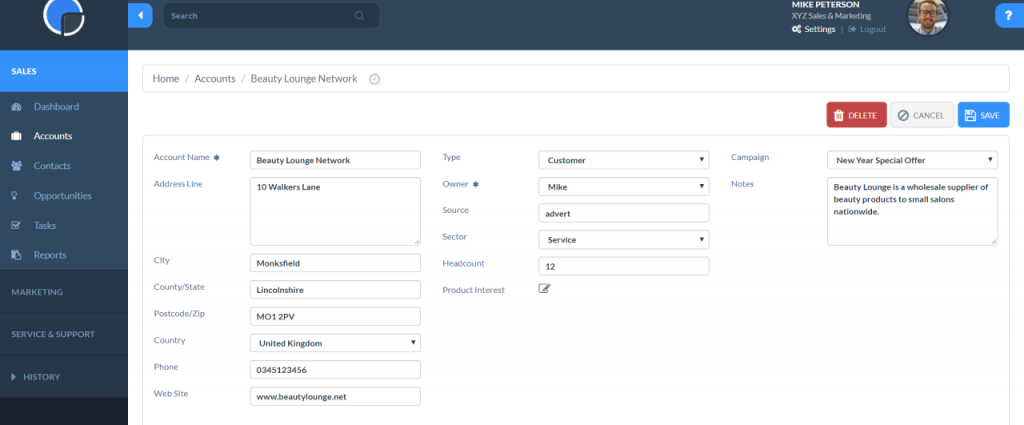
Create a new Account - CRM getting started

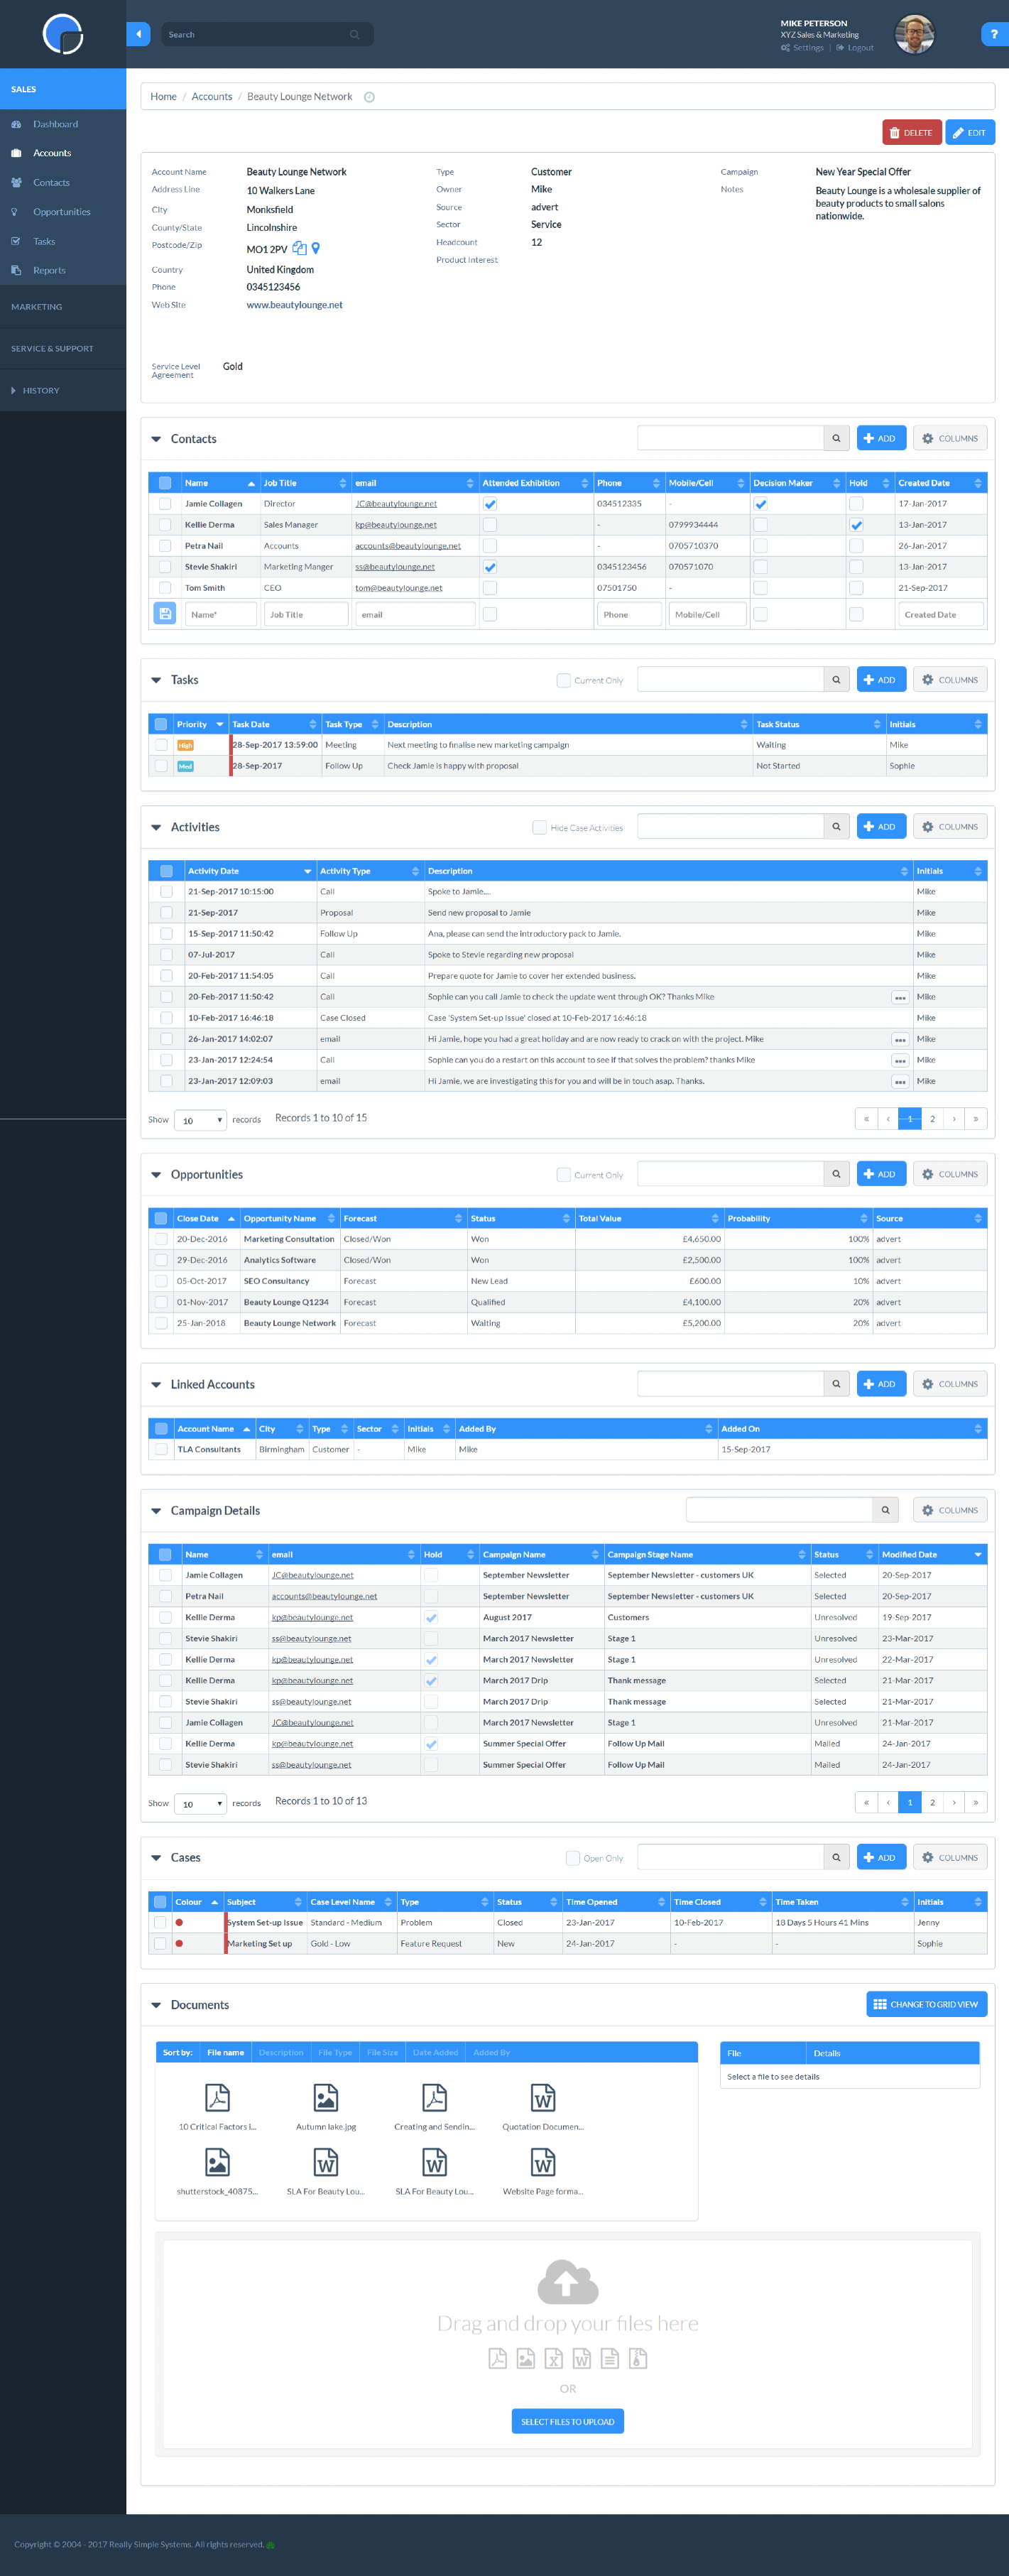
In the open account, scroll down to view the various sections, or grids within the account, e.g. Contacts, Tasks, Activities, Opportunities. To edit these sections, click the ‘+ Add’ icons, and Save.

View each customer account in full on one page

5. Custom Settings

Custom Data Tables/Grids

Watch the tutorial video “How to create custom grids/tables”


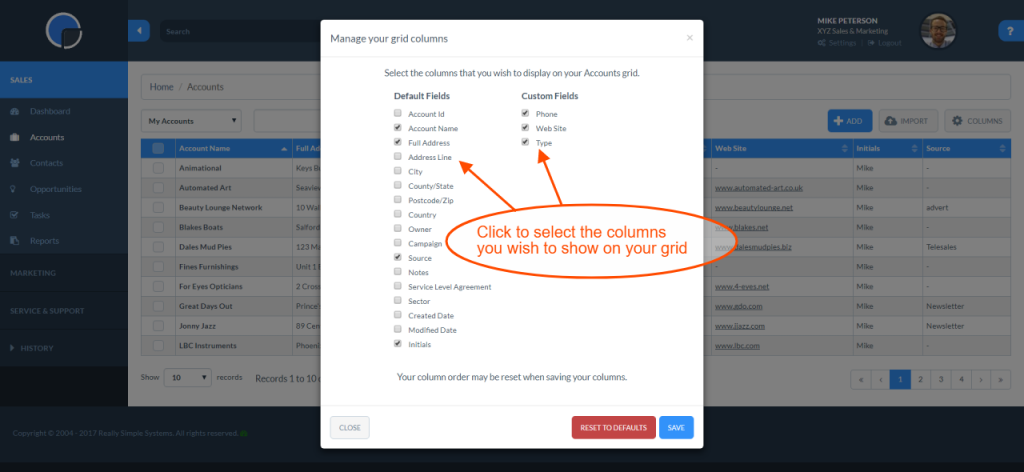
You can select which columns display in your data tables, e.g. Accounts, Contacts etc, by clicking the Columns button and selecting/de-selecting the column titles from the dropdown menu. You can also add in any Custom Fields you have created. Please see Custom Data Tables for more information.

Select Columns and customise grids

You can change the order of the columns of the data tables by simply “dragging and dropping” from the column title bar. Depending upon the size of the screen you are viewing on, you may need to de-select some columns to display the columns before you can drag and drop. Clicking the ‘+’ icon for each account, on the far right of the grid, will open the data held in the columns not visible on your screen.
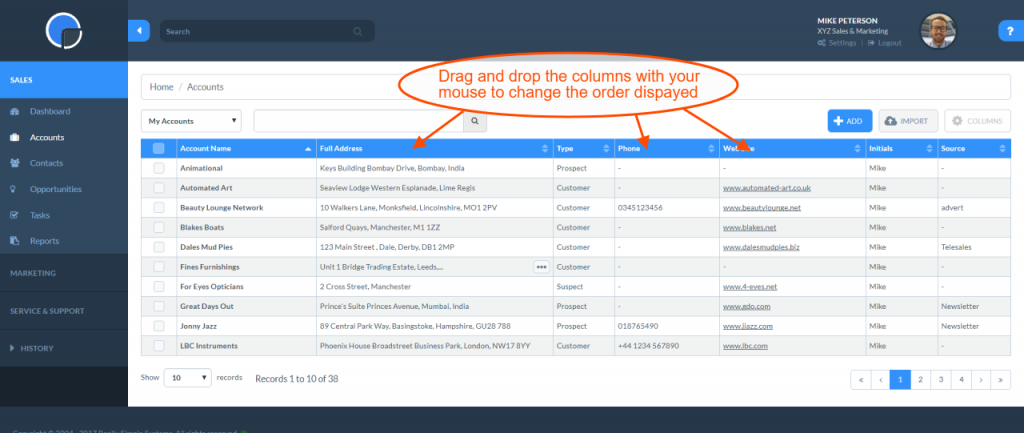
Custom Fields

Watch our tutorial video “How to create a CRM Custom Field”


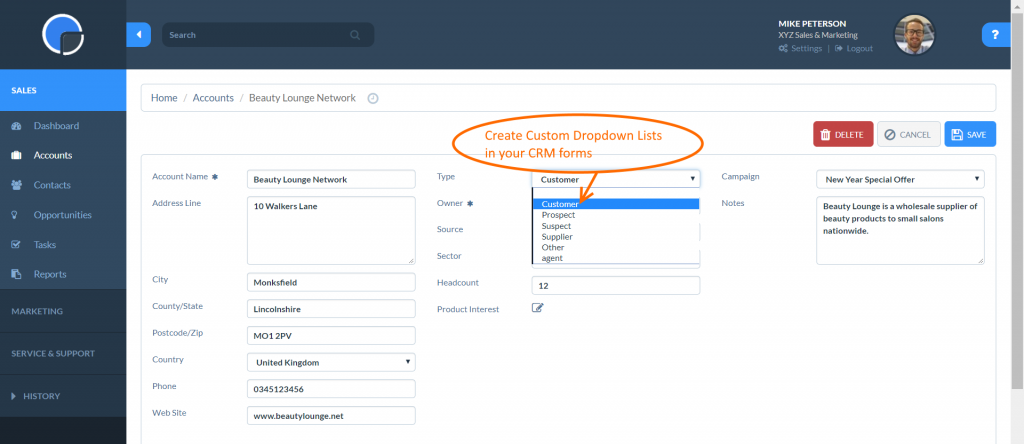
You can create Custom Fields in the forms in your Accounts, Contacts, Opportunities, Tasks etc. to meet your business needs. An example of a field in the Account screen would be Type, Owner, Source etc.

Custom Settings: Create custom fields in your CRM forms

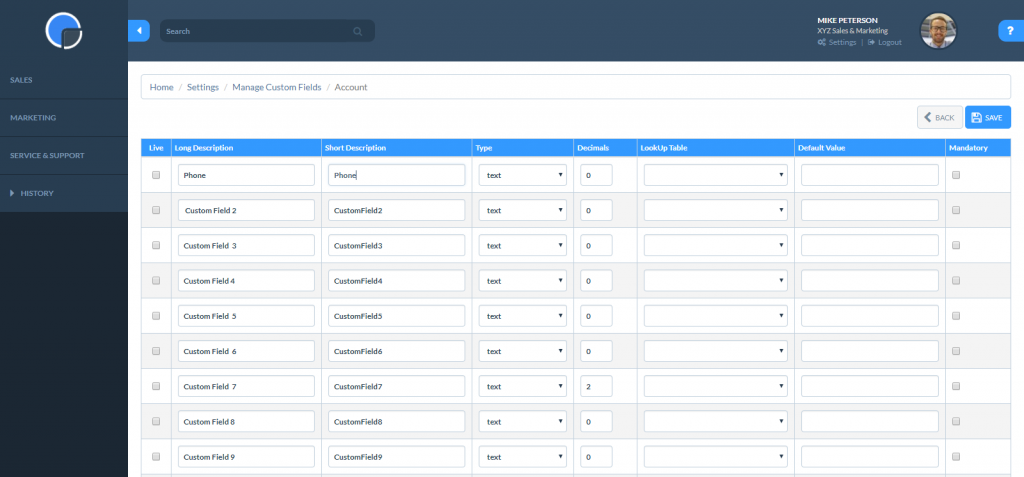
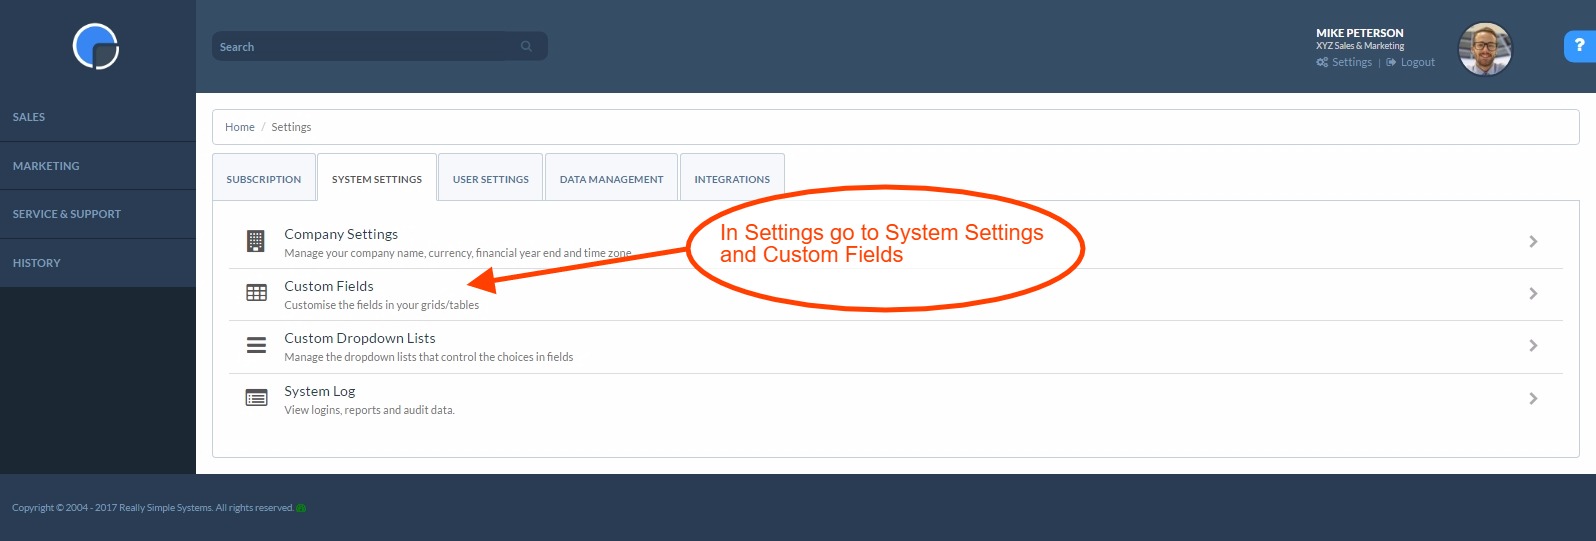
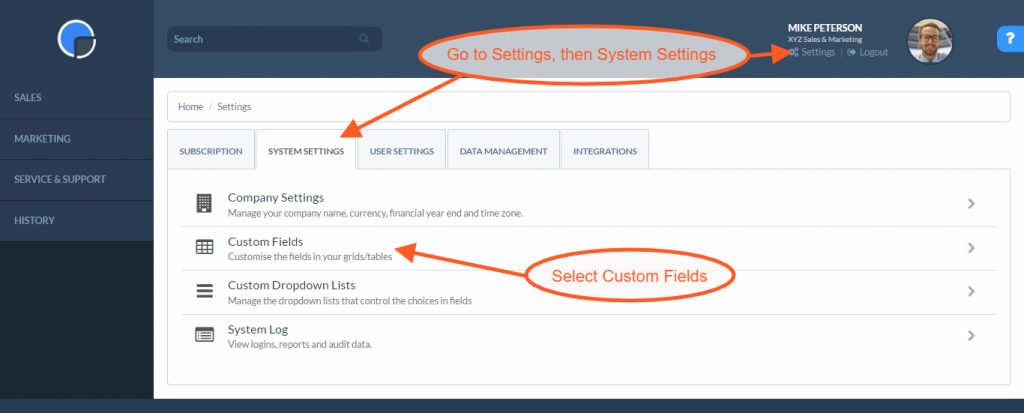
To create a custom field, in Settings, go to  System Settings then Custom Fields. In Custom Fields select the name of the section form/table you wish to configure, e.g. Accounts.

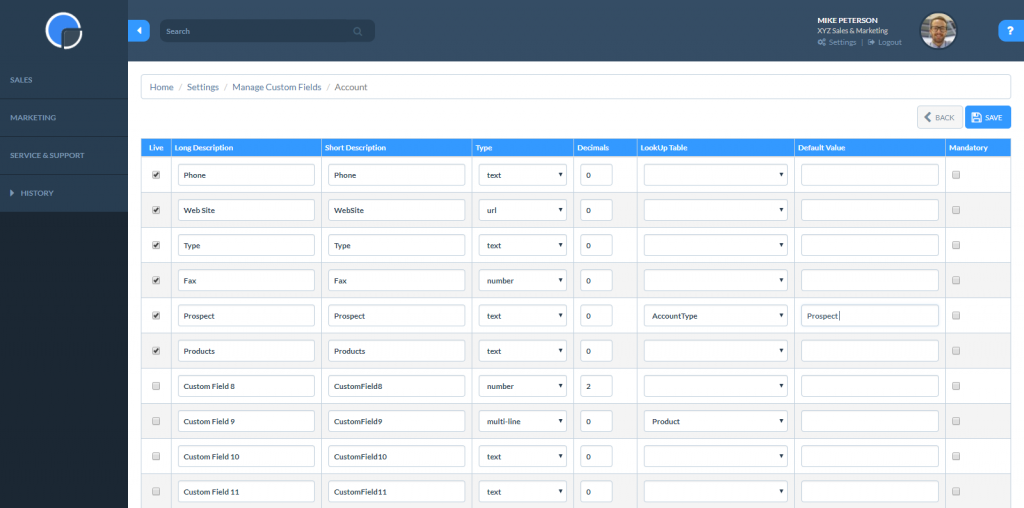
You can switch the various fields on and off by checking the ‘Live’ box on the left-hand side of the screen. You can change the field text and add new fields by typing in any box marked Custom Field. Go to Custom Fields for full details on creating custom fields.

Click Save Changes to save your custom field.

Create Custom Field in your CRM

Dropdown Lists

Watch our tutorial video “How to create Custom Dropdown Lists”


You can create Custom Dropdown Lists, previously known as Look-up Tables, within the Custom Fields facility, to create lists that fit with your company’s operation.

Create custom dropdown lists

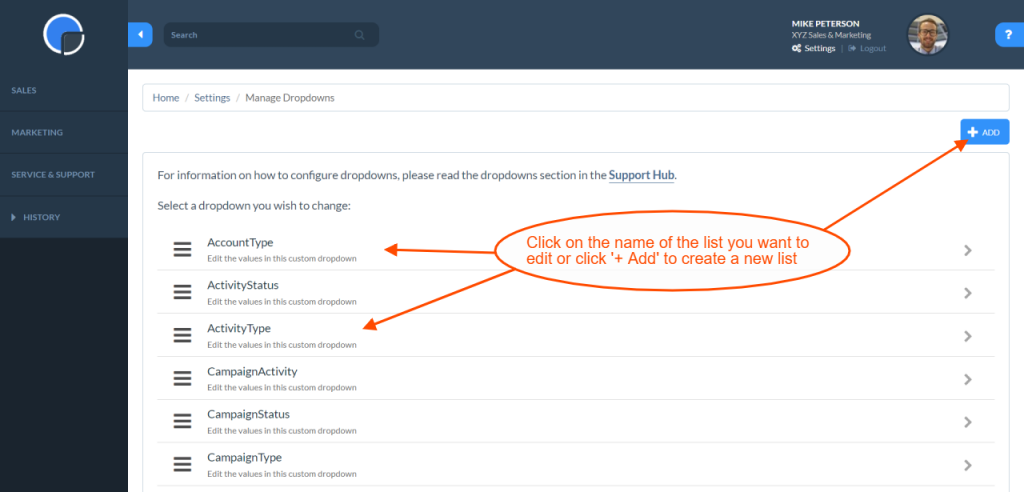
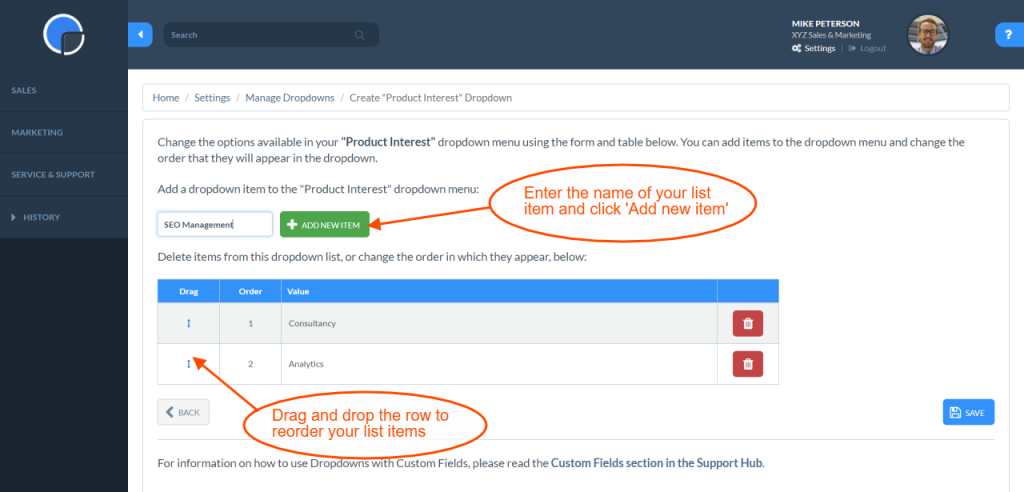
In Settings, go to System Settings then Custom Dropdown Lists. Click on the name of the list you wish to edit, or click ‘+ Add’ to create a new list.

Edit a Dropdown List or Create a new one

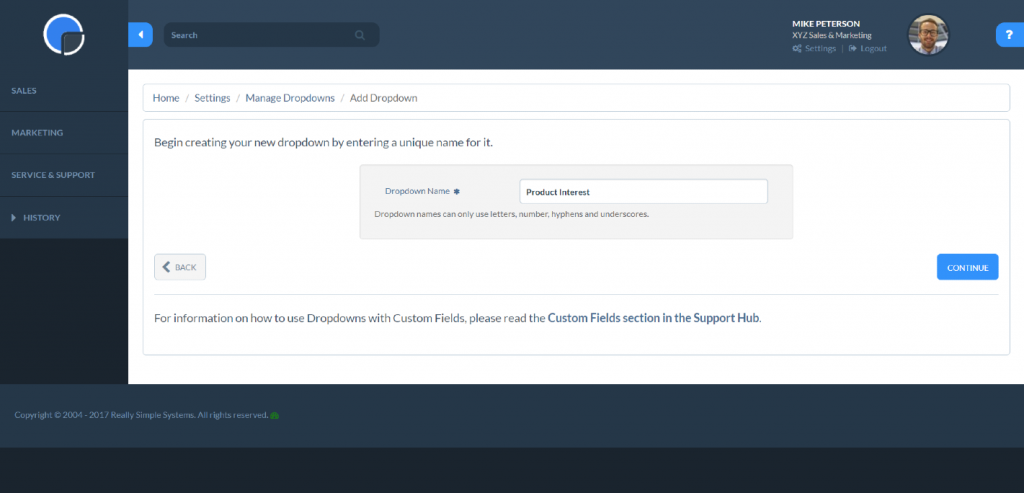
Give your list a name and click the Continue button.

Create a new dropdown list

Enter the name of your list item and click ‘Add new item’. Reorder your items by “dragging and dropping” the row from the arrow icon in the left-hand column. Remove items by clicking the trash icon. Then click to save.

Create Custom Dropdown Lists in your CRM

Back in your Custom Field, in the Look-up Table field search for your new Dropdown List.

6. Managing Contacts

Adding Contacts

Watch our tutorial video “How to Add a Contact”.

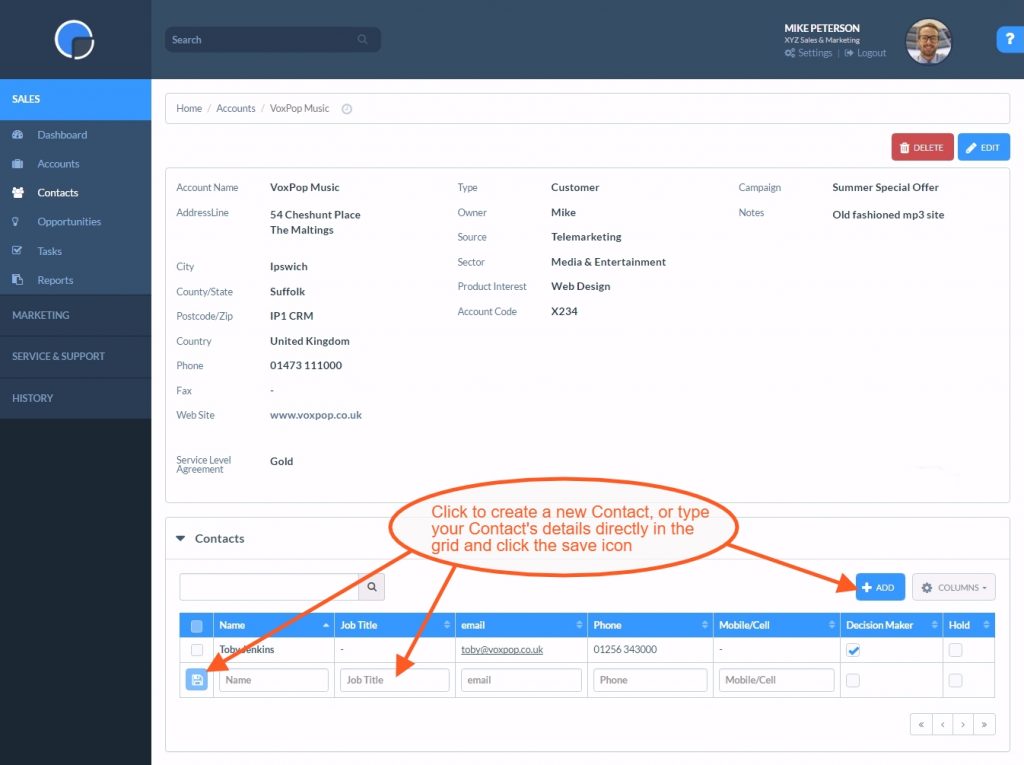
Once you have some Company Accounts loaded you can then add Contacts to the Accounts. You may have already imported your Contacts with your Accounts but if not you can add them individually to your Accounts. N.B. You cannot add a Contact before you have created an Account. Go to Adding Contacts for full details.

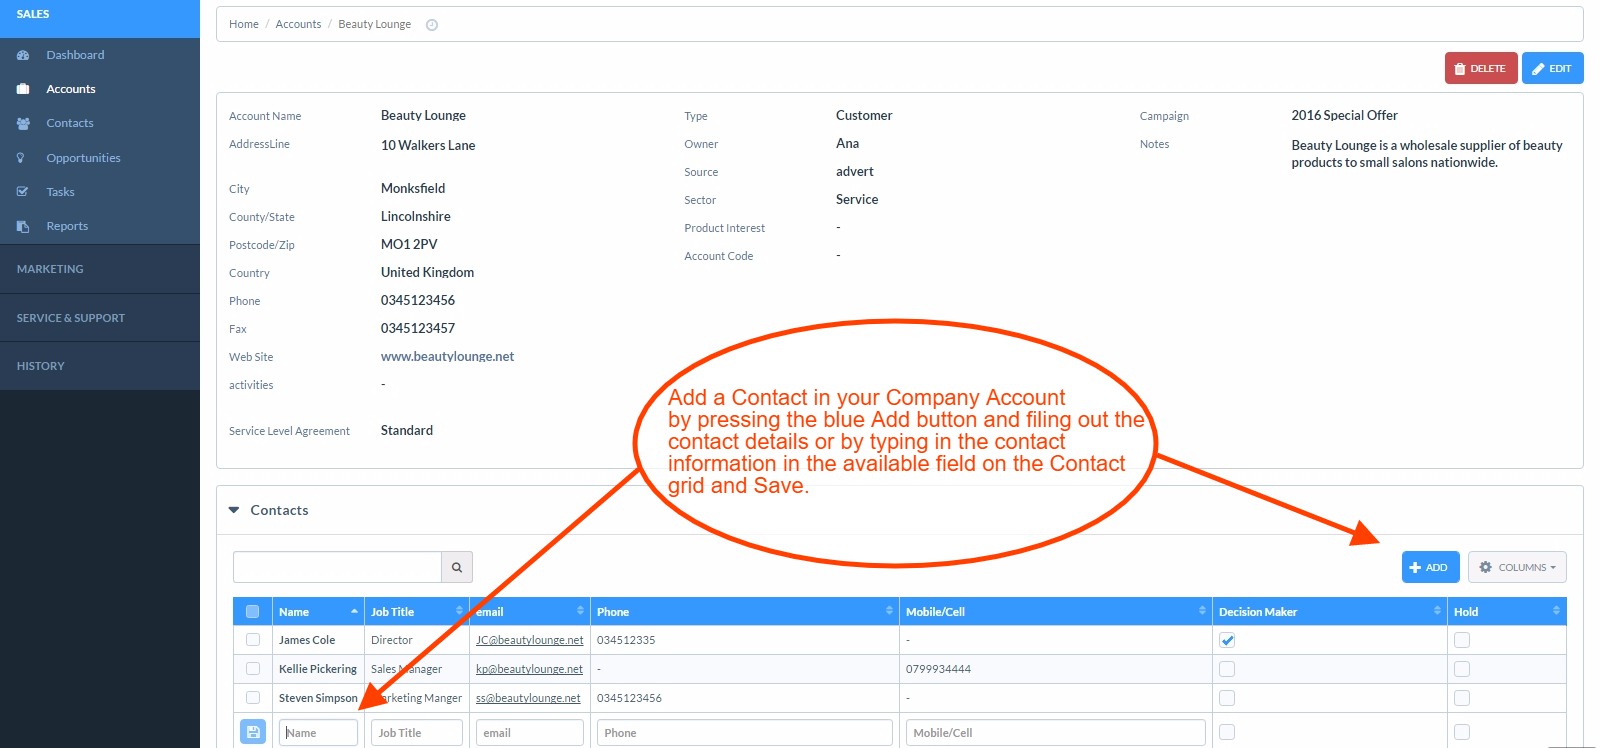
You can add a new Contact by clicking the ‘ Add’ button on the summary Contacts grid and searching for the relevant account or you can open the Account and click the ‘+ Add’ icon above the Contacts table. Simply add the contact’s details to the form and Save. You can also type your contact’s details directly into the grid fields and clicking the save icon.

Add Contacts to your Company Accounts

Editing Contacts

To edit an existing Contact simply click on the contact name and this will open the contact form. Edit the form and click save. The form allows you to record who is the decision maker on the account and if they have a different address from the company account. If you are using the integrated Marketing tool, you can set the contact to “hold” so they do not receive your marketing emails. The contact will automatically be set to “hold” if they have unsubscribed from your emails.
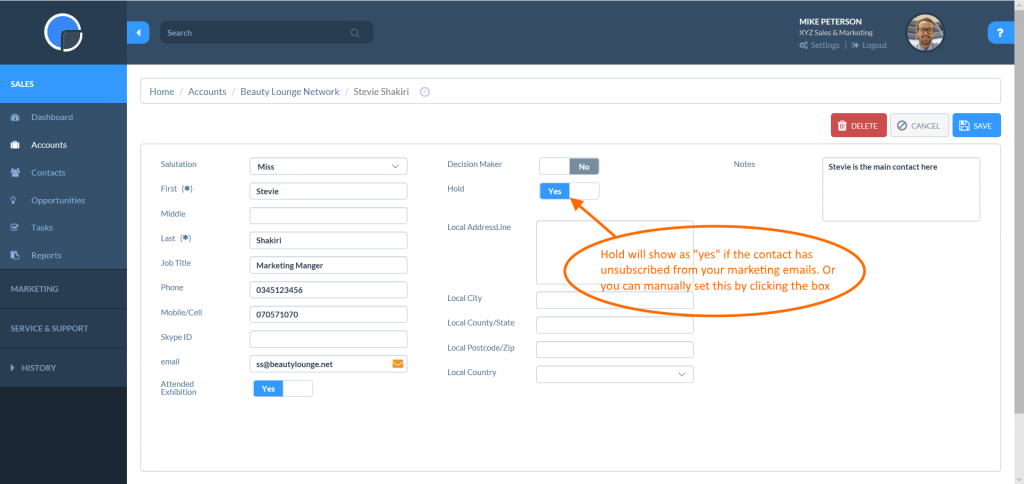
7. Adding Tasks, Activities & Opportunities

Watch our tutorial video “How to Add Tasks and Activities”

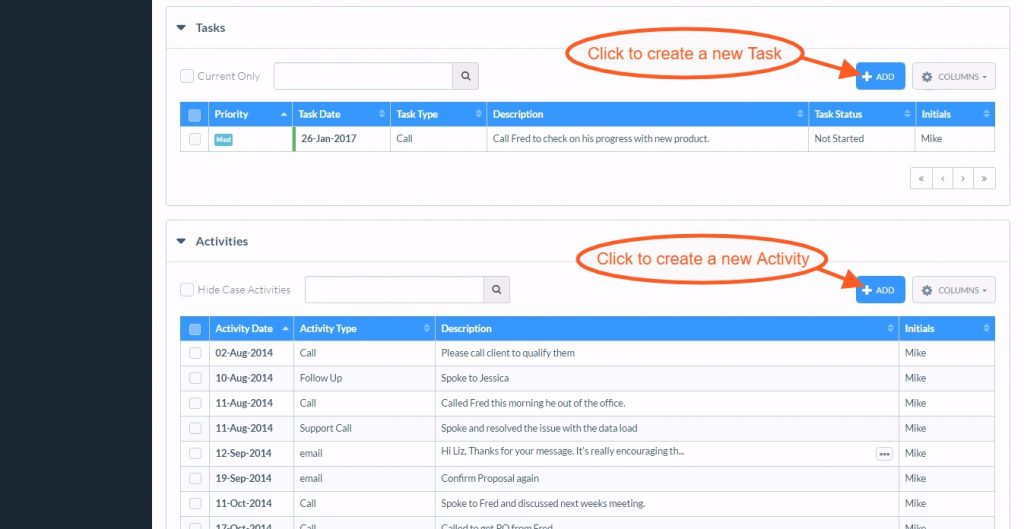
As you manage your customers you will want to record the various activities and interactions you make with your customer. For example, meetings, telephone calls, emails, sales activity etc. You can record these within the Company Account pages.

On the Accounts page, you will find separate grids/tables for Tasks, Activities and Opportunities. To add a new Task, Activity or Opportunity simply click on the ‘+ Add’ icon and a new box will open.

Add Tasks & Activities within each Company Account

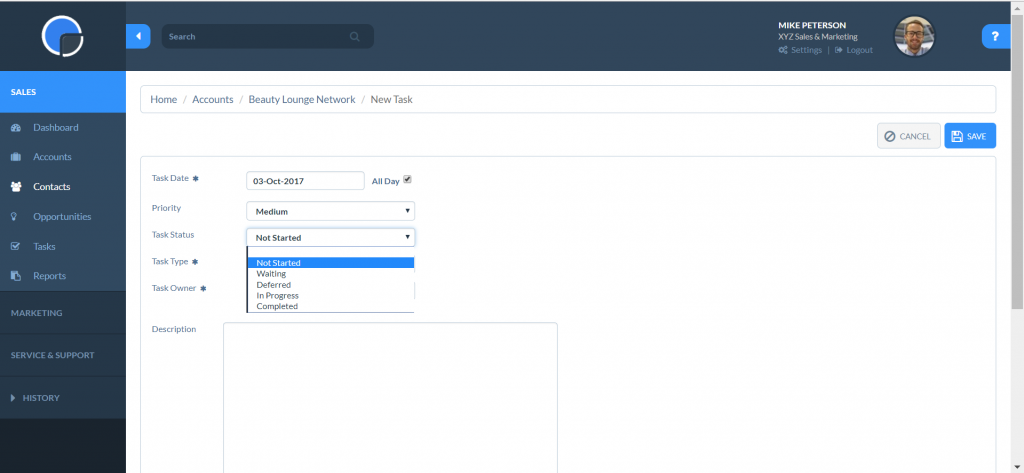
Tasks and Activities work in much the same way, providing dropdown lists for each field and a date picker to set up your Task or record your Activity. You can change the dropdown lists to meet your business needs by using custom dropdown lists – go back to Step 4 – Custom Settings for more details.

Getting Started with your CRM: Create Tasks

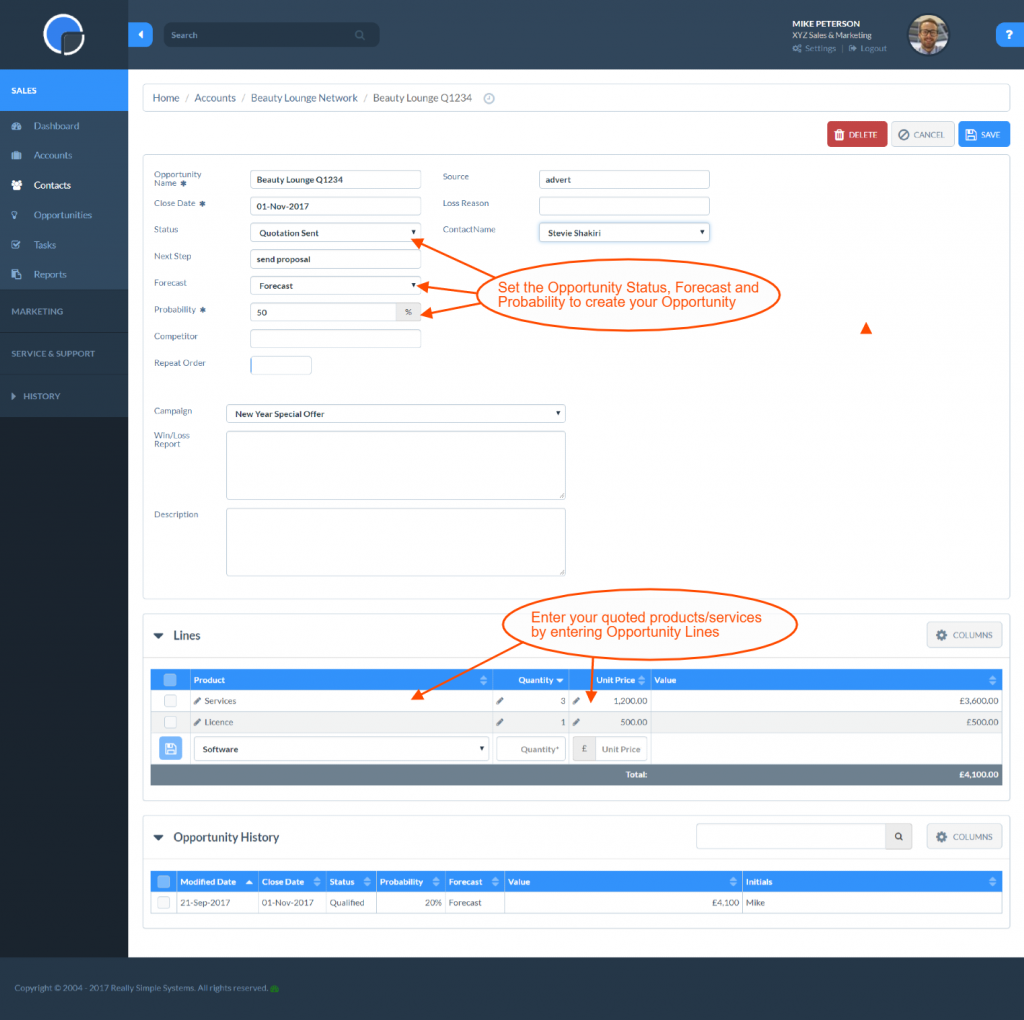
Adding an Opportunity works similarly but with a few more options. The data you add here will be fed into your Sales dashboard and Sales Funnel and will determine your sales forecasting.

Watch the tutorial video “How to add an Opportunity”

CRM Getting Started: Adding Opportunities

Again you can customise the Form Fields and Dropdown Lists to suit your business. The asterisks indicate a mandatory field and you can also add Marketing Campaign to record your lead source details. The main difference is the Opportunity Lines table, i.e. product lines. Here you simply add the product or service you are selling from the dropdown list, the quantity and unit price, and save. you can add more Opportunity Lines once saved.

How do I add Contacts?

How to Add Contacts

Watch our tutorial video “How to Add a Contact”.


Contacts (people) belong to Company Accounts (companies, customers, organisations etc).

To add Contacts, bring up the relevant Company Account (or create a new one) and then click the blue Add button on the Contacts grid. Or simply enter the Contact details directly into one of the empty lines on the Contact field and click Save.

Add Contacts

SpotlerCRM is primarily a B2B (business to business) system, as opposed to a B2C (business to consumer) system, so Contacts always belong to Company Accounts. If you deal with individuals who don’t belong to a company, just create a Company Account with their name and add their Activities & Tasks to that.

N.B. If you want to link an Opportunity, Task or Activity to a specific Contact within your Company Account you can create a Custom Field with a built-in Dropdown list called “ContactName”.

How do I add an Account?

How to add a Company Account

Watch our tutorial video “How to Add an Account”.


To get started with your CRM the first thing you will need to do is to add some Company Accounts. Company Accounts are the organisations you deal with.

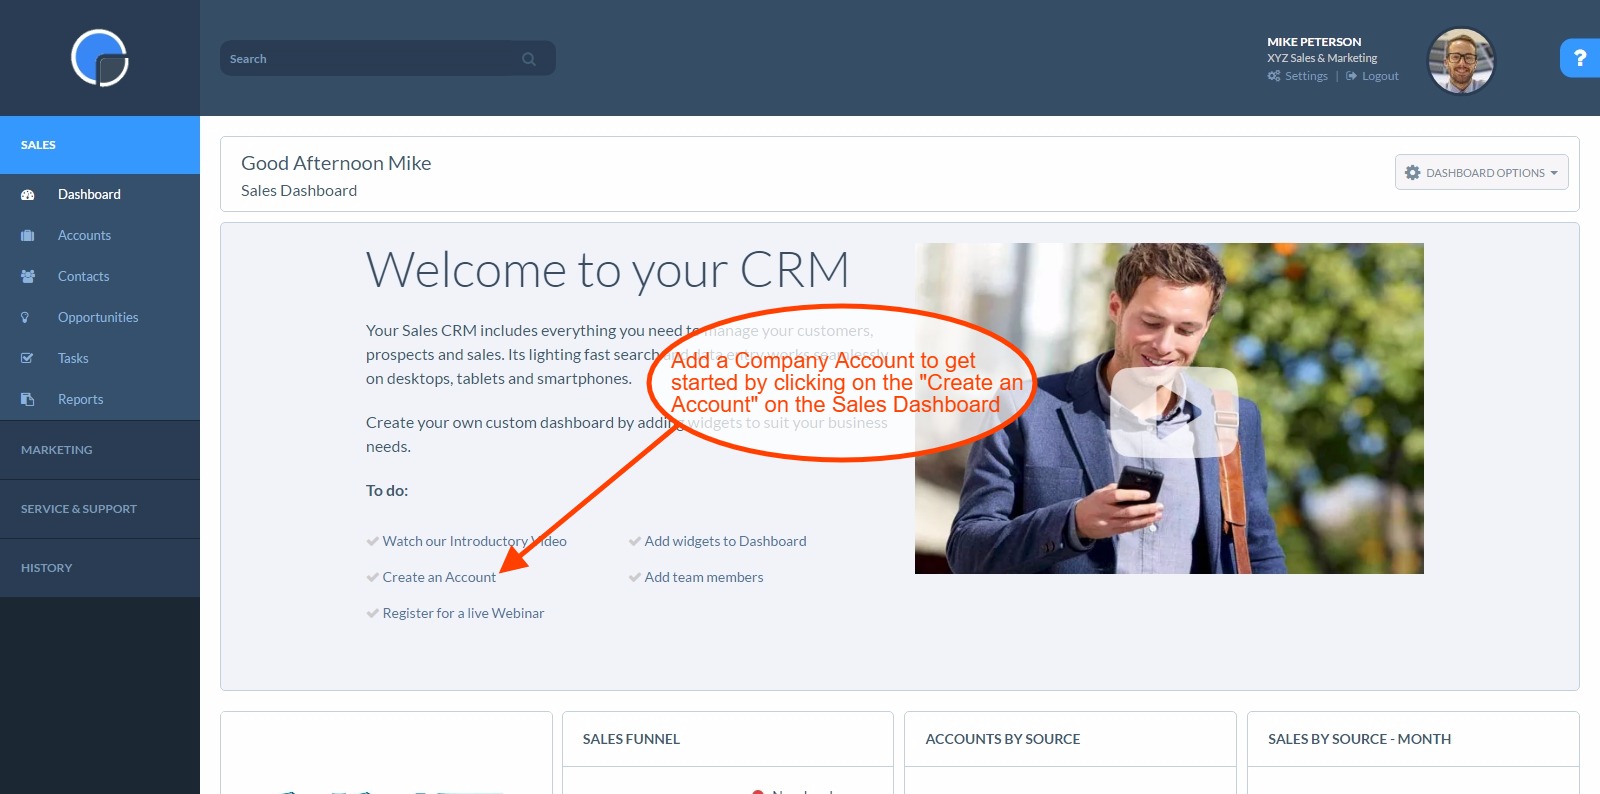
Add a Company Account from your dashboard

If you have a new CRM, on the Sales Dashboard you will see a section called Create an Account.  If you press on the section you will be taken to the add new Company Account page. Type in the details of the Company Account you are adding and Save.

Add an Account from Sales Home page

Import Company Account Data

On the left hand Functions Menu, click on Accounts to view your Company Accounts – at first the grid will be empty.

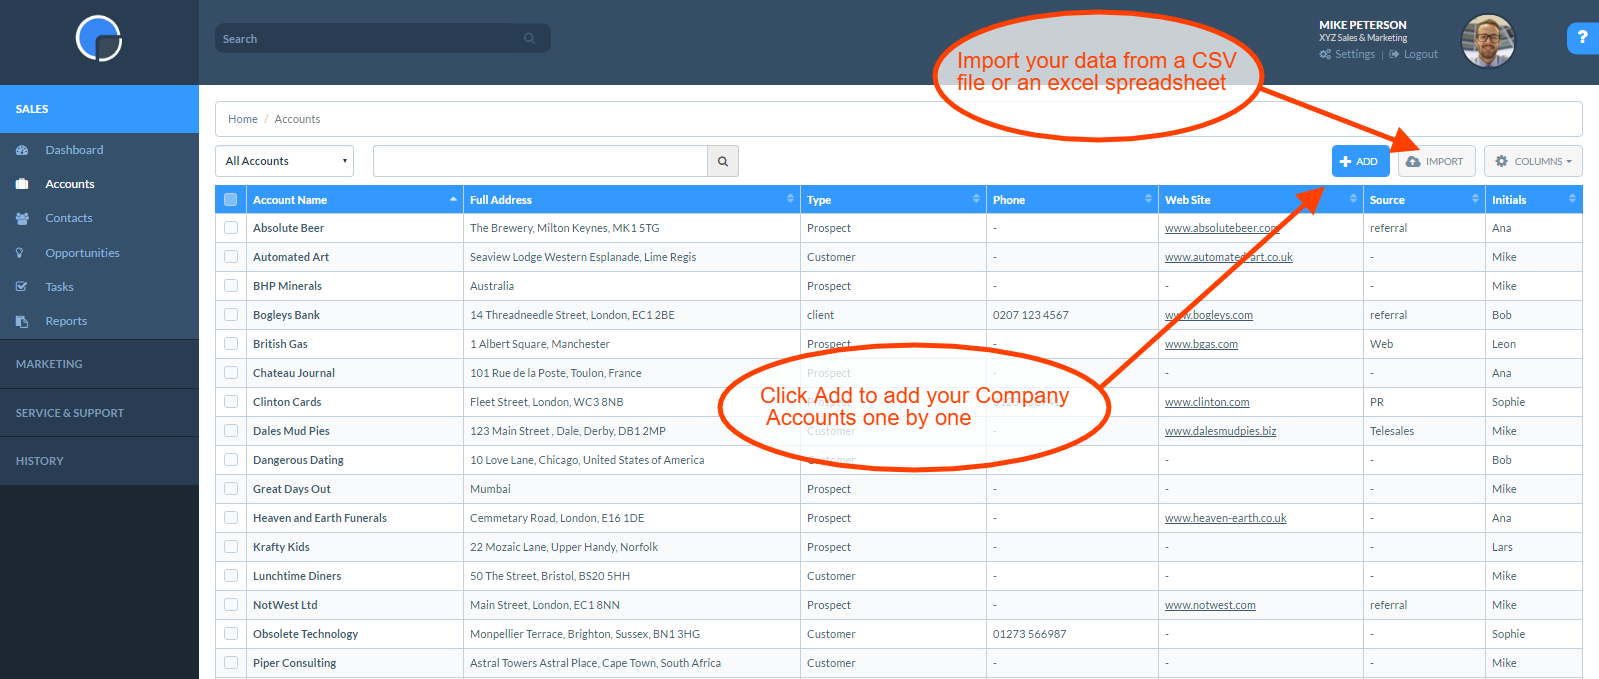
If you are just starting out and have just a few Company Accounts to load you can add them one at a time using the blue Add button on the right hand side of your screen.

Add and Import data from the Accounts page

If you already have data stored in another format (e.g. spreadsheets, Outlook, another CRM system) you can import the data in bulk to your CRM. Do watch our Data Import video to help you. If you use any specific terminology to describe your data you may also want to read up on how to Customise your CRM (see Step 5).

When you are ready to start uploading your data, in the Accounts page click on Import and choose the file you wish to upload.

Once you have uploaded some Company Accounts the Accounts page will look something like this:

My Accounts and All Accounts

How do I import data?

Importing your Data

SpotlerCRM has a CRM Data Import feature that is designed to import your data quickly into your CRM System.

Data can be imported from numerous sources including Spreadsheets, Outlook, Macs, LinkedIn, Gmail, Hotmail and Lotus Notes.

Advanced Data Import

The CRM data import tool allows you to import new records and your update data. You can either import your data using a file in the native SpotlerCRM format, or the import tool can look to detect your type of data and offer matching options for you.

By default, all new CRM systems have the Advanced Data Import tool enabled. This “intelligent” tool will look at your data and attempt to map it into the CRM system. It also has more sophisticated deduping options, including soft-matching on Account names and on Account Post/Zip Code combinations.

Loading CRM data from a spreadsheet or csv file

Get started by watching this “how to” video, and remember that if you get stuck, our support team can import your data for you!

I’m having difficulty importing data

If you are the Administrator of your CRM system and you are experiencing difficulties in importing data, please contact the Customer Support team. If you aren’t your CRM systems’ Administrator, please contact the Administrator in your organisation first.

General Rules for Importing Data

All data is validated when input, whether typed in or uploaded from a data file. It is common to get data rejected by Really Simple Systems CRM for one of the following reasons:

  • No Account Name (you just have Contact details without the organisation they work for)
  • Invalid email address

If your data is rejected, check it over and try again.

Running the Data Import

The CRM tool data import tool runs in three phases:

First, you need to upload your data file

Phase One simply checks that the headers are valid and that each line has the requisite number of fields. It will give you matching options, based on the data in your csv file

Phase Two then checks to see if you have a record limit on your account. If the import exceeds your limit, it will inform you.

It then validates each field in each line, checking the format of numeric, date and True/False fields, that email addresses are valid or blank, that the data in fields that are driven by dropdown tables are valid entries. Phase Two also checks whether that data is already in the database. It will report how many records match based on your selected matching options.

Errors are reported and if they exist the upload aborts.

If no errors are found in the data file the tool proceeds to Phase Three, the actual upload. Before uploading the data the tool reports how many Accounts and Contacts match and provides the following options:

Update the matched Accounts and/or Contacts

Insert the unmatched Accounts and/or Contacts

Creating New Records

When new records are created any fields that are not defined in the data file will be left blank, unless they are one of default Type, Owner and Country on the upload page, in which case those values will be used.

Updating Records

When records are updated the data from non-blank fields in the data file will overwrite the existing data. If the field is not declared in the data file, or is blank, the existing data will not be overwritten. The values specified as default Type, Owner and Country on the upload page will not be used to update existing records.

Other Points

When reporting duplicate records the tool only compares the data in the data file to the existing database. Duplicates within the data file are not recognised until Phase 3, and will then be either applied or not as determined by the tick boxes on the upload page.

Microsoft Excel can be used for saving csv files, and will automatically add quotes around fields with commas in them. It’s best to view the file with a text editor like Notepad before uploading, to make sure that the format is correct.

Why can’t I change some fields?

Some Fields in the system, such as ‘Account.Source’ and ‘Account.Owner’, can’t be changed in the Custom Fields page.

This is because they are used by other parts of the CRM system, so changing them would cause malfunctions. For example, the Source is copied from the Company Account when you create an Opportunity, and the Owner defines security permissions in User Permission Levels.

Adding a New Custom Field

Watch our tutorial video on How to create a Custom Field.

Step by Step

To create a new Custom Field go to Settings, System Settings and then Custom Fields.

Custom Fields

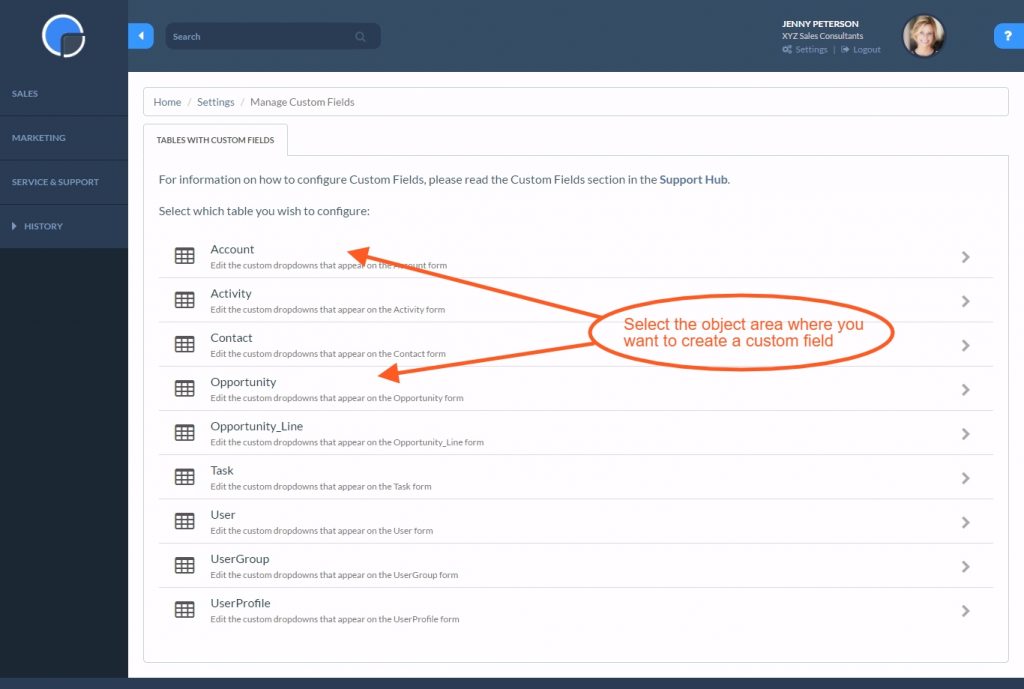
Choose which Object (Account, Contact, Activity etc.) where you want to customise the fields.

In an unused field (e.g. Custom Field 11) box:

  • Check the Live box. This will switch on the field
  • Add a Long Description – this is what will be displayed on the page
  • Add a Short Description – this will be used by the Report Writers. Make sure the Short Description does not have any spaces between the words
  • The Type will determine what kind of field it will be: a number, some text, a check box. See the Field Types section for a list of Types
  • If it is a numeric field, the Decimals field will control how places of decimals will be shown. So put 2 there for currencies
  • The LookUp Table field lets you choose which Dropdown list is used for the field if you want one. Leave blank for free text entry
  • If you want the field to have a Default Value, enter that in the Default Value field
  • Tick the Mandatory box if data must be entered in that field. (N.B. don’t make too many fields mandatory, or users will get annoyed!)

See Custom Fields for further information.

How do I add my products?

Add products to your CRM

You can add your products to the CRM using the Opportunity Lines, so you can then select which products you have quoted on when creating an Opportunity. OpportunityLines is a Custom Dropdown List and you can edit the list to add your products.

In Settings, System Settings go to Custom Dropdown Lists then OpportunityLine.

You can delete the products that you don’t want, and to add the ones you do.

Creating Custom Dropdown Lists

Watch our tutorial video on how to create a Custom Dropdown List.

Click the name of an existing Dropdown List, e.g. AccountType, to edit or ‘+ Add’ to create a new list.

Add Products to your CRM Opportunity Lines

Give your new dropdown a name and click Continue. Next, add the Table Values/Items.

Add Products to your CRM Opportunity Lines

To delete a dropdown list, simply delete all the Table Value entries by checking the box in the Delete column then Save.

Table Values

To delete the entries, tick the ‘Trash’ icon” box and then Save.

See Dropdown Lists for further information.

How do I add a field to a form?

How to add a field to a form

Watch our tutorial video on How to create a Custom Field:

Step by Step

To create a new CRM Custom Field go to Settings/System Settings and select ‘Custom Fields’.

CRM Custom Fields Set up

Selecting Custom Fields will open a list of the forms and tables you can customise. Choose which object (Account, Contact, Activity etc.) where you want to customise the fields.

Select Custom Field Object

Selecting the object you wish to customise will display a form showing the CRM Custom Fields available to use.

Create custom field

In an unused field (e.g. Custom Field 1) box:

  • Check the Live box. This will switch on the field
  • Add a Long Description – this is what will be displayed on the page
  • Add a Short Description – this will be used by the Report Writers. Make sure the Short Description does not have any spaces in it
  • The Type will determine what kind of field it will be: a number, some text, a checkbox. See the Field Types section (on the tab above) for a list of Types.
  • If it is a numeric field, the Decimals field will control how places of decimals will be shown. So put 2 there for currencies
  • The LookUp Table field will choose which Dropdown List will be used to provide a list for the field, if you want one. Leave blank for free text entry.
  • If you want the field to have a Default Value, enter that in the Default Value field
  • Tick the Mandatory box if data must be entered in that field. (N.B. don’t make too many fields mandatory, or users will get annoyed!)

See Custom Fields for more information.

How do I change my CRM password?

How to change your CRM password

All Users Passwords are stored in the system as encrypted text, unreadable even to our technical staff.

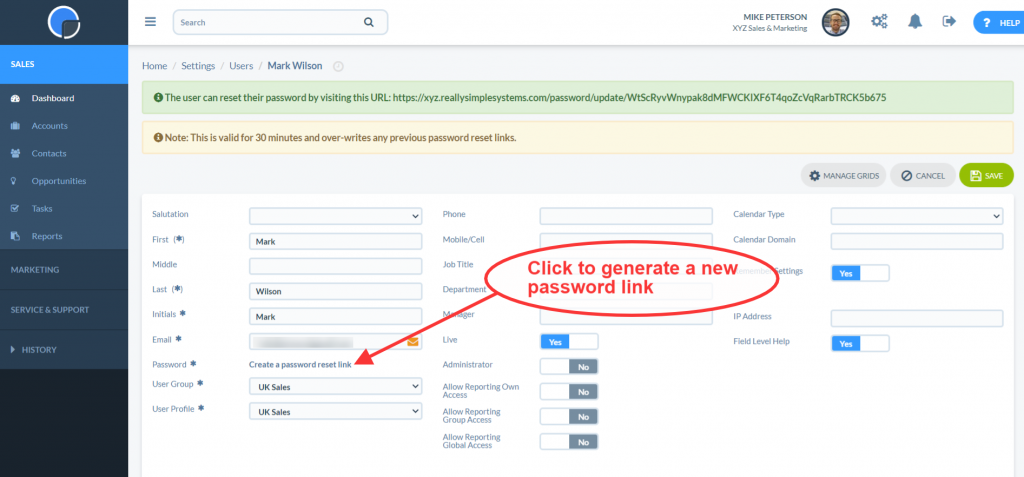
When you Create a New User they will be emailed a link to activate their access and create a password. The system Administrator can also send them a link to reset their password from their User record by clicking “create a password reset link”, this generates a link that is displayed in green at the top of the screen which can be forward to the user or actioned by the Administrator.

Create new password link

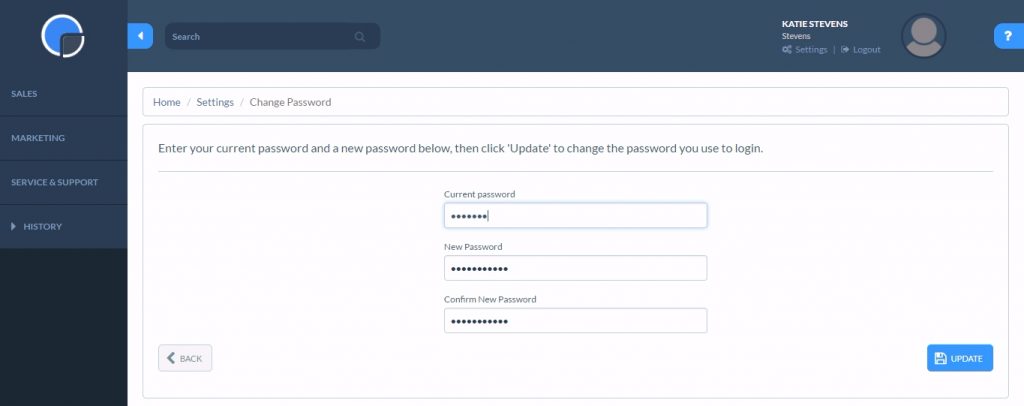
A User can change their password by going to Settings / User Settings, then entering their current password and then a new password. For Users who are not a system Administrator the User Settings menu only displays the Change Password option.

Change your CRM Password

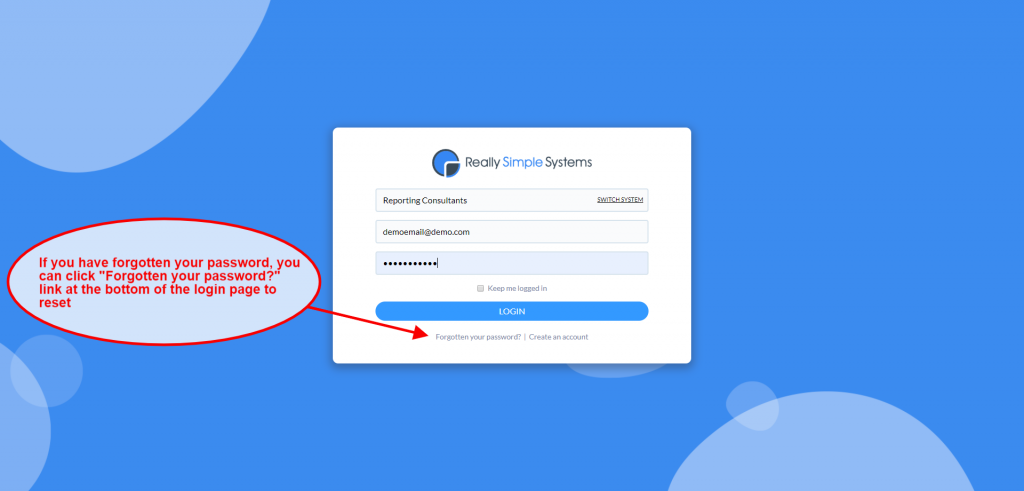
A User can also request to reset their password by clicking the “Forgotten your password” link on the login page.

Forgotten password reset

N.B. It is bad practice to send Users their password in an unencrypted email. If the Administrator needs to email the login details, they should instead click the “Create a password reset link” after creating the User.

If you need help from our Customer Support team and request that the support staff log into your CRM system to resolve an issue, they will do so using one of your User’s email addresses, but with their own password. The system log will record the login together with the name of the support person who used it.

How do I get support for my CRM?

How to get CRM support

The best way to get CRM support is to contact our Support Team on support@reallysimplesystems.com.

If you think your problem would be better handled by a telephone call, please email in the first instant and we’ll call you back as soon as possible or we can book a time with you to call.

Do state what your problem is in your email, so we know who to allocate the call to.

We also have a Live Chat function which is manned by our Sales Team. When a member of the team is available a blue “Live Chat” box will appear in the bottom right hand corner of your screen. Simply click the box in and type in your question.

If you need to contact us urgently, do give us a call, although the lines are often busy so an email may be the best solution.

What are the support hours?

SpotlerCRM Support Hours

Our Customer Support team is operational from 09:00 to 20:00 UK time, Monday to Friday, except on public holidays.

Outside those hours and at weekends, you can send emails and they will be picked up when the support desk opens. If it is really urgent mark the email “Urgent” and we will try and get back to you outside normal hours.

Our engineers monitor the system for uptime 24/7.

How do I export my data?

How to Export Data

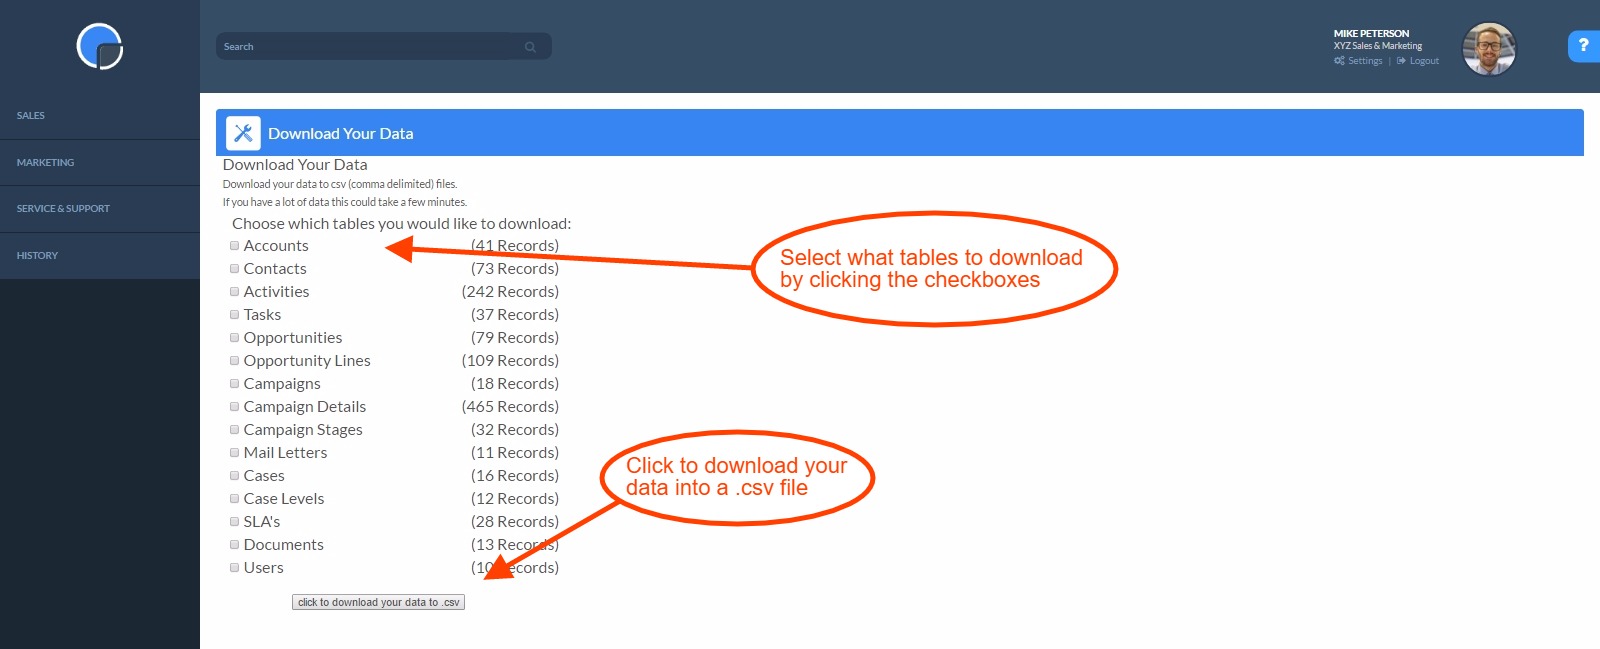
You can download data at any time using the CRM Export Data option.

In the CRM go to Settings, then Data Management / Export Data. Click the checkboxes to select the tables you wish to download and then ‘click to download your data to .csv’. This will create a .csv file of your data.

CRM Export Data

What is a Won / Lost / Pipeline Opportunity?

The Sales Pipeline is a term used to describe the process your organisation uses to track a Sales Opportunity from the customer’s initial awareness through to a confirmed sale, i.e. a sale you have Won.

If you have Won an Opportunity then you could say the percentage sale probability is 100%. If you have Lost an Opportunity then the percentage probability would be 0%. The Pipeline Opportunity is, therefore, anything in between these two.

  • Won Opportunity – 100% Probability
  • Lost Opportunity – 0% Probability
  • Pipeline Opportunity – 1-99% Probability

Do you have a CRM App?

One of the most common questions we get asked is “Do you have a CRM app?” The answer is “No, we don’t have a CRM app”, but this is a positive attribute that often goes misunderstood.

Our CRM has been written using a technique called “responsive design”. This means the CRM automatically adjusts to the size of the device you are using. Therefore, the full CRM system is available on your smartphone or tablet and there’s no need for a mobile app.

Because the CRM is cloud-based, rather than downloading and synchronising an app, you just open the internet browser on your mobile device and access the CRM.

You can read more about how responsive design works in our CRM blog “You don’t need a CRM App”.

How can I stop the system logging me out?

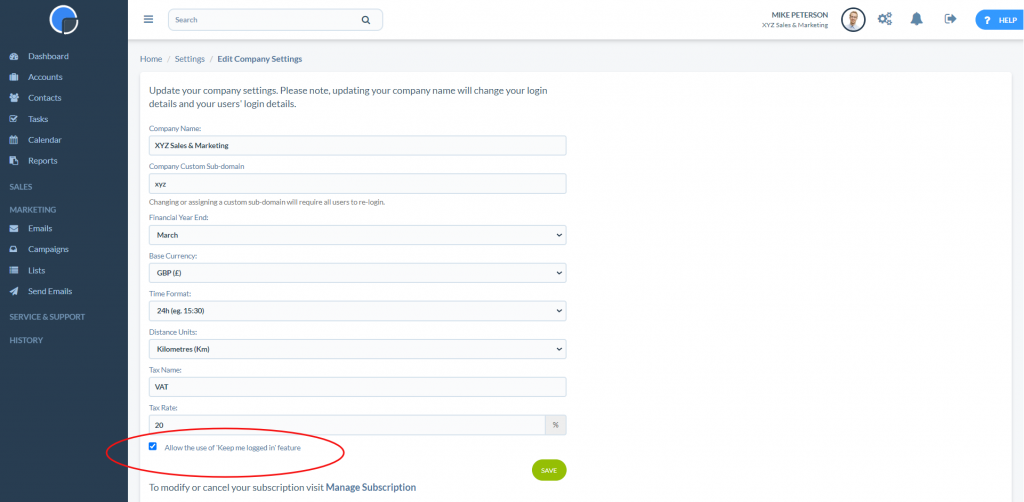
By default, you will be logged out of the CRM system after 2 hours of no activity. This is a security feature so that if you leave your workstation unattended nobody else will be able to access your data.

However, your Administrator can override this by ticking the checkbox at the bottom of the Company Settings page.

Activiate the Keep me Logged in feature

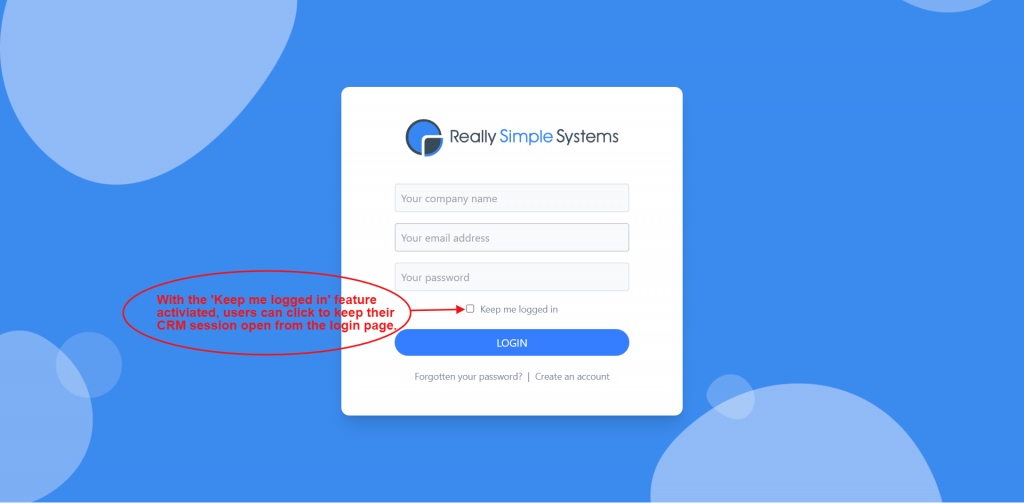
Users can select to ‘Keep me logged in’ on the login page and this will keep them logged in continuously for two weeks or until they logout.

use keep me logged in feature

What happens when my business grows?

SpotlerCRM scalable CRM is designed to grow with your business. As your company develops and your business needs change you can extend the CRM to fit your requirements. This might be as simple as adding more users – you could start with one user and add more as your team grows.

Features like our email integration, MailSync, and Marketing tool may not be a priority when you start out. If that’s the case, you can start for free and upgrade to add these when you need. And as your business progresses further you can upgrade to the next level increasing the number of company records permitted and adding more features.

Custom Settings

In time, you might find you need more bespoke functionality and custom settings. Our CRM system is simple to customise, making it easy to match with the way you work and the terminology you use. And if you have more detailed custom requirements our Customer Support team will be happy to help.

To upgrade your account, simply go to Manage Subscription in the Settings tab.