CRM Report Writer for Listing Reports
The built-in Listing Report Writer can be used to provide a wide range of reports. From simple activity reports like “How many calls has Bob made this week?” to sophisticated summaries such as “How many customers do we have in each industry Sector?”.
With the Listing Report Writer you can use pre-defined reports, create your own custom reports, download reports to your screen, or export them as a PDF or CSV file.
The Listing Report Writer is available in all of our CRM Price Plans. Advanced Reporting options are available in the Enterprise plan, giving additional functionality such as scheduling, run-time filters, automated data output formats and increased permission level options.
The Listing Report Writer can be found in the Reports tab on your main menu.

Pre-defined Listing Reports
When you start with your CRM you’ll find some pre-defined reports that might be useful to you. You can run these reports or edit them to suit your needs.
To run a pre-defined report, simply select the report from the list and click the blue arrow in the right hand column. Select the output type required, i.e. if you want the report to display on your screen or be downloaded as a PDF or CSV file. Then click “Run Report”.
Report Record Limits
Please note, if you’re running a large report, containing more than a thousand lines, it’s best to download as a CSV file. There is an upper limit of 1,000 records when outputting to your screen (5,000 on Advanced Reporting), and when outputting to a PDF, if there’s over 1,000 results it will revert to a CSV file. There is no upper limit for CSV files.

With the report displayed on your screen, you can select how many rows you want to show and you can click through on the account records, as required, by clicking on the account name.

Dashboard Widgets
You can add your reports to your dashboard widgets so you can quickly edit and run the reports as you wish. The My Reports widget selects your 5 most recently run reports. To add reports to the Company Reports widget, set the option “Include in dashboard widget Company Reports” to “yes”, when creating/editing a report.

Reports Terminology
Report Log
Title: The title that you would like displayed on the report
Field Options: Field Options gives you a dropdown list of the available options to run reports on e.g. Accounts, Contacts, Opportunities, System Log, Linked Accounts, Tasks and Activities. All Field Options include the Account and User fields.
With Advanced Reporting additional report views are available for Account+MainContact, LastActivity, a wider range of Opportunity views, Campaign and Case Management views.

Scope: You can report on data from just your own Accounts, from your User Group’s Accounts, or from all Accounts, depending upon your security settings. Account and User data is available in each Scope.
Report Owner: Report Owner defaults to the creater or you can change this to another user.
Output to PDF in Landscape: Click the toggle to “yes” if you would like your PDF report in a landscape format.
Include in dashboard widget “Company Reports”: Click the toggle to “yes” to include the report in your dashboard widget.
Report Permissions
Permission Access: If you are using the User Permissions Levels feature, select who should have access to the report using the dropdown list.
Permission Level: If you are using the User Permissions Levels feature, select what permission level you want to grant using the dropdown list.
Available Fields
Available Fields: The tabs show lists of fields available in the Field Options. Use your mouse to drag and drop the fields you wish to report on into the Selected Fields tables for Report Fields, Criteria Fields and Sorting Fields.
Report Fields: These are the fields that will appears as columns in your report. 10 Report Fields are available in the Free, Starter and Professional plans, and 20 fields in the Enterprise plan. Some of the fields have special attributes, see Special Fields below.
Report Output Options: With Advanced Reporting (Enterprise plan), use the dropdown lists to specify how the field is displayed in the report. For example, date formats and the maximum number of characters of a field that has a lot of text.
Criteria Fields: By default a report will return all the records that it finds, as defined by your Report Fields. You can filter the results by setting the Criteria Fields. You can choose up to 3 filters, or if you are using Advanced Reporting on the Enterprise plan, you can choose up to 10 Criteria Fields.
Run-time: Checking the Run-time box will make the filter option available on the saved report, allowing you to quickly change your criteria values without having to edit the report.
Sorting Fields
Sorting Fields: You can sort the report data in ascending or descending order, with up to 3 levels of sort in the Free, Starter and Professional plans, and up to 5 levels in the Enterprise plan.
Subtotal, Summarise and Suppress: With Advanced Reporting (included in Enterprise plan), you can subtotal your report based on various groupings. Make sure you have a numeric Report Field included, for example, ‘count’ or ‘value’ or your own custom numeric field. Then choose your Sorting Field, for example ‘Account.Source’ and choose ‘Subtotal’, this will then subtotal your value fields based on the ‘Account.Source’.
Using Summarise will add the values together into one line where values match. For example, if you choose as your Sort Field ‘User.Initials’ and select Summarise, this will add up the values and place them in one line for each User.Initials.
The Suppress option simply hides repeating values for neatness, it does not require a numeric field to be present.
Report Buttons
Schedule Report: With Advanced Reporting (Enterprise plan) you can select to schedule your report to automatically run at set frequencies and be mailed to your inbox.
Run Report: Runs the report, allowing you to first select an output type, e.g. to your screen, PDF or as a CVS file.
Save: Save the report to your Report Summary Table.
Special Fields
Account.FullAddress: This merges all the Account address fields to one field separated by commas and suppresses the Country if the Country is the User’s default country. Use this to save space on and improve the legibility of reports.
Account.MainContact: This reports One Contact per Account. Accounts with no Contacts are not included. The Contact that is reported has Contact.DecisionMaker ticked, or where not indicated, the historically first created Contact in the Account.
Contact.FullAddress: Similar to the Account.FullAddress, this concatenates all the Contact address fields to one field separated by commas unless the Contact address is blank, in which case it uses the Account address.
Contact.AddressLine, City, County/State, Postcode/Zip, Country: will report those fields unless the address is blank, in which case it will report the Account fields. Use the Contact address fields for mail merging to make sure that if a Contact has a local address it is picked up.
Opportunity.Value: the total Value of the Opportunity, calculated as the sum of Quantity x Unit Value of the individual Opportunity Lines.
Opportunity.WeightedValue: the total Weighted Value of the Opportunity, calculated as the sum of Quantity x Unit Value x Probability of the individual Opportunity Lines.
Custom Fields: will appear with their names if created.
Create a New Listing Report – Step by Step
To create a new Listing Report, on the Report Summary Table, click ‘+ Add Listing’.
Report Log
First, complete the Report Log by giving the report a title, selecting the Field Options and Scope. Field Options gives you a dropdown list of all possible field groups you can choose from. For example, Accounts will display the fields you have set up in your company account form, including any custom fields. The Scope lets you select just your own accounts, your group’s accounts or all accounts.
If your report has numerous columns, and you are looking to output to PDF, you may want to select to output in a landscape format so it fits the page. You can do this by clicking on the toggle switch and selecting “yes”.
If you are likely to be running the report frequently you might want to add it to your dashboard widgets.

Report Permission
If you are using the User Permissions Levels feature (available in Professional and Enterprise plans) you can select who has access to the report. If you are giving access to other users you can select whether they are able to simply run the report or if they also have permission to edit the report.
Building the Report
Depending on which Field Options you have selected, the fields you can report on will display the list shown in Available Fields. They are grouped on different tabs so you can find what you want more easily, or you can use the search box. For example, the Field Option “Accounts” displays the options from the Accounts form and also the User settings.
To build your report, simply “drag and drop” the fields you want to report on from Available Fields to Report Fields, on the right-hand side. To “drag and drop” click your mouse on the arrow icon in the left-hand column, and slide the field across.
With Advanced Reporting (Enterprise plan) you can use the Report Output Options to specify how you want the data to appear. For example, setting date formats, wrapping text or limiting the number of characters in a source URL.
Report Filters
By default, a report will return all the records that it finds, as defined by your Report Fields. You can filter the results by setting the Criteria Fields. Click on the Criteria Fields tab then “drag and drop” the fields you want to filter by from the Available Fields tabs to the right hand panel. For example, if you want a report that shows all customer contacts based in London, the Criteria Field would be “Account.AddressCity”.

When you add the field, Report Criteria Option boxes will appear. Here you can define the filters you want. For example, to report only on my contacts based in London, I would select “Equal to” from the dropdown list and type “London” in the corresponding box.
And/Or Options (Advanced Reports)
Using Advanced Reporting, you can add Criteria Fields to build up your report filters, drilling down to specific data using the “And” operator. For example, you could add a second filter to the “London Contacts” report to specify just those accounts created after a certain date. In this example, you would add the Criteria Field “Account.CreatedDate”, set the operator to “And”, and set the Report Criteria Options to “greater than or equal to” and select the date.
If you are looking to report on multiple criteria you can also use the “Or” operator option. For example, on the “London Contacts” report, you could include the filter options for contacts in London and created date, then add an “Or” option for industry sector. This would return a report that includes all contacts in London created on or after the given date, plus any contacts in the selected industry sectors.

Run-time Option
If using Advanced Reporting, checking the Run-time box will make the filter option available on the saved report, allowing you to quickly change your criteria values without having to edit the report.

Sort Fields
Going to the next tab, Sort Fields, you can specify the sort order for your report. For example, if you want the report sorted by Account Name alphabetically you would add the Account.Name fields and select the Report Sort Option “Ascending”.
With Advanced Reporting (Enterprise plan) you have the options to Subtotal, Summarise and Suppress data.
If you are using a numeric Report Field, for example, ‘count’ or ‘value’, you can Subtotal the data. For example, if you wanted to report on your Opportunities by User you can subtotal the sales for each individual.
Using Summarise will add the values together into one line where values match. For example, if you choose the Sort Field ‘User.Initials’ and select Summarise, this will add up the values and place them in one line for each User.Initials.
The Suppress option simply hides repeating values for neatness, it does not require a numeric field to be present.
Report Preview
When you create your report a preview of the report, showing the first 5 lines, will appear at the bottom of your screen. The preview will show you how your report will look, letting you make changes before you save and run the report.
If you make changes to your report fields and criteria, click to refresh the preview.

Save the Report
Once you have all the fields you need, click Save at the top of the screen. Once saved, new buttons of Run Report and, if you are using Advanced Reporting, Schedule Report will appear.
Run Report
Clicking Run Report will bring up a box where you can select the Output Type, i.e. to your screen, a PDF or a CSV file.
Scheduled Reports
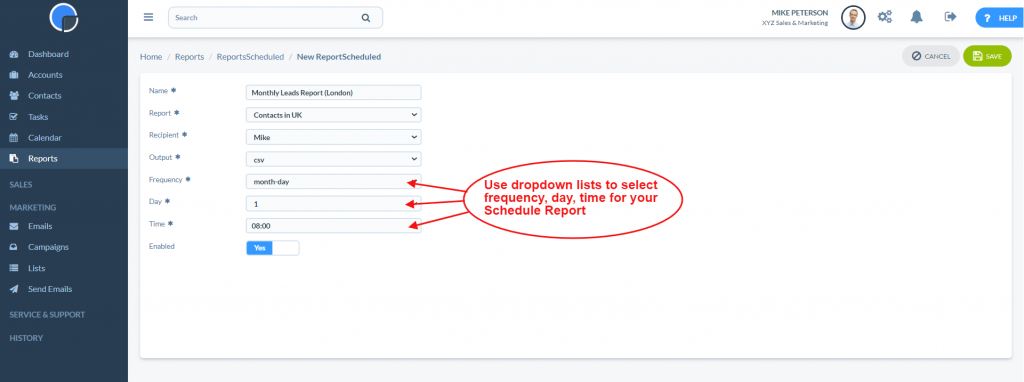
With Advanced Reporting (Enterprise plan) you have the option to schedule your Listing Reports. Scheduling will automatically run a report and mail it to your inbox in the format requested. You can schedule daily, weekly or monthly, selecting the time, day and day of the month as required.
To schedule a report, with your report open in the editing mode, click the blue “Schedule Report” button.
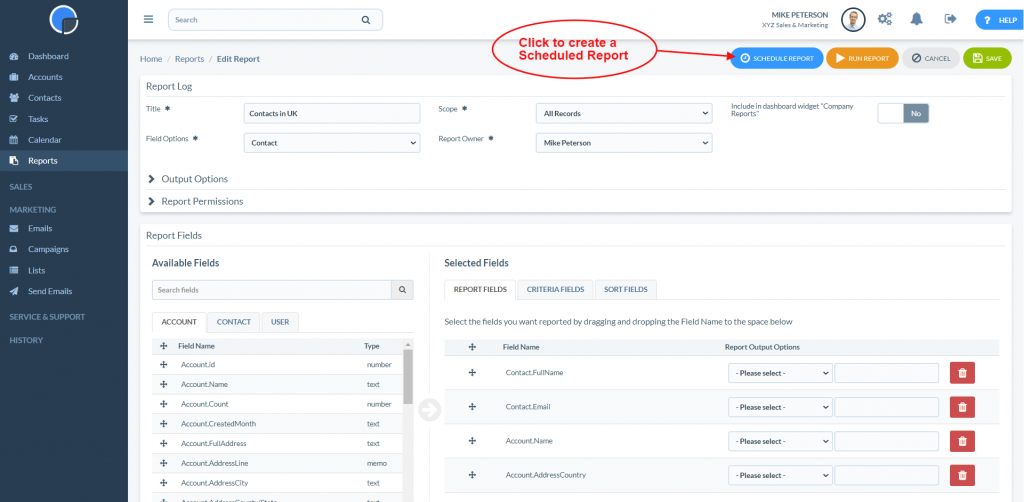
On the next screen give your scheduled report a name and select from the options the format, frequency etc.
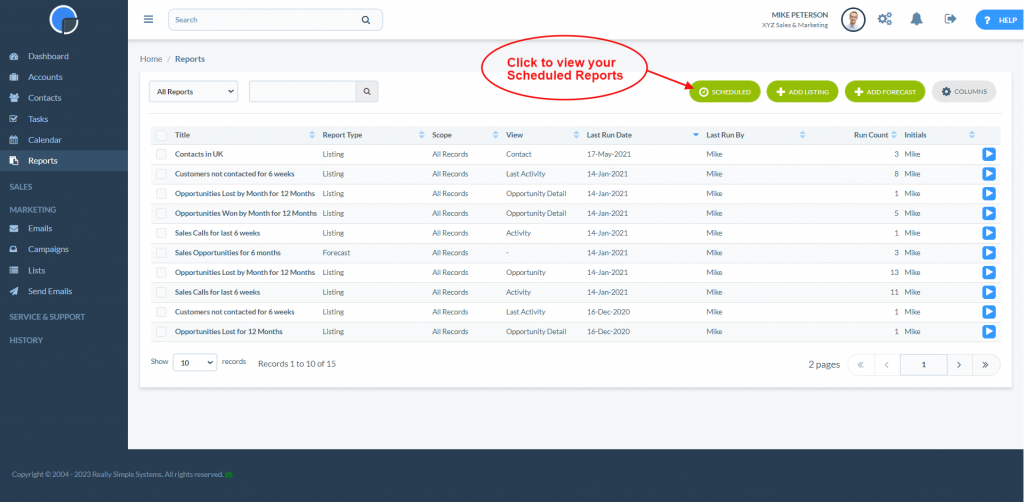
You can view a summary of your scheduled reports by clicking the Scheduled button on your reports home page.