CRM Data Import
CRM Data Import Tool
You can easily import your data using the CRM Data Import Tool. The CRM Data Import Tool allows you to update your existing data or upload new records into your CRM system. It also has sophisticated deduping options, including soft-matching on Account names and on Account Post/Zip Code combinations.
You can either import your data using a CSV file in the native Really Simple Systems format, or the import tool can look to detect your type of data and offer matching options for you.
Preparing Your Data
You can import bulk records of Company Accounts and Contacts as well as historical data, e.g. your past sales data and activities/events. If you have data fields that do not match the standard fields in your CRM you can add Custom Fields.
We recommend editing/cleaning your data file before the import. Check your data is consistently appearing in the correct columns so they can be mapped to the correct CRM field.
To import your data it is best to prepare it as a CSV file using the template provided below. Alternatively, you can send your file to our support team on support@spotlercrm.com and we will run the import for you.
Example data import file:

Here’s a spreadsheet template that you can download and use:
![]()
| General Rules of Data Import
All data is validated when input to the CRM, whether typed in or uploaded from a data file. It is not uncommon to have data rejected by the CRM for one of the following reasons:
If your data is rejected, please check it over and try again. |
Running the CRM Data Import Tool
To import your data, having prepared your data in a CSV file format, navigate to Settings, then Data Management, and go to Import Data.
First, set your Default Fields. Some fields in the CRM are mandatory. If you are importing new records, you will need to set default values. Your default selection will automatically fill in the mandatory fields if your data import does not include the information required.

Select Your Data File
Next, upload your data file into the CRM system by either dragging and dropping it to the grey box. Alternatively, click on the box and select your file from your computer.

Map Your Data Fields
Once you have selected your data file, you will arrive at a new page where you need to confirm how your data matches with the existing CRM fields, or any custom fields you have added.
N.B. If you have not yet added custom fields to the CRM, it is best to do this before you import your data.
The CRM will automatically attempt to match your data using the data headers in your import file. If you want to change the field that your data maps to, simply click the dropdown menu in the “Match Field” column. If there is any data included in the file that you don’t wish to import, click “Don’t import”.

When you are happy with how your data and CRM fields match, click “NEXT”.
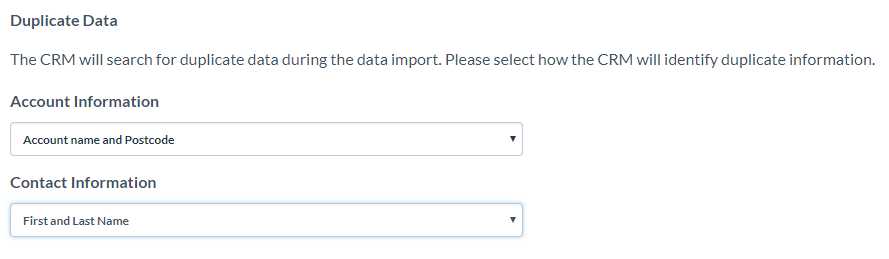
Duplicate Data Records
During the import, the CRM will automatically search for duplicate data records in the file you are importing and any existing data in your CRM system. Use the presented dropdown options to select how the CRM will identify duplicate information.
When reporting duplicate records the tool only compares the data in the data file to the existing CRM database. Duplicates within the data file are not recognised until the import preview, and will then be either applied or not as determined by the tick boxes on the page.
Multi-Line Custom Fields
If you have Multi-Line Custom Fields set up in your CRM system you will also see an option for updating your Multi-Line records.

Click the tick the box if you want your imported data to append your Multi-Line records.
Click “NEXT”.
Data Preview
The CRM will now review your data and present you with an import preview. The preview will display the number of new records and/or updated records to be imported.
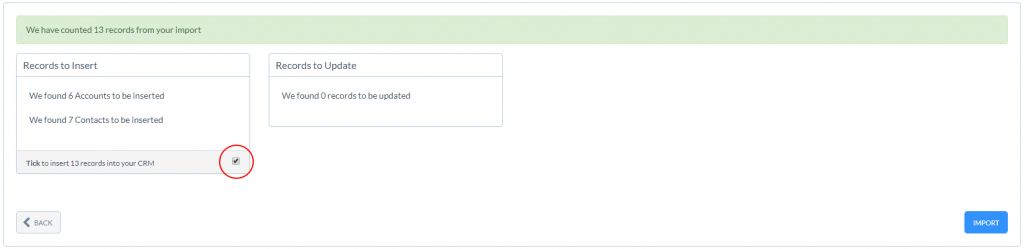
If you are happy with the data in your import preview, click the tick boxes to confirm the data is to be added into the CRM system and click “IMPORT”.
The CRM will now import your data and confirm completion.

Press “FINISH” and your data import is now complete.
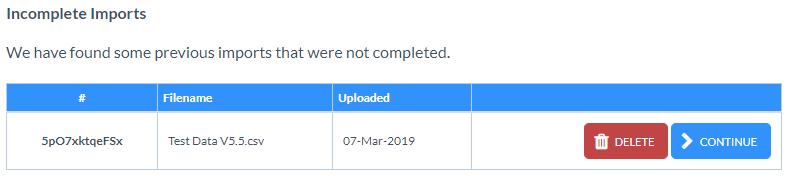
Incomplete Imports
If you have previously started a data import but didn’t complete the process, you will see an “Incomplete Import” section when you go to start a new data import. You can either continue your previous import or delete it.
Contacting Support
Should you have any problems importing your data, our support team will be happy to help. Alternatively, you can send your data file to support@spotlercrm.com and we’ll run the data import for you.