CRM Users
Users can be either your people who can log into the CRM system, or “holding places” for Accounts that are currently not being dealt with by a specific person e.g. Marketing. You can have as many Users as you like but to access CRM a user must be set to Live (see below).
User Licence
The number of Live Users you can have is controlled according to your User licence in your CRM subscription, i.e. how many users you are paying for. With the Free CRM, there is a maximum of two Users.
You can switch a User on or off as required. For example, if you have members of staff that only need occasional access to the CRM you can switch them to Live only when needed. This will help you reduce the cost of your User licences.
To see a list of your Users, in Settings go to User Settings then User Management.
Creating a New User
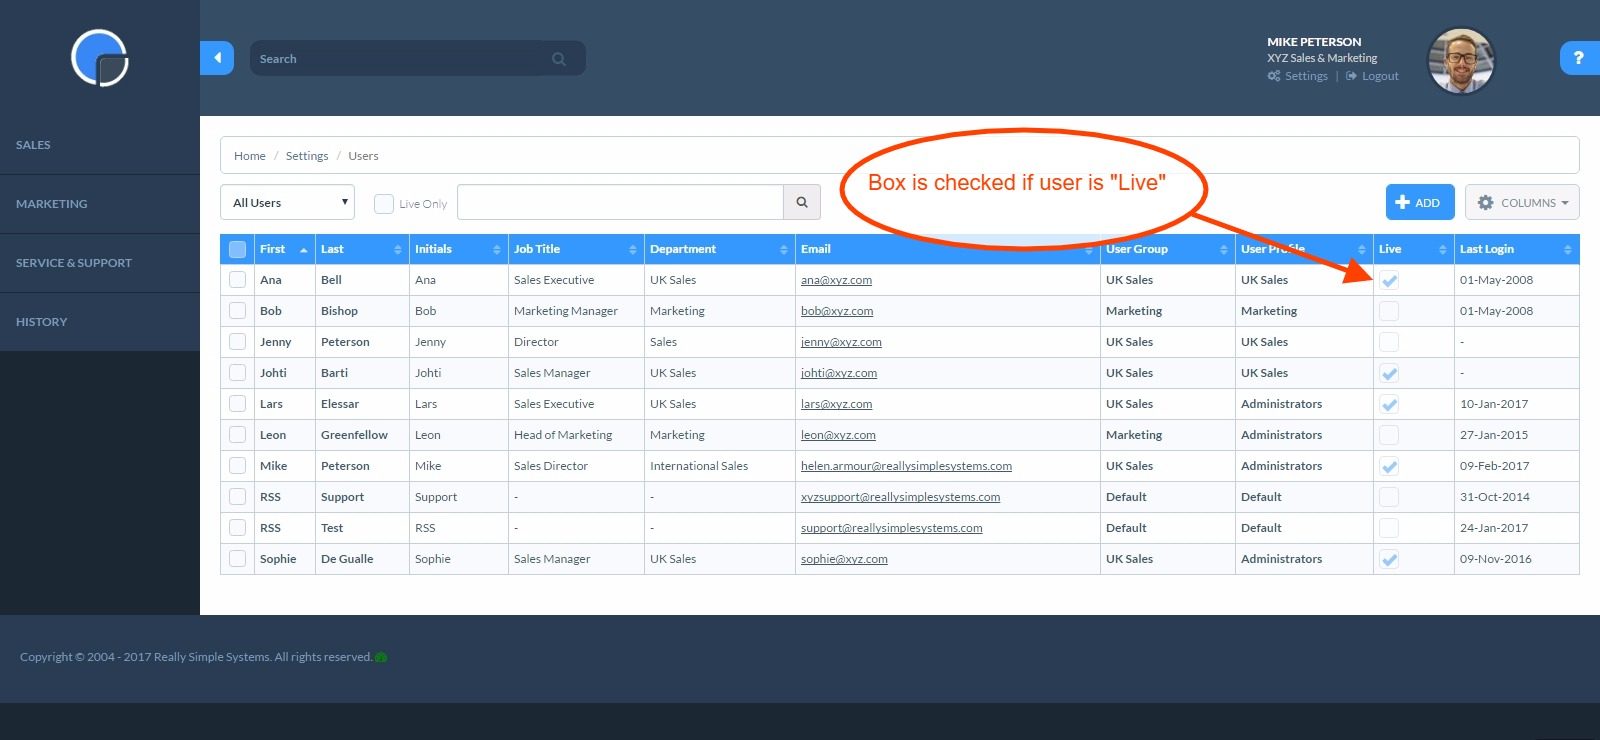
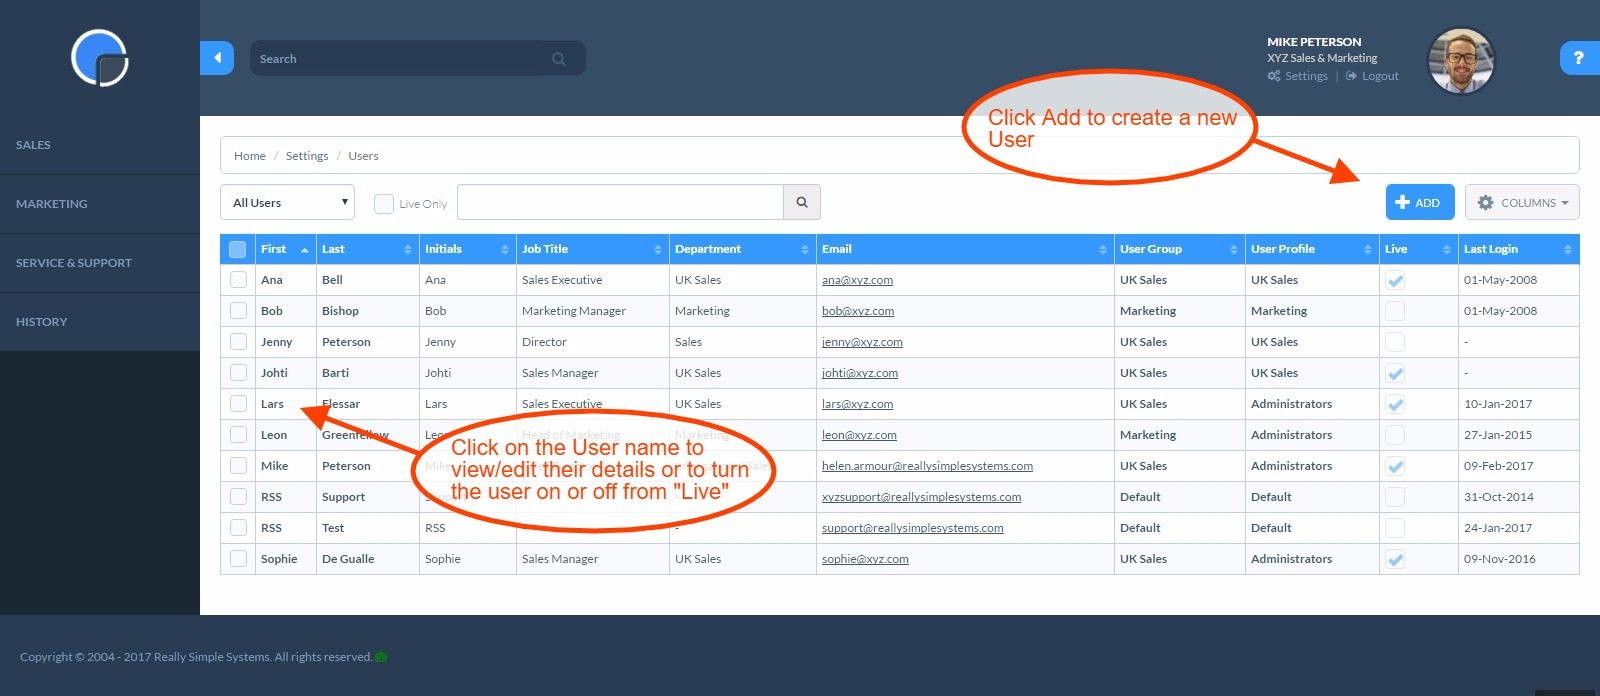
To create a New User, first check your User Licence (see below), then on the Settings tab go to User Settings / User Management. This will display a list of all your current Users. Click on the User Name to view or edit their details. If the User is ‘Live’ the checkbox in the Live field will be ticked.
Click the blue ‘+ Add’ button to create a new User.
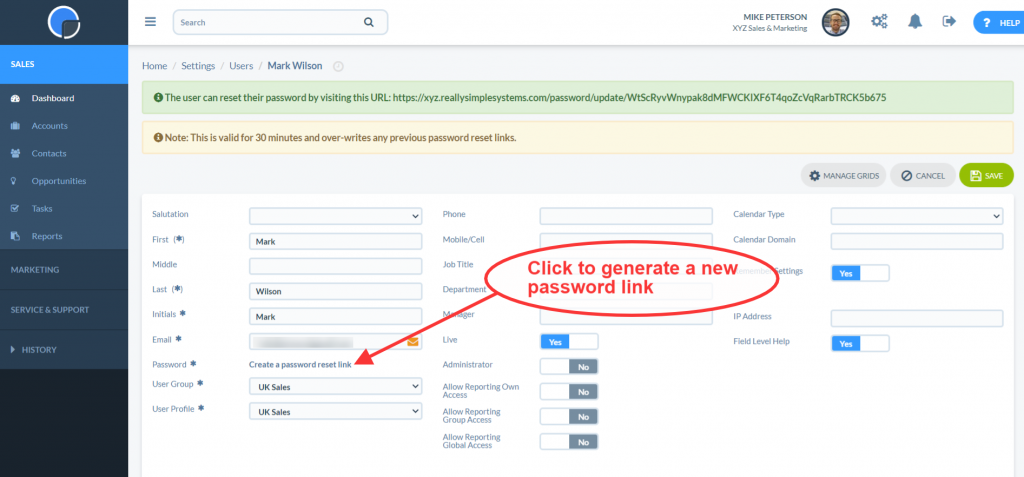
When you create a new User they will be emailed a link to activate their access and create a password. Your system Administrator can also send them a link to reset their password from their User record by clicking “create a password reset link”, this generates a link that is displayed in green at the top of the screen which can be forward to the user or actioned by the Administrator.
Note: The password reset link is only active for 30 minutes, so make sure your user is expecting it.
Increase User Licence
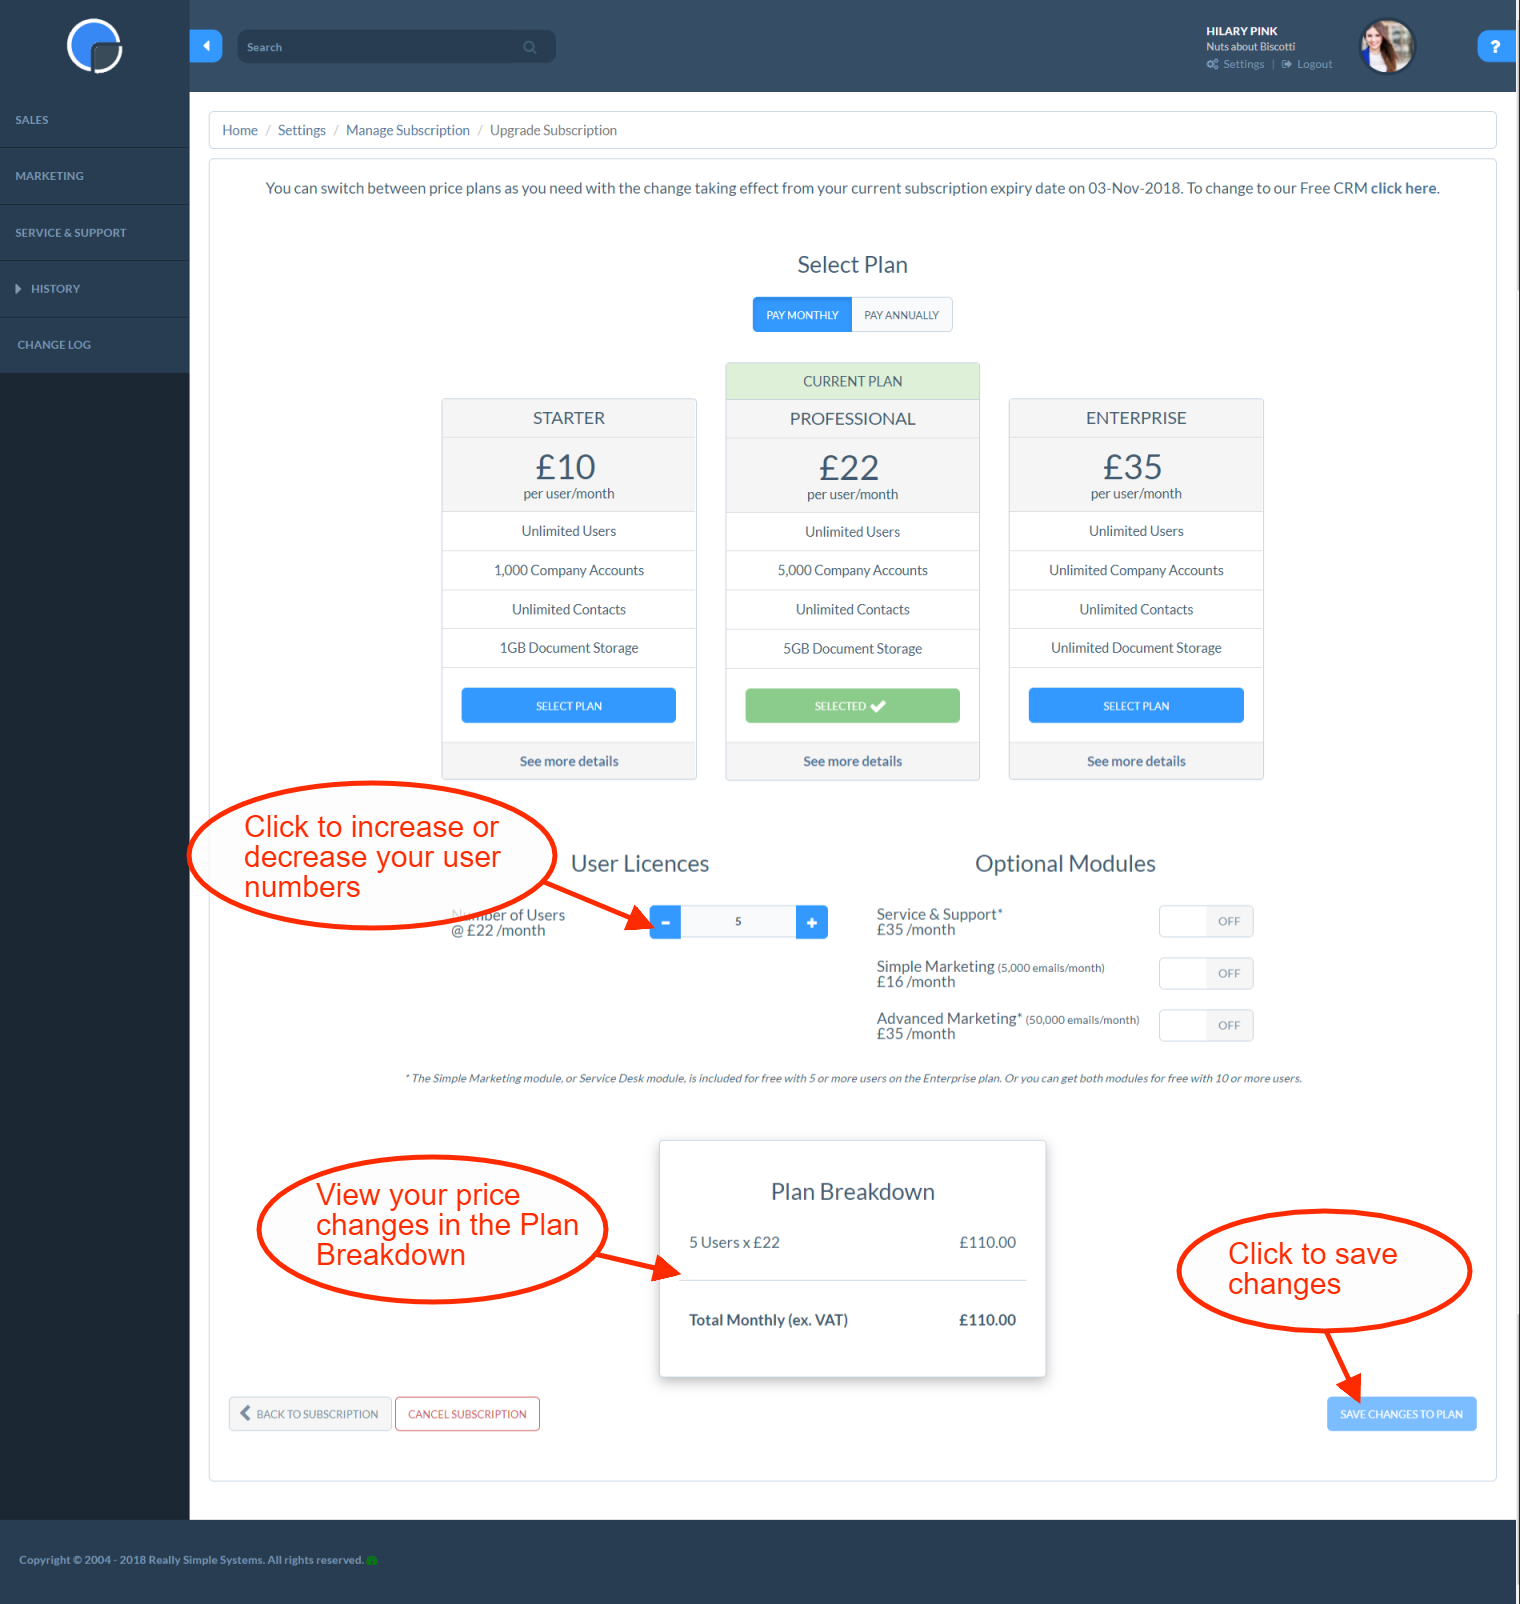
If you already have the maximum number of Live Users allowed by your subscription you will need to either “turn off” any old user or increase the User License in your subscription. To do this go to Settings then Manage Subscription and click on ‘Change Plan & Options’ at the bottom of the page. On the next page scroll down to ‘User Licences’ and use the + and – buttons to increase/decrease the number of users you need, then click Save Changes to Plan. The increase in cost will be shown in the Plan Breakdown.
System Administrator
If you want the new user to be a system administrator, set the Administrator checkbox to “Yes”.
Field Level Help
Activating the Field Level Help option will enable prompts in the CRM form fields, assisting the user with the data entry.
Reporting
You can restrict reporting access on the User record, to disallow a User from reporting their own, their User Group or global data, even if their User Profile has granted “Read” access. This would mean they would be unable to export any data. This feature is available in all price plans, including the Free CRM.
User Permission Levels
With the Really Simple Systems CRM you have the added advantage of controlling your user security with the User Permission Levels feature. In the Professional and Enterprise plans, you can increase security by limiting access for certain Users or User Groups. The User Permission Levels feature lets you set up User Groups, for example UK Sales and US Sales, and create User Profiles that can be allocated to individuals and to the User Groups.
Deleting a User
For audit purposes, it is not possible to completely delete a user but you can set the user record so they are no longer “Live”. To turn off the “Live” user status, in Settings, go to User Settings / User Management and open the user record you no longer need by clicking on the name. In the record, set the “Live” field to “No” using the toggle switch, and save.
Reduce User Licence
Having changed a user status to “non-Live”, you can then reduce your User Licence. In Settings / Manage Subscription, at the bottom of the page, click on ‘Change Plan & Options’. On the next page scroll down to ‘User Licences’ and use the + and – buttons to increase or decrease the number of users you need, then click Save Changes to Plan.
Changing a User’s Email Address
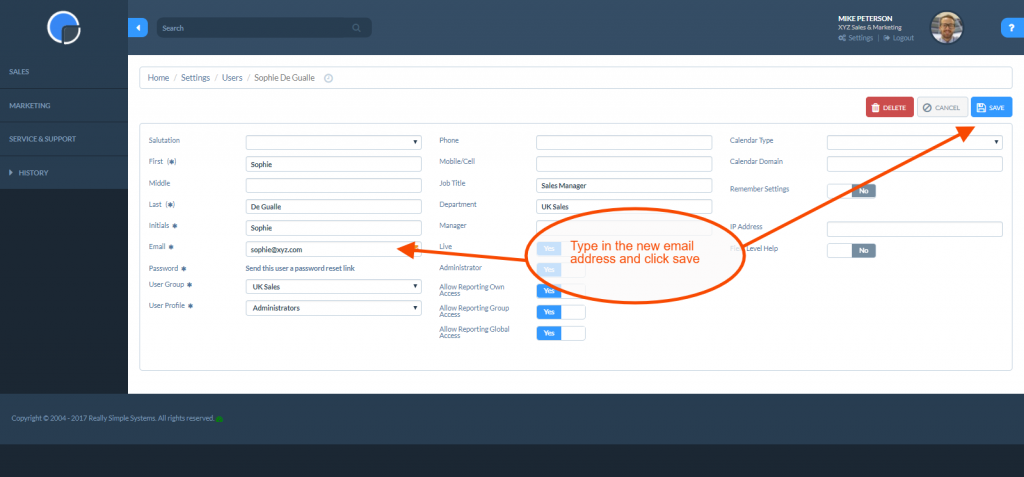
You can change a User’s email address by going to Settings / User Settings then User Management. Click on the User’s name and type in the new email address then click Save.
User Groups, Profiles and Permissions
In the Free and Starter all Users have “Read” and “Write” access to everything. This means they can view and edit all records.
In the Professional and Enterprise plans you can increase security by limiting access for certain Users or User Groups. The User Permission Levels feature lets you set up User Groups, for example, UK Sales and US Sales, and create User Profiles that can be allocated to individuals and to User Groups.
Go to User Permission Levels for full details.

